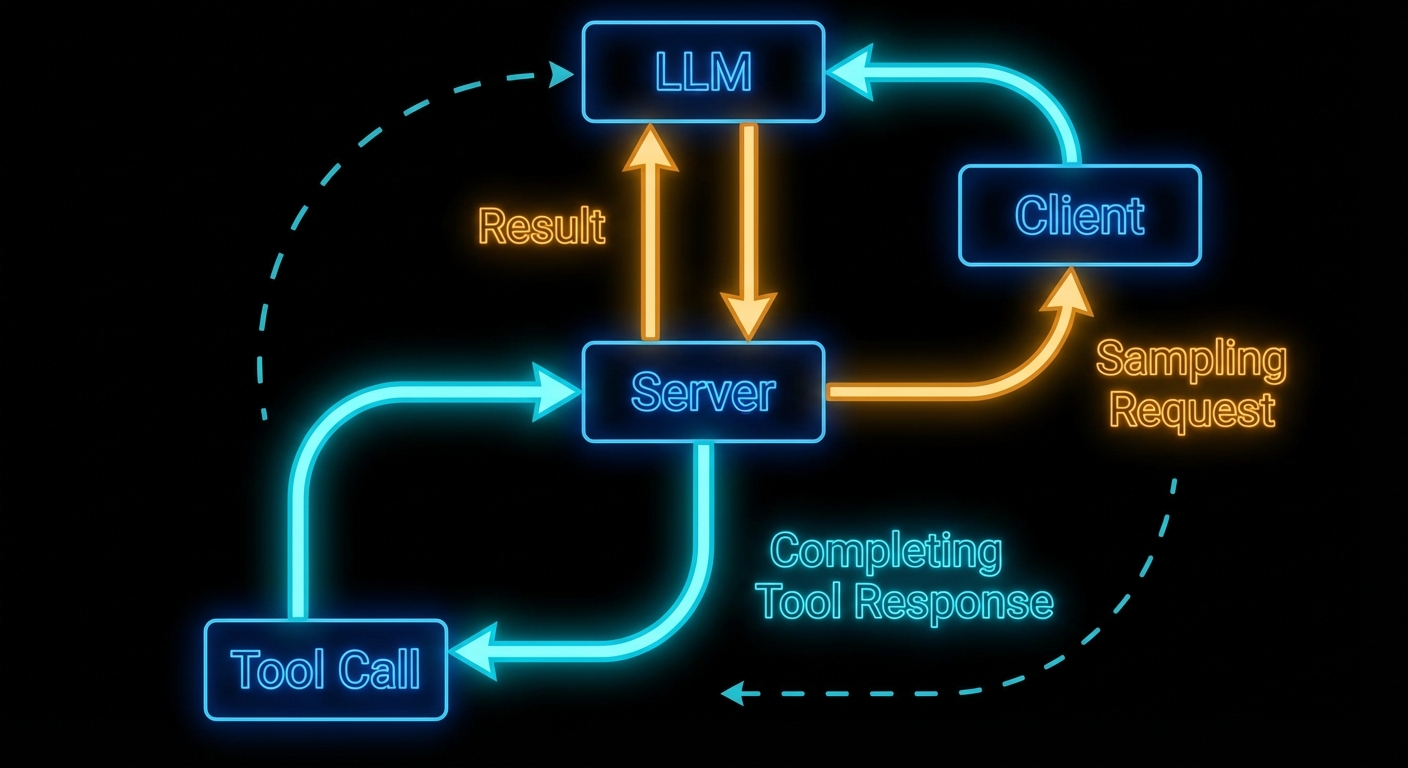
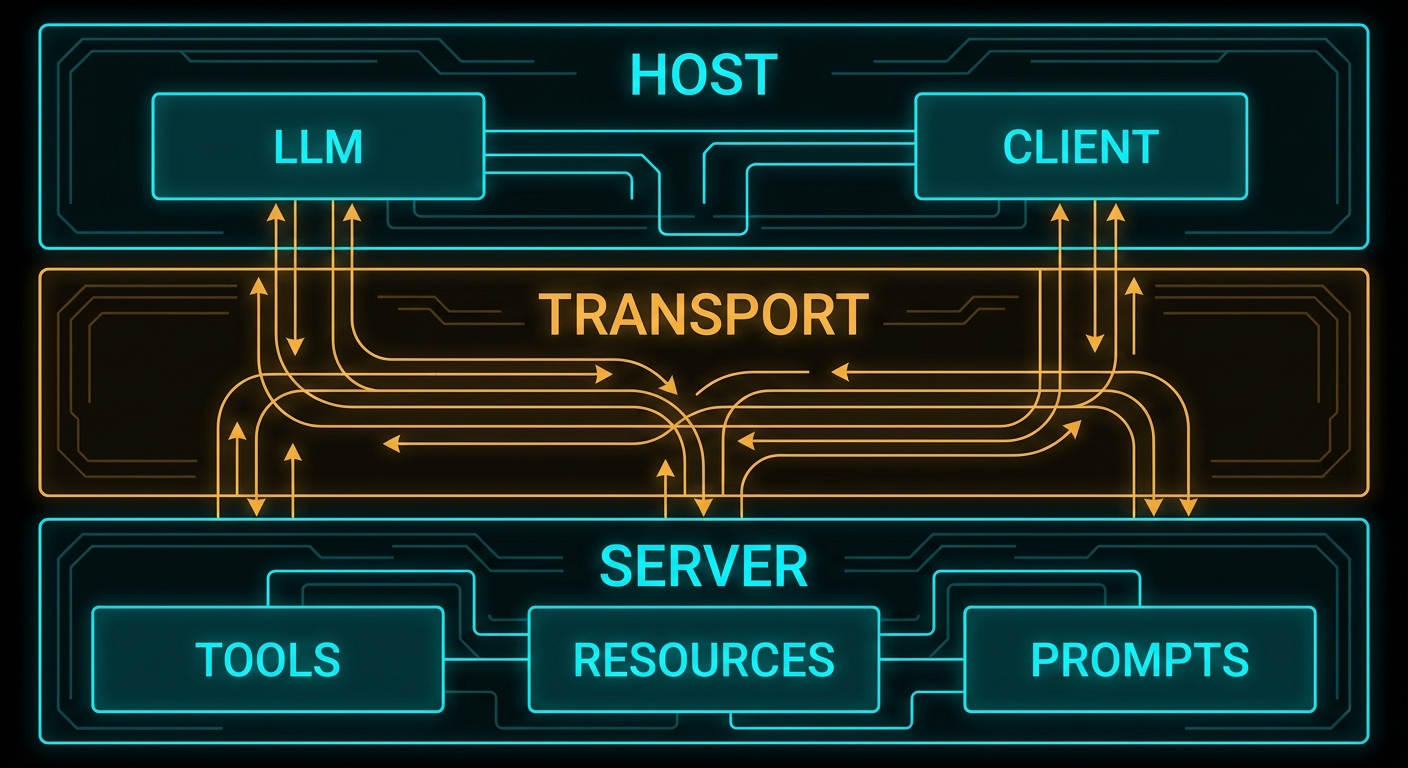
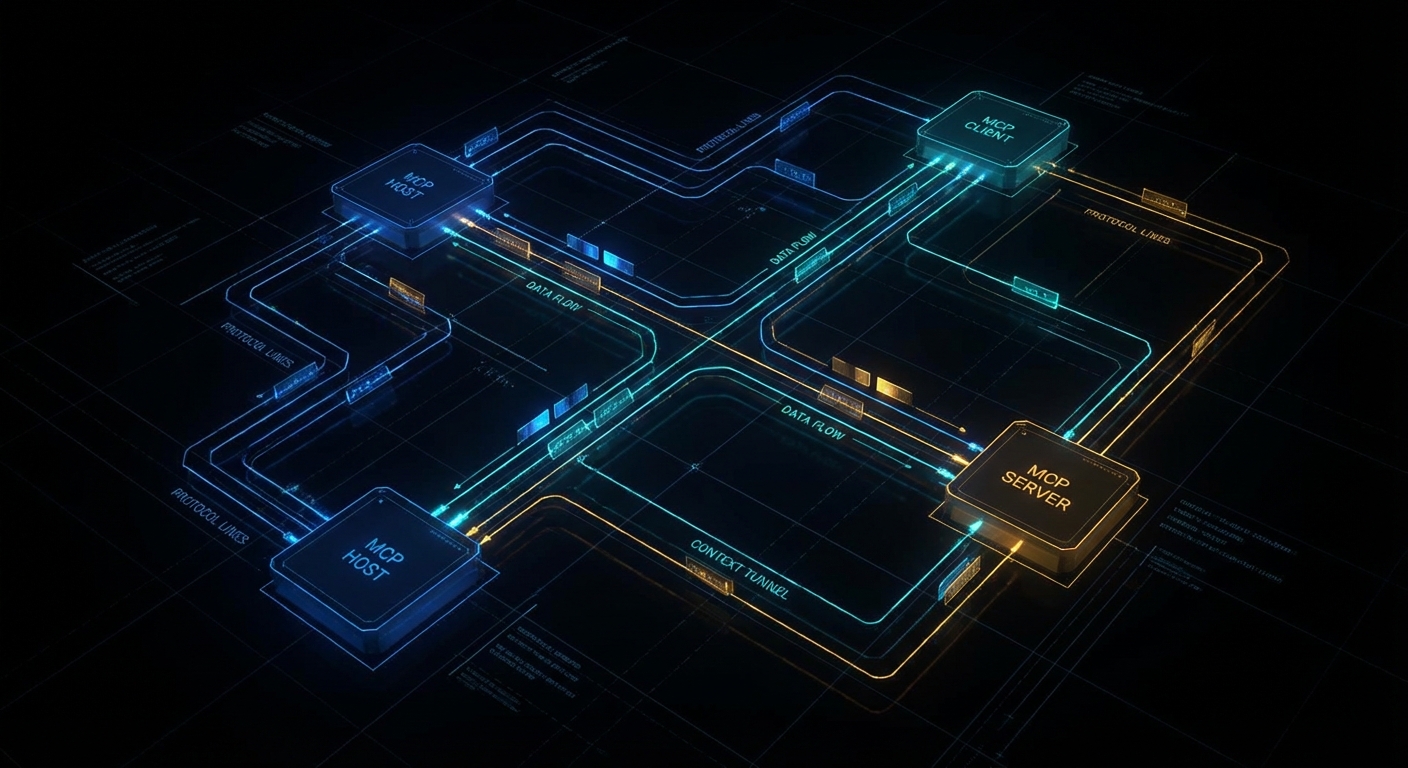
Here is the mind-bending part of MCP: servers can ask the LLM for help. In the standard model, the flow is one-way – host calls LLM, LLM calls tool, tool runs on server, result goes back. Sampling reverses one arrow. It lets a server, while handling a request, ask the host’s LLM to generate text – and then use that generated text in its response. This is recursive AI, and it is what enables genuinely intelligent MCP servers that reason about their own actions.
Sampling: the server requests an LLM inference from the client, enabling server-side reasoning loops.
The Sampling Flow
Sampling works as follows: a server handling a tool call decides it needs to “think” before it can respond. It sends a sampling/createMessage request to the client. The client receives this, shows the pending sampling request to the user (or approves it automatically based on policy), then calls the actual LLM API, and returns the result to the server. The server uses the result to complete its work and returns the final tool response to the original caller.
The critical point: the server does not know which LLM the client is using. It just asks for “a language model response” and gets back generated text. This maintains provider-agnosticism even for server-side reasoning.
// Client configuration to enable sampling
const client = new Client(
  { name: 'my-host', version: '1.0.0' },
  {
    capabilities: {
      sampling: {},  // Must declare this to receive sampling requests from servers
    },
  }
);

// Client must handle incoming sampling requests
client.setRequestHandler(CreateMessageRequestSchema, async (request) => {
  const { messages, maxTokens, temperature } = request.params;

  // Here the host calls its actual LLM
  const openai = new OpenAI();
  const response = await openai.chat.completions.create({
    model: 'gpt-4o',
    messages: messages.map(m => ({
      role: m.role,
      content: typeof m.content === 'string' ? m.content : m.content.text,
    })),
    max_tokens: maxTokens || 1000,
    temperature: temperature || 0.7,
  });

  return {
    role: 'assistant',
    content: { type: 'text', text: response.choices[0].message.content },
    model: 'gpt-4o',
    stopReason: 'endTurn',
  };
});
Why this matters: without capabilities.sampling the server cannot request completions at all, and without a handler every sampling call fails the tool mid-flight. In a real project you would centralise LLM calls here so quotas, logging, and redaction policies stay in one place on the host.
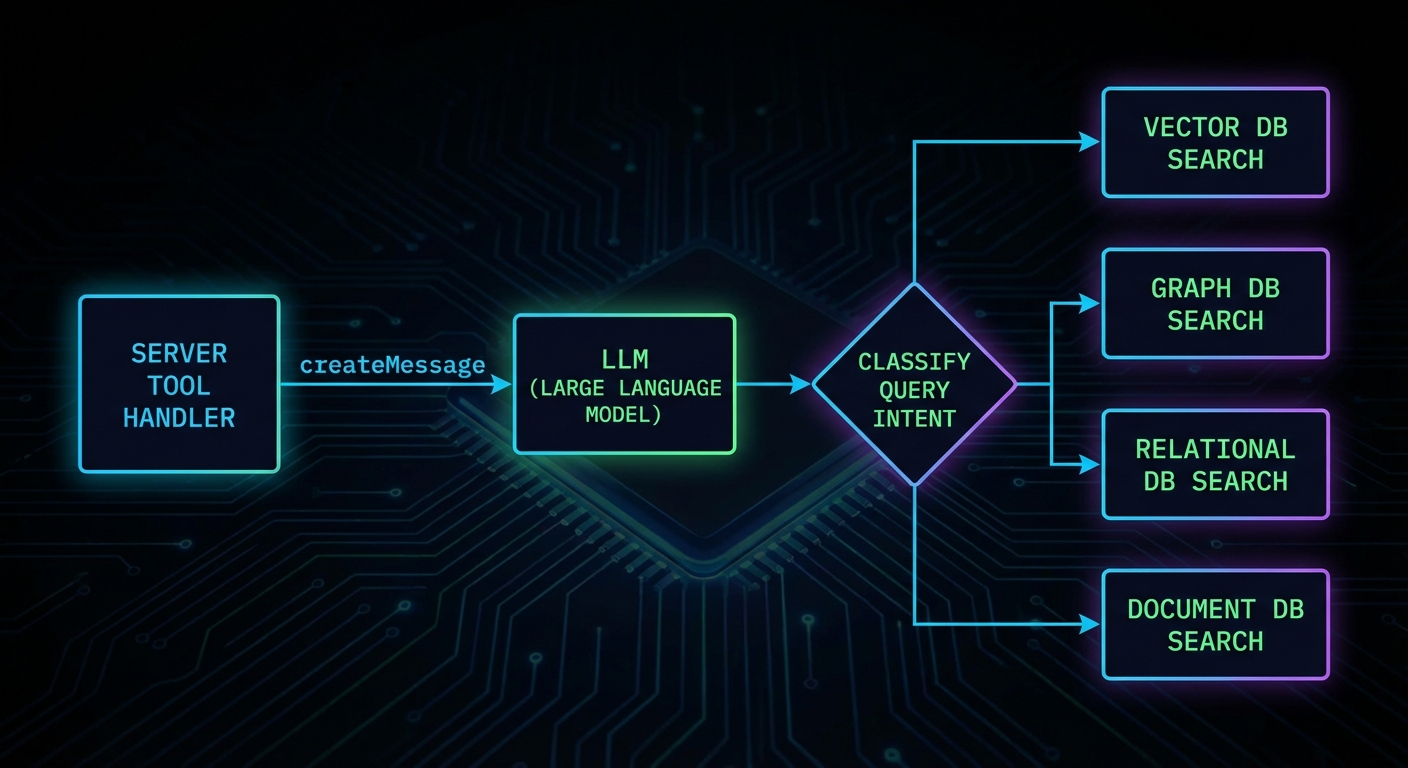
A server using sampling to analyse data before returning a structured response.
Server-Side Sampling Usage
On the server side, you request sampling through the server’s sampling capability. Here is a server that uses sampling to classify user intent before deciding which database to query:
import { McpServer } from '@modelcontextprotocol/sdk/server/mcp.js';
import { z } from 'zod';

const server = new McpServer({ name: 'smart-search', version: '1.0.0' });

server.tool(
  'intelligent_search',
  'Searches across databases, routing the query based on intent',
  { query: z.string().describe('The search query') },
  async ({ query }, { server: serverInstance }) => {
    // Use sampling to classify the query intent
    const classification = await serverInstance.createMessage({
      messages: [{
        role: 'user',
        content: {
          type: 'text',
          text: `Classify this search query into one of: products, users, orders, docs.\nQuery: "${query}"\nRespond with only the category name.`,
        },
      }],
      maxTokens: 10,
    });

    const category = classification.content.text.trim().toLowerCase();

    // Route to the appropriate search function
    let results;
    switch (category) {
      case 'products': results = await searchProducts(query); break;
      case 'users': results = await searchUsers(query); break;
      case 'orders': results = await searchOrders(query); break;
      default: results = await searchDocs(query);
    }

    return { content: [{ type: 'text', text: JSON.stringify(results) }] };
  }
);
In a real project you would treat the classification step as a bounded, cheap call (low maxTokens, strict prompt) and keep routing logic easy to unit test. If the model returns an unexpected label, fall back to a safe default path instead of failing the whole tool.
“Sampling allows servers to request LLM completions through the client, enabling sophisticated agentic behaviors while maintaining security through human oversight. The client retains control over which model is used and what requests are permitted.” – MCP Documentation, Sampling
Sampling Parameters
The sampling/createMessage request supports model preferences and sampling parameters. These are preferences, not requirements – the client may choose to ignore them if they conflict with its policy or available models.
Those preferences are negotiation, not a guarantee: the host may pin a single approved model or ignore cost and speed hints for compliance. Use them to express intent, then document what your client actually honours so server authors know what to expect.
Failure Modes with Sampling
Case 1: Using Sampling for Every Decision
Sampling adds latency and cost. Using it for decisions that can be made with deterministic code (string matching, regex, a simple lookup) is waste. Reserve sampling for genuinely ambiguous situations where LLM understanding adds real value.
// WASTEFUL: Sampling for something a regex handles
const isEmail = await serverInstance.createMessage({
  messages: [{ role: 'user', content: { type: 'text', text: `Is "${input}" an email address? Yes or No.` } }],
  maxTokens: 5,
});

// BETTER: Just use a regex
const isEmail = /^[^@]+@[^@]+\.[^@]+$/.test(input);
Why this matters: every sampling round trip adds latency and billed tokens. In a real project you would profile hot tools and replace LLM branches with deterministic code wherever the spec is stable.
Case 2: Infinite Sampling Loops
If a server uses sampling and the LLM response triggers another tool call that uses sampling again, you can create infinite loops. Always set a maximum recursion depth and terminate if exceeded.
Starting with spec version 2025-11-25, servers can include tools and toolChoice parameters in a sampling/createMessage request. This lets the server constrain which tools the LLM may call during the sampling turn. Without this, the LLM during sampling would either have no tools at all or the full tool set – there was no way for the server to scope the tools available during a recursive inference.
// Server: sampling request with constrained tool set
const response = await serverInstance.createMessage({
  messages: [{
    role: 'user',
    content: {
      type: 'text',
      text: 'Look up the current status of order ORD-12345 and summarise it.',
    },
  }],
  maxTokens: 500,
  tools: [
    {
      name: 'get_order_status',
      description: 'Look up the current status of an order by ID',
      inputSchema: {
        type: 'object',
        properties: {
          orderId: { type: 'string', description: 'The order ID' },
        },
        required: ['orderId'],
      },
    },
  ],
  toolChoice: { type: 'auto' },  // 'auto' | 'none' | { type: 'tool', name: '...' }
});
The tools array defines the tool definitions available during this specific sampling turn. The toolChoice parameter controls how the LLM selects tools: "auto" lets the model decide, "none" disables tool use entirely, and { type: 'tool', name: 'get_order_status' } forces a specific tool. This is useful when a server needs the LLM to do a lookup-then-reason task: you provide only the lookup tool, the LLM calls it, gets the data, and writes a summary.
The client is responsible for actually executing the tool calls the LLM makes during sampling. The client returns the final assistant message to the server, including any tool results in the conversation. This keeps the server out of the tool execution loop during its own sampling request – the client manages the entire multi-turn tool-use conversation internally.
What to Check Right Now
Declare sampling on your client – if you want servers to be able to use sampling, your client must declare capabilities: { sampling: {} }. Without this, sampling requests from servers will be rejected.
Implement a sampling handler – if you build a host application, implement the CreateMessageRequestSchema handler. An unimplemented handler will cause all sampling requests to fail silently.
Show sampling requests to users – the spec emphasises human oversight. Production hosts should surface pending sampling requests to users and allow approval/rejection.
Cap sampling depth – any server that uses sampling recursively must have a maximum depth limit. Without it, one malformed query can run up unbounded costs.
Most MCP developers learn about tools and resources and stop there, treating prompts as a nice-to-have. This is a mistake. Prompts are the mechanism that turns a raw capability server into a polished, user-facing product. They let you bake your best workflows into the server itself, expose them through any MCP-compatible host, and guarantee that users get the same high-quality prompt structure regardless of which host they use. Think of prompts as the “saved queries” of the AI world.
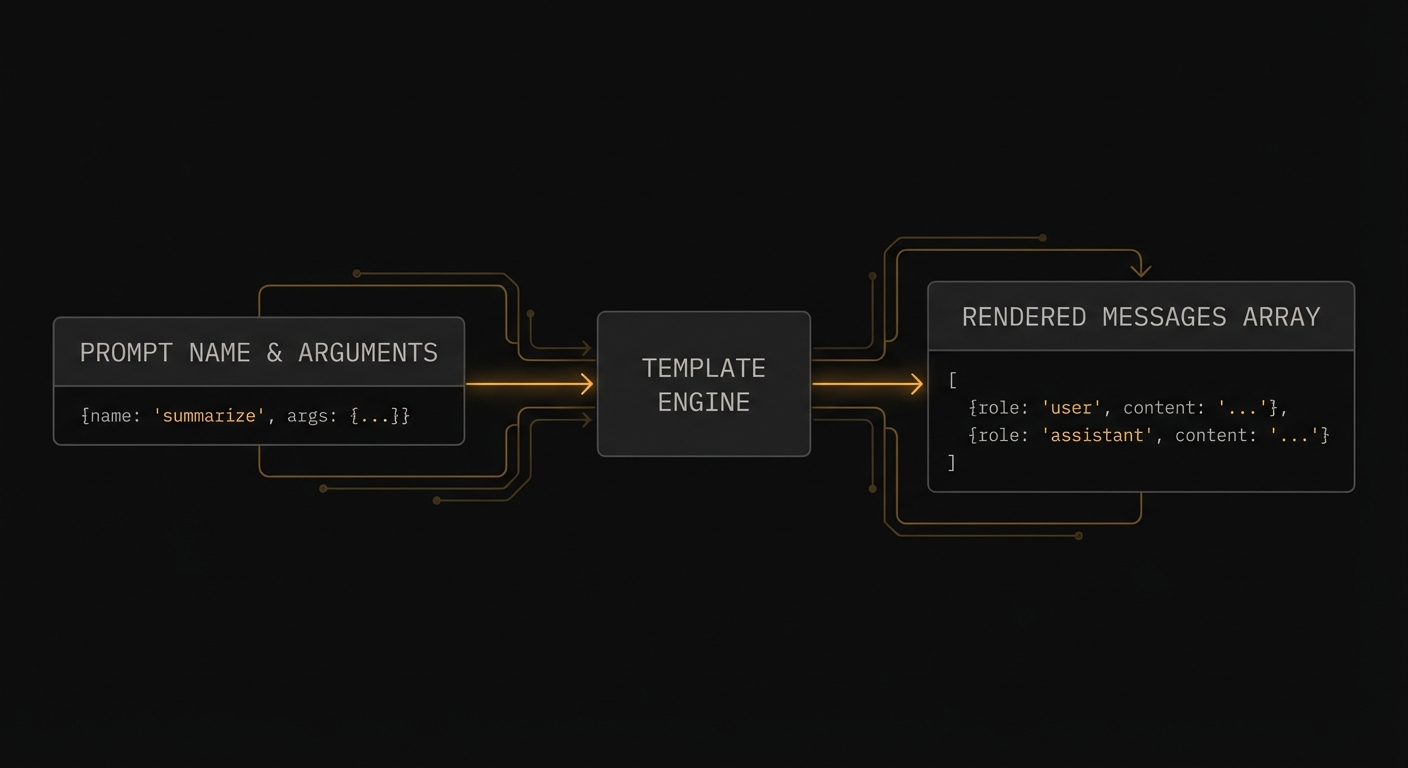
Prompts: named, parameterised message templates that clients surface to users.
What Prompts Are and Why They Matter
An MCP prompt is a named, reusable prompt template that the server exposes for clients to use. When a client calls prompts/get with a prompt name and arguments, the server returns a list of messages ready to be sent to an LLM. The messages can reference resources (to inject dynamic content), contain multi-turn conversation history, and include both user and assistant roles.
The key difference from tools: prompts are human-initiated workflows. A user explicitly selects a prompt from the host UI (“Code Review”, “Summarise Document”, “Translate to French”). Tools are model-initiated – the LLM decides to call them based on context. Prompts are the programmatic equivalent of slash commands.
import { McpServer } from '@modelcontextprotocol/sdk/server/mcp.js';
import { z } from 'zod';

const server = new McpServer({ name: 'dev-assistant', version: '1.0.0' });

// Simple prompt with arguments
server.prompt(
  'code_review',
  'Review code for quality, security, and best practices',
  {
    code: z.string().describe('The code to review'),
    language: z.string().describe('Programming language (e.g. javascript, python, rust)'),
    focus: z.enum(['security', 'performance', 'style', 'all']).default('all')
      .describe('What aspect to focus the review on'),
  },
  async ({ code, language, focus }) => ({
    messages: [
      {
        role: 'user',
        content: {
          type: 'text',
          text: `Please review the following ${language} code with a focus on ${focus}:\n\n\`\`\`${language}\n${code}\n\`\`\`\n\nProvide specific, actionable feedback with examples.`,
        },
      },
    ],
  })
);
This matters because without prompts, every user has to manually craft the same instructions over and over. A well-designed prompt bakes in your team’s best practices – the right system instructions, the correct output format, the domain-specific framing – so that every user gets consistent, high-quality results regardless of how they phrase their request.
“Prompts enable servers to define reusable prompt templates and workflows that clients can easily surface to users and LLMs. They provide a way to standardize and share common LLM interactions.” – MCP Documentation, Prompts
Prompts with Resource Embedding
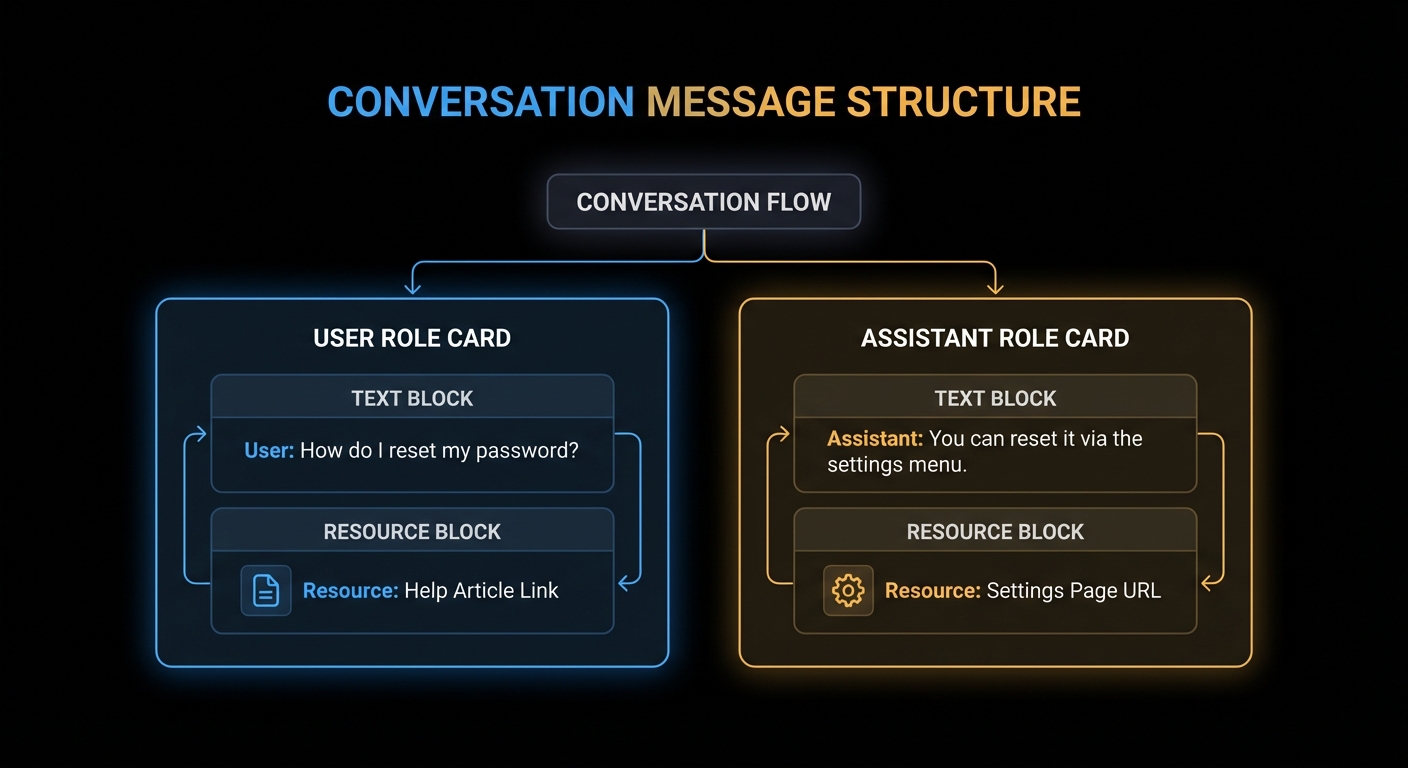
Prompts can embed resources directly into messages. When the server returns a message with a resource content block, the client reads the resource and injects its content into the conversation context before sending it to the LLM.
server.prompt(
  'analyse_file',
  'Analyse the contents of a file',
  { file_uri: z.string().describe('The URI of the file to analyse') },
  async ({ file_uri }) => ({
    messages: [
      {
        role: 'user',
        content: [
          {
            type: 'text',
            text: 'Please analyse the following file and provide a summary of its contents, structure, and any notable patterns:',
          },
          {
            type: 'resource',
            resource: { uri: file_uri }, // Client resolves this URI and injects content
          },
        ],
      },
    ],
  })
);

// Multi-turn prompt with context
server.prompt(
  'debug_error',
  'Debug an error with context',
  {
    error_message: z.string(),
    stack_trace: z.string().optional(),
    context: z.string().optional().describe('Additional context about what you were doing'),
  },
  async ({ error_message, stack_trace, context }) => ({
    messages: [
      {
        role: 'user',
        content: { type: 'text', text: 'I am getting the following error:' },
      },
      {
        role: 'user',
        content: {
          type: 'text',
          text: `Error: ${error_message}${stack_trace ? `\n\nStack trace:\n${stack_trace}` : ''}${context ? `\n\nContext: ${context}` : ''}`,
        },
      },
      {
        role: 'assistant',
        content: { type: 'text', text: 'I can help debug this. Let me analyse the error...' },
      },
      {
        role: 'user',
        content: { type: 'text', text: 'What is causing this error and how do I fix it?' },
      },
    ],
  })
);
In a production deployment, the multi-turn pattern shown above is especially useful for support workflows. Pre-filling an assistant message like “I can help debug this” primes the model’s tone and focus, reducing the chance of generic or off-topic responses. Think of it as setting the stage for the conversation, not just the first question.
Prompt messages: multi-turn conversations with user/assistant roles and embedded resource content.
Resource embedding and multi-turn prompts give you a powerful composition model. But with that power comes a few common traps that are easy to fall into, especially when coming from a background of building direct LLM integrations. The failure modes below cover the most frequent mistakes.
Failure Modes with Prompts
Case 1: Putting LLM Logic Inside the Prompt Handler
A prompt handler should assemble and return messages. It should not call an LLM. Calling an LLM inside a prompt handler breaks the separation between prompt construction (server’s job) and prompt execution (host’s job). It also makes your server non-deterministic and slow.
// WRONG: Calling an LLM inside the prompt handler
server.prompt('summarise', '...', { text: z.string() }, async ({ text }) => {
  const openai = new OpenAI();
  const summary = await openai.chat.completions.create({ ... }); // WRONG
  return { messages: [{ role: 'user', content: { type: 'text', text: summary } }] };
});

// CORRECT: Return the prompt; let the host's LLM execute it
server.prompt('summarise', '...', { text: z.string() }, async ({ text }) => ({
  messages: [{
    role: 'user',
    content: { type: 'text', text: `Please summarise the following text in 3 bullet points:\n\n${text}` },
  }],
}));
The first case is about respecting the boundary between prompt assembly and prompt execution. The next case deals with a subtler problem: data freshness. If you inline content directly into a prompt, it becomes a frozen snapshot that will silently go stale.
Case 2: Hardcoding Content That Should Be a Resource Reference
If your prompt inlines large amounts of data (a whole document, a database dump), the data will not be updated when the underlying source changes and the prompt will grow stale. Reference a resource URI instead, letting the client fetch fresh content at prompt execution time.
title: New in 2025-06-18 | icons: New in 2025-11-25
Like tools and resources, prompts now support a title field for human-readable display names and an icons array for visual identification in host UIs. The title is what users see in a prompt picker or slash-command menu. The name remains the stable programmatic identifier.
// In the prompts/list response
{
  name: 'code_review',
  title: 'Code Review',                  // User-facing label
  description: 'Review code for quality, security, and best practices',
  icons: [
    { src: 'https://cdn.example.com/icons/review.svg', mimeType: 'image/svg+xml' },
  ],
  arguments: [
    { name: 'code', description: 'The code to review', required: true },
    { name: 'language', description: 'Programming language', required: true },
  ],
}
Icons help users quickly scan a list of available prompts in a host that renders a visual picker. Multiple sizes are supported via the sizes property. SVG icons are a good default since they scale to any resolution.
What to Check Right Now
Identify your power workflows – what are the 3-5 most common things your users ask the AI to do? Each one is a prompt candidate.
Test prompts in the Inspector – the Inspector shows prompts in a dedicated tab. Fill in arguments and render the messages to verify the output before integrating with an LLM.
Use resource references for dynamic content – never inline large or frequently-changing data in prompt text. Reference it by URI.
Notify on changes – if your prompts change (updated templates, new prompts added), send notifications/prompts/list_changed so clients can refresh their prompt catalogues.
Tools do things. Resources provide things. This distinction matters more than it sounds. A tool executes code with side effects – it searches, writes, sends, deletes. A resource is a read-only window into data – it gives the model (or the user) access to content without triggering any action. The resources primitive is MCP’s answer to the question: “how do I give the AI access to my data without writing a bespoke data-access tool every time?”
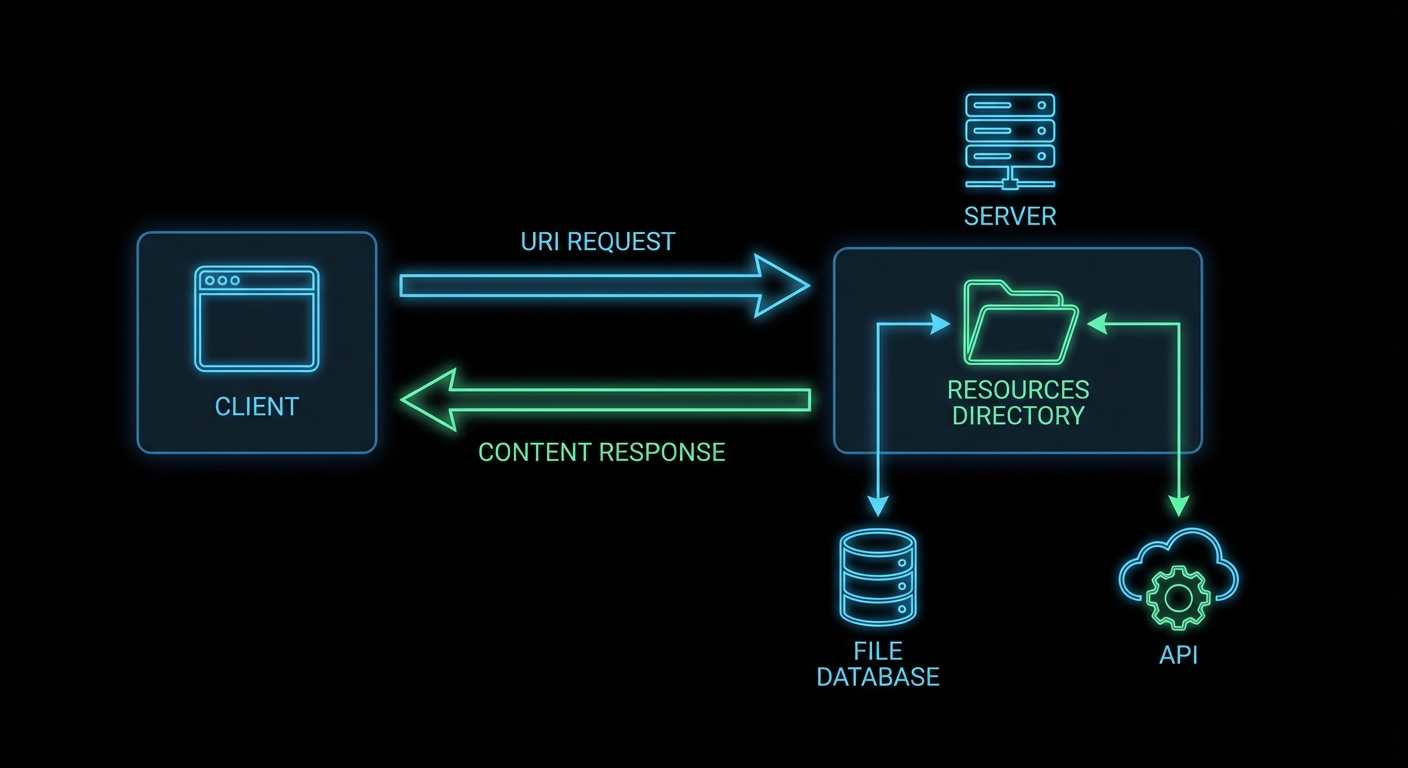
Resources: URI-addressed content that servers expose for reading by clients and AI models.
What Resources Are and How They Work
Every MCP resource has a URI – a unique identifier that the client uses to request it. The URI can follow any scheme: file://, db://, https://, custom-scheme://. The server defines what URIs exist and what they return. The client requests a URI and gets back content blocks (text or binary).
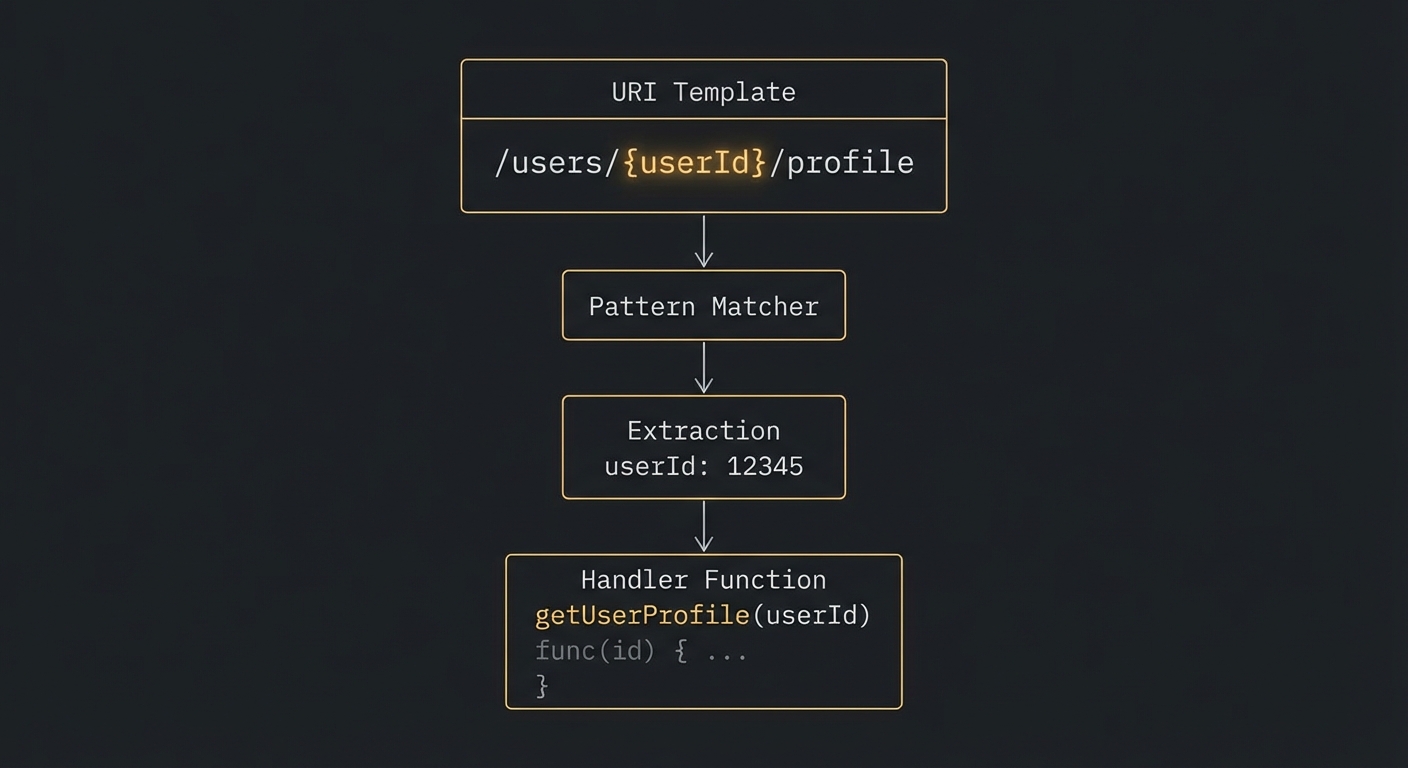
Resources come in two forms: direct resources (static items with known URIs that the server lists upfront) and resource templates (URI patterns with parameters, for dynamic resources where the set of possible URIs is not fixed).
import { McpServer } from '@modelcontextprotocol/sdk/server/mcp.js';
import { ResourceTemplate } from '@modelcontextprotocol/sdk/server/mcp.js';
import { z } from 'zod';
import fs from 'node:fs/promises';

const server = new McpServer({ name: 'file-server', version: '1.0.0' });

// Direct resource - static, known URI
// title and icons are optional metadata (title: New in 2025-06-18, icons: New in 2025-11-25)
server.resource(
  'config',
  'config://app/settings',
  {
    description: 'The application configuration',
    mimeType: 'application/json',
    title: 'App Settings',
    icons: [{ src: 'https://cdn.example.com/icons/settings.svg', mimeType: 'image/svg+xml' }],
  },
  async (uri) => {
    const config = await fs.readFile('./config.json', 'utf8');
    return { contents: [{ uri: uri.href, mimeType: 'application/json', text: config }] };
  }
);

// Resource template - dynamic, parameterised URI
server.resource(
  'user-profile',
  new ResourceTemplate('users://{userId}/profile', { list: undefined }),
  { description: 'User profile by ID' },
  async (uri, { userId }) => {
    const user = await db.getUser(userId);
    if (!user) throw new Error(`User ${userId} not found`);
    return {
      contents: [{
        uri: uri.href,
        mimeType: 'application/json',
        text: JSON.stringify(user, null, 2),
      }],
    };
  }
);
This pattern matters because it eliminates the need to write a separate tool for every piece of data your AI needs to read. Instead of creating get_config, get_user, and get_product tools, you expose each as a resource with a clean URI. The client can then browse and select what it needs without the model having to decide which tool to call.
“Resources represent any kind of data that an MCP server wants to make available to clients. This can include file contents, database records, API responses, live system data, screenshots, images, log files, and more.” – MCP Documentation, Resources
Resource Content Types
Resources return content blocks with either text or blob (binary) content. Text resources are the most common – JSON, Markdown, plain text, CSV, code. Binary resources use base64-encoded data.
Resource templates: URI patterns like users://{userId}/profile resolve to dynamic content.
So far, resources are fetched on demand – the client requests a URI and gets a snapshot. But what about data that changes continuously? The next section covers subscriptions, which let clients receive push notifications when a resource’s content updates.
Resource Subscriptions
If a resource changes over time, the server can support subscriptions. Clients subscribe to a URI and receive notifications when its content changes. This is useful for live data: a log file that grows, a database record that updates, a sensor reading that changes.
// Server with subscription support
const server = new McpServer({
  name: 'live-data-server',
  version: '1.0.0',
  capabilities: { resources: { subscribe: true } },
});

server.resource(
  'live-metrics',
  'metrics://system/cpu',
  { description: 'Live CPU usage percentage' },
  async (uri) => {
    const usage = await getCpuUsage();
    return {
      contents: [{ uri: uri.href, mimeType: 'text/plain', text: `${usage}%` }],
    };
  }
);

// When the data changes, notify subscribers:
setInterval(async () => {
  server.server.notification({
    method: 'notifications/resources/updated',
    params: { uri: 'metrics://system/cpu' },
  });
}, 5000); // every 5 seconds
In a production system, you would gate the notification interval based on actual data changes rather than a fixed timer. Broadcasting updates every 5 seconds when nothing has changed wastes bandwidth and triggers unnecessary re-fetches on the client side. Use event-driven notifications – emit only when the underlying data actually changes.
Now that we have covered how resources work when everything goes right, let’s look at what happens when they are misused. The following failure modes are the most common mistakes developers make when first implementing resources.
Failure Modes with Resources
Case 1: Returning Mutable Data from Resources
Resources are semantically read-only. If your resource handler has side effects (incrementing a counter, logging access, triggering a build), you are violating the contract. Clients may cache resource responses and re-use them without re-fetching. Side effects in resource handlers lead to missed triggers and hard-to-reproduce bugs.
// BAD: Side effect in a resource handler
server.resource('report', 'reports://quarterly', {}, async (uri) => {
  await markReportAsViewed(userId); // Side effect - will not fire on cached reads
  return { contents: [{ uri: uri.href, text: reportContent }] };
});

// GOOD: Side effects belong in tools
server.tool('mark_report_viewed', '...', { report_id: z.string() }, async ({ report_id }) => {
  await markReportAsViewed(report_id);
  return { content: [{ type: 'text', text: 'Marked as viewed.' }] };
});
The distinction between resources and tools is one of the most important design decisions in MCP server architecture. The next case covers the opposite mistake: using a resource where a tool would be more appropriate.
Case 2: Using Resources When Tools Are the Right Primitive
Resources are for pre-existing data the AI reads passively. If the data requires parameters that affect what is returned, the access has query semantics, or you need to aggregate data from multiple sources on the fly – that is a tool, not a resource.
// Ambiguous: is this a resource or a tool?
// If it takes user query parameters and runs a search algorithm -> Tool
// If it returns a fixed, addressable document -> Resource

// RESOURCE: Fixed, URI-addressable content
server.resource('user-manual', 'docs://user-manual', {}, handler);

// TOOL: Dynamic query with parameters
server.tool('search_docs', '...', { query: z.string() }, handler);
Resource Metadata: title and icons
title: New in 2025-06-18 | icons: New in 2025-11-25
Resources (and resource templates) now support a title field for human-readable display names and an icons array for visual identification in host UIs. The title is distinct from the programmatic name – use name as a stable identifier and title for user-facing labels that can contain spaces and special characters.
// In the resources/list response, each resource can include title and icons
{
  uri: 'config://app/settings',
  name: 'config',
  title: 'Application Settings',        // Human-readable label
  description: 'The current application configuration',
  mimeType: 'application/json',
  icons: [
    { src: 'https://cdn.example.com/icons/config.svg', mimeType: 'image/svg+xml' },
  ],
}
Content Annotations
New in 2025-06-18
All content types (text, image, audio, embedded resources, resource links) now support optional annotations that provide metadata about the intended audience, priority, and modification time. Hosts use these annotations to route content to the right place – for example, showing high-priority user-facing content in the chat while keeping low-priority assistant-only content in the model context without displaying it.
return {
  contents: [{
    uri: uri.href,
    mimeType: 'application/json',
    text: JSON.stringify(data),
    annotations: {
      audience: ['user', 'assistant'],   // who should see this
      priority: 0.8,                     // 0 (low) to 1 (high)
      lastModified: '2025-12-01T14:30:00Z',
    },
  }],
};

// assistant-only content (debug info the user does not need to see)
return {
  contents: [{
    uri: uri.href,
    mimeType: 'text/plain',
    text: debugTrace,
    annotations: {
      audience: ['assistant'],
      priority: 0.1,
    },
  }],
};
The audience array can contain "user", "assistant", or both. priority is a float from 0 to 1. lastModified is an ISO 8601 timestamp. All three are optional. These annotations apply to resource content, tool result content, and prompt message content – any content block in MCP can carry them.
What to Check Right Now
Identify your read-only data sources – any data your AI needs to read but not modify is a resource candidate: config files, user profiles, product catalogues, documentation.
Use resource templates for parameterised access – if you have N users with profiles, use users://{userId}/profile rather than registering N individual resources.
Enable subscriptions for live data – if any of your resources update frequently, implement subscription support so clients can receive push notifications rather than polling.
Test resource listing – call resources/list from the Inspector and verify all your direct resources appear with correct URIs and descriptions.
Tools are the heart of MCP. When people say “the AI can use tools”, they mean it can call functions exposed through this primitive. Tools are what let an AI model search your database, send an email, read a file, call an API, or run a command. Everything else in MCP is scaffolding around this core capability. This lesson covers the full tool API: defining schemas, validation, error handling, streaming, annotations, and the failure modes that will destroy a production system if you do not anticipate them.
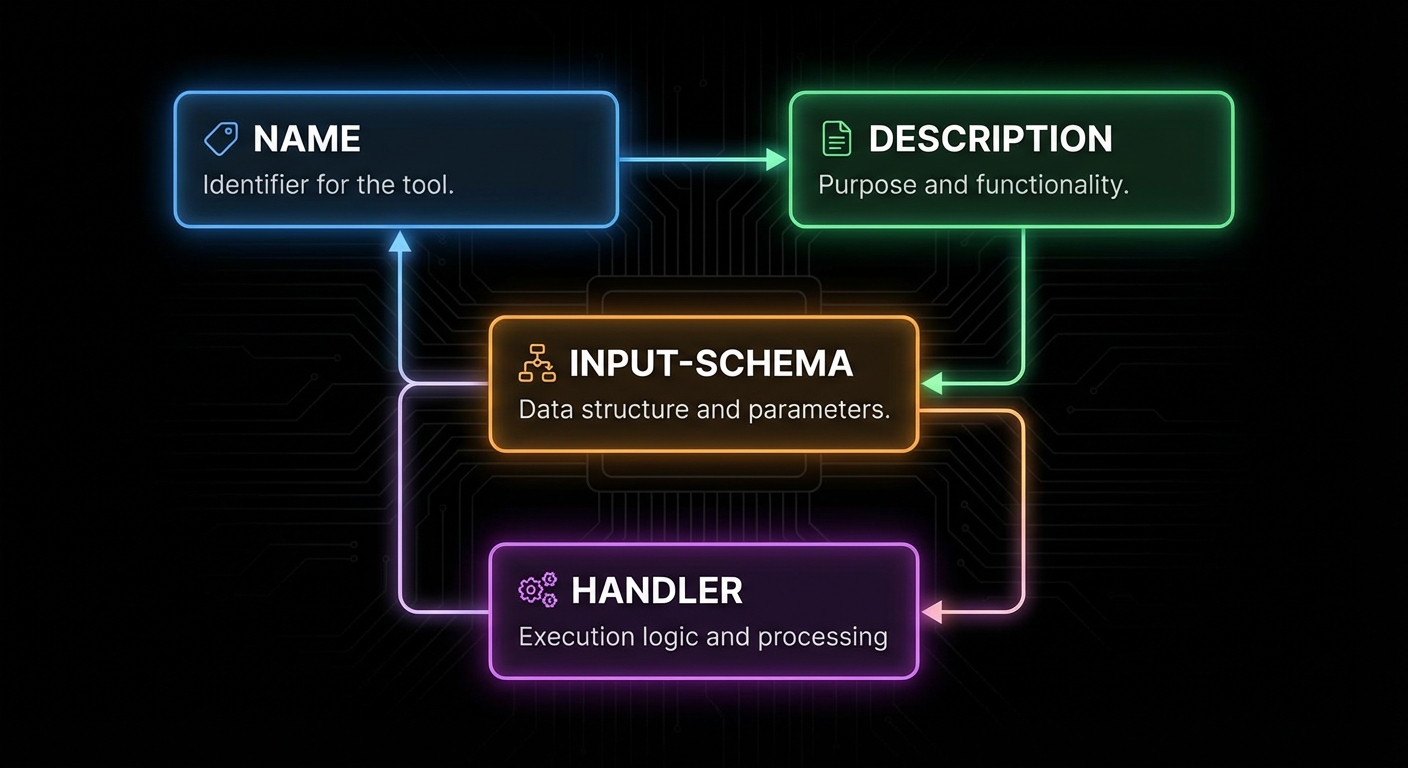
The anatomy of an MCP tool: name, description, input schema, and async handler returning content blocks.
The Tool Definition API
A tool in MCP has four required components: a name (unique identifier, snake_case by convention), a description (what the tool does – this is what the LLM reads to decide when to use it), an input schema (a Zod object shape describing what arguments the tool takes), and a handler (an async function that receives validated arguments and returns a result).
Why this surface matters: the host turns your Zod shape into JSON Schema the model sees at call time. When validation fails, the error is precise instead of your handler receiving garbage. In a real project you would treat name, description, schema, and handler as one versioned contract with integrators, the same way you would document a public REST endpoint.
The description is the most important field for LLM usability. It is what the model reads when deciding whether to use this tool. Write it as if explaining to a smart colleague what the function does, when to use it, and what it returns. Vague descriptions cause the model to either misuse the tool or avoid it entirely.
“Tools are exposed to the client with a JSON schema for their inputs. Clients SHOULD present tools to the LLM with appropriate context about what the tool does and when to use it.” – MCP Documentation, Tools
With the definition shape clear, the next question is what a handler is allowed to return. The protocol is not limited to a single string: you can combine blocks so the model and the user get summaries, images, and pointers to large artifacts in one response.
Content Types and Rich Responses
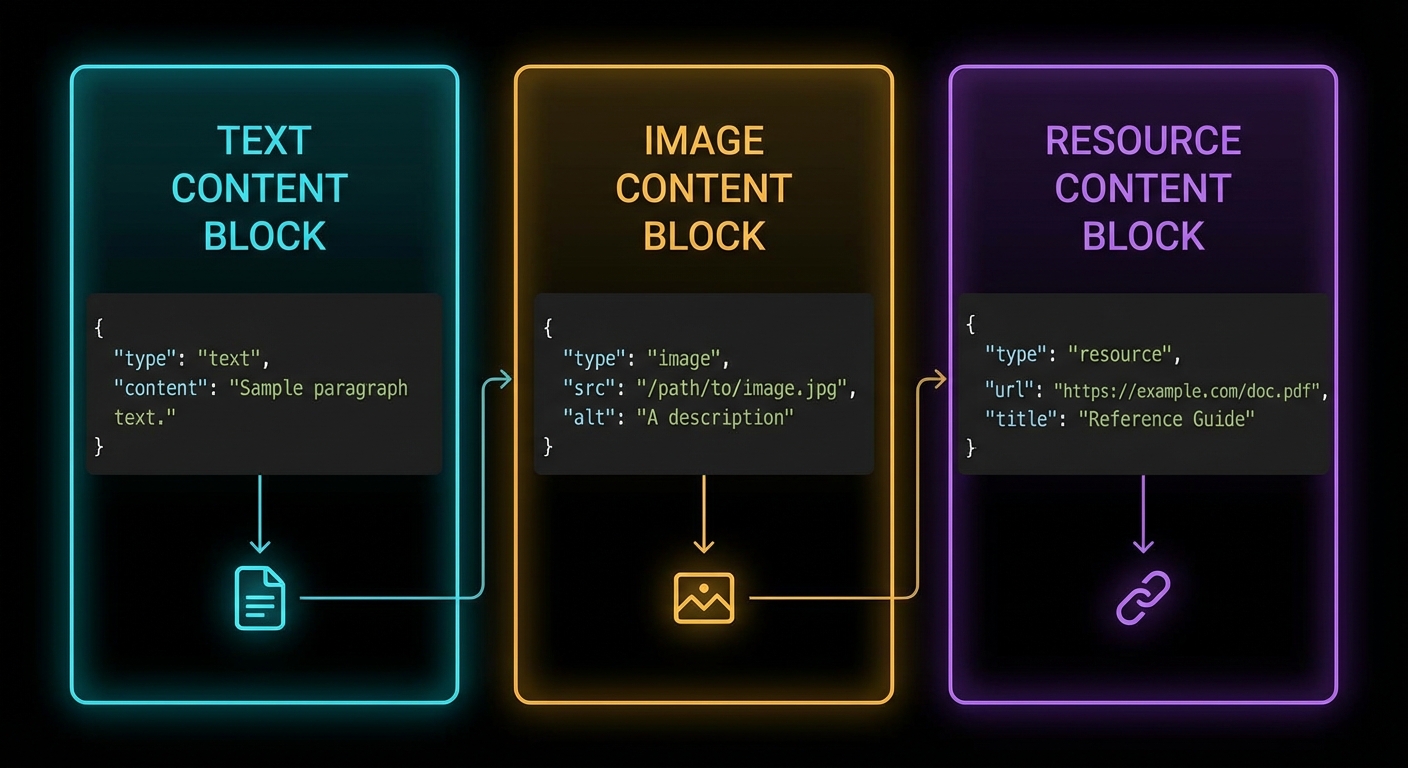
Tool handlers return an object with a content array. Each item in the array is a content block. MCP defines five content types: text, image, audio, resource (embedded), and resource_link.
// Text content (most common)
return {
  content: [{ type: 'text', text: 'The result as a string' }],
};

// Multiple text blocks (e.g. separate sections)
return {
  content: [
    { type: 'text', text: '## Summary\nHere is what I found...' },
    { type: 'text', text: '## Details\nFull results below...' },
  ],
};

// Image content (base64-encoded)
const imageData = fs.readFileSync('./chart.png').toString('base64');
return {
  content: [{
    type: 'image',
    data: imageData,
    mimeType: 'image/png',
  }],
};

// Audio content (base64-encoded)                  [New in 2025-03-26]
const audioData = fs.readFileSync('./recording.wav').toString('base64');
return {
  content: [{
    type: 'audio',
    data: audioData,
    mimeType: 'audio/wav',
  }],
};

// Resource link (pointer the client can fetch or subscribe to)  [New in 2025-06-18]
return {
  content: [{
    type: 'resource_link',
    uri: 'file:///project/src/main.js',
    name: 'main.js',
    description: 'Application entry point',
    mimeType: 'text/javascript',
  }],
};

// Embedded resource (inline content with URI)
return {
  content: [{
    type: 'resource',
    resource: { uri: 'file:///data/report.pdf', mimeType: 'application/pdf' },
  }],
};

// Content annotations on any block               [New in 2025-06-18]
return {
  content: [{
    type: 'text',
    text: 'Internal debug trace - not for the user',
    annotations: {
      audience: ['assistant'],       // only the model sees this
      priority: 0.2,                 // low importance
    },
  }, {
    type: 'text',
    text: 'Your export is ready at /downloads/report.csv',
    annotations: {
      audience: ['user'],            // shown directly to the user
      priority: 1.0,
    },
  }],
};

// Mixed content (text + image)
return {
  content: [
    { type: 'text', text: 'Here is the sales chart for Q1:' },
    { type: 'image', data: chartBase64, mimeType: 'image/png' },
  ],
};
In a real project you would return images for charts or screenshots, audio for voice recordings or transcriptions, resource links when the payload is huge or already lives in storage the client can fetch, and embedded resources when you want inline content with a URI. Text blocks stay ideal for short, model-friendly summaries; mixing types keeps token use down while still giving rich UI hooks on the host. The resource_link type is distinct from resource: a resource link is a pointer the client may fetch or subscribe to, while an embedded resource carries the actual content inline.
Content annotations (audience, priority, lastModified) let you control which blocks the user sees versus which blocks only the model receives. A low-priority assistant-only block is perfect for debug traces; a high-priority user-only block is for the final answer. The host uses these hints to route content to the right place in its UI.
Tool content types: text, image, audio, embedded resource, and resource_link.
Beyond what you return, hosts also need a coarse sense of risk and side effects before they invoke a tool. The next section covers optional annotations that carry that signal; they complement content blocks but do not replace real authorization on the server.
Tool Annotations
MCP supports optional annotations on tools that hint to clients about the tool’s behaviour. These help hosts make better security and UX decisions before invoking a tool. Annotations are hints, not enforceable constraints – a well-behaved host should respect them, but the protocol does not validate them at runtime. Clients should never make trust decisions based solely on annotations from untrusted servers.
The annotation properties use the *Hint suffix (not bare names) to reinforce that they are advisory. The MCP specification defines these properties:
destructiveHint (boolean) – the tool may perform irreversible changes (deletes, overwrites). When true, compliant hosts may prompt for confirmation.
readOnlyHint (boolean) – the tool does not modify its environment. Useful for hosts that want to auto-approve read operations.
idempotentHint (boolean) – calling the tool multiple times with the same arguments produces the same effect as calling it once. Relevant for retry logic.
openWorldHint (boolean) – the tool interacts with entities outside the local system (network calls, third-party APIs).
title (string) – a human-readable display name for the tool, distinct from the programmatic name.
server.tool(
  'delete_file',
  'Permanently deletes a file from the filesystem',
  { path: z.string().describe('Absolute path to the file') },
  {
    annotations: {
      destructiveHint: true,    // Irreversible action - host may ask for confirmation
      readOnlyHint: false,      // This tool modifies the filesystem
      idempotentHint: true,     // Deleting twice has the same effect as deleting once
      openWorldHint: false,     // Local filesystem only, no network
      title: 'Delete File',
    },
  },
  async ({ path }) => {
    await fs.promises.unlink(path);
    return { content: [{ type: 'text', text: `Deleted: ${path}` }] };
  }
);

// Read-only tool: the host can safely auto-approve this without user confirmation
server.tool(
  'read_file',
  'Reads a file from the filesystem and returns its contents',
  { path: z.string().describe('Absolute or relative path to the file') },
  {
    annotations: {
      readOnlyHint: true,       // No side effects - safe to call without confirmation
      destructiveHint: false,   // Does not modify anything
      openWorldHint: false,     // Local only
      title: 'Read File',
    },
  },
  async ({ path }) => {
    const content = await fs.promises.readFile(path, 'utf8');
    return { content: [{ type: 'text', text: content }] };
  }
);

// A tool that calls an external API - note the openWorldHint
server.tool(
  'fetch_weather',
  'Fetches current weather for a city from the OpenWeather API',
  { city: z.string().describe('City name, e.g. "London"') },
  {
    annotations: {
      readOnlyHint: true,       // Does not modify anything
      destructiveHint: false,
      openWorldHint: true,      // Makes a network call to a third-party API
      idempotentHint: true,     // Same city always returns the latest weather
      title: 'Fetch Weather',
    },
  },
  async ({ city }) => {
    const res = await fetch(
      `https://api.openweathermap.org/data/2.5/weather?q=${city}&appid=${process.env.OWM_KEY}`
    );
    const data = await res.json();
    return { content: [{ type: 'text', text: JSON.stringify(data) }] };
  }
);
Annotations do not replace auth or policy on the server, but they give honest hosts a standard vocabulary for confirmations, auto-approve reads, and retry-friendly tools. In a real project you would align these hints with your product rules so support and security teams can reason about tool risk without reading every handler.
Common mistake: using bare property names. Writing destructive: true or readOnly: true or requiresConfirmation: true will silently produce a tool with no recognised annotations – the SDK does not validate unknown keys. Always use the *Hint suffix: destructiveHint, readOnlyHint, idempotentHint, openWorldHint. There is no requiresConfirmation property in the specification – the decision to confirm is delegated to the host based on the hints.
The following cases are the ones that show up in logs after launch: vague copy, wrong error channel, weak schema guidance, and dynamic lists that never refresh on the client. Treat them as a checklist while you review a server before production.
Failure Modes in Tool Design
Case 1: Vague Tool Descriptions Causing Misuse
When the description is too vague, the LLM will either call the wrong tool, pass wrong arguments, or skip the tool when it should use it. This causes subtle, hard-to-debug failures in production.
// BAD: Vague description - what does "process" mean?
server.tool('process', 'Process some data', { data: z.string() }, handler);

// GOOD: Specific description with context and return value
server.tool(
  'summarise_text',
  'Summarises a long text to under 100 words. Use when the user asks for a summary or when text exceeds 2000 characters and needs to be condensed. Returns: a concise summary string.',
  { text: z.string().min(1).describe('The text to summarise') },
  handler
);
Why this matters: the model cannot repair a tool name it never understood. Telemetry often shows repeated failed calls with drifting arguments until you tighten the description and examples. In a real project you would A/B descriptions against real transcripts the same way you tune prompt copy.
Case 2: Throwing Errors Instead of Returning isError
Throwing an uncaught error from a tool handler causes the server to return a JSON-RPC error (protocol-level failure). The LLM sees this as a system failure, not a domain error. For domain errors – “user not found”, “quota exceeded”, “invalid file type” – return isError: true so the LLM can reason about the failure.
// BAD: Protocol error - LLM cannot reason about this
async ({ user_id }) => {
  const user = await db.findUser(user_id);
  if (!user) throw new Error('User not found'); // JSON-RPC error - not helpful to LLM
}

// GOOD: Domain error - LLM can adjust response
async ({ user_id }) => {
  const user = await db.findUser(user_id);
  if (!user) return {
    isError: true,
    content: [{ type: 'text', text: `No user found with ID ${user_id}. Check if the ID is correct.` }],
  };
  return { content: [{ type: 'text', text: JSON.stringify(user) }] };
}
Why this matters: isError keeps the turn inside the tool contract so the model can apologise, ask for a corrected ID, or try another path. A thrown error looks like infrastructure failure and often stops the whole chain. In a real project you would reserve throws for true bugs and programmer errors, not user or domain mistakes.
Case 3: Missing Zod .describe() on Input Fields
Every Zod field in a tool’s input schema should have a .describe() call. The description appears in the JSON Schema that gets sent to the LLM. Without it, the model has to guess what the field means from its name alone – which leads to wrong values being passed.
// BAD: No descriptions - LLM must guess what max_items means
{ query: z.string(), max_items: z.number(), include_archived: z.boolean() }

// GOOD: Descriptions guide the LLM to pass correct values
{
  query: z.string().describe('Search query - supports AND, OR, NOT operators'),
  max_items: z.number().int().min(1).max(100).describe('Maximum results to return (1-100)'),
  include_archived: z.boolean().default(false).describe('Set to true to include archived items in results'),
}
Why this matters: field names alone rarely encode units, formats, or business rules. Descriptions are cheap to add and expensive to omit once users rely on agents in the wild. In a real project you would lint for missing .describe() in CI for every tool schema you ship.
Dynamic Tool Registration
Tools do not have to be registered at server startup. You can register tools dynamically and notify connected clients:
That pattern matters when capabilities depend on tenancy, feature flags, or plugins loaded after connect. Without a list-changed notification, long-lived sessions keep a stale catalog and the model calls tools that no longer exist or misses new ones.
// Register a tool at startup
const toolRegistry = new Map();

function registerTool(name, description, schema, handler) {
  server.tool(name, description, schema, handler);
  toolRegistry.set(name, { name, description });
  // Notify connected clients that the tool list changed
  server.server.notification({ method: 'notifications/tools/list_changed' });
}

// Call this at any point after the server is connected
registerTool(
  'new_dynamic_tool',
  'A tool added at runtime',
  { input: z.string() },
  async ({ input }) => ({ content: [{ type: 'text', text: `Got: ${input}` }] })
);
In a real project you would debounce or coalesce notifications if many tools register at once, and you would log which clients refetched so you can debug desync issues. Pair dynamic registration with integration tests that connect, mutate the registry, and assert the host sees the updated list.
“Servers MAY notify clients when the list of available tools changes. Clients that support the tools.listChanged capability SHOULD re-fetch the tool list when they receive this notification.” – MCP Documentation, Tools
Structured Tool Output
New in 2025-06-18
By default, tools return unstructured content: an array of text, image, or resource blocks that the LLM interprets as it sees fit. Starting with spec version 2025-06-18, tools can also declare an outputSchema – a JSON Schema that defines the precise shape of a structured result. When a tool declares an output schema, its result includes a structuredContent object that clients and downstream code can parse, validate, and route without relying on text extraction or regex.
This matters for any tool whose callers are other programs, not just an LLM. A weather tool called by a dashboard widget needs { temperature: 22.5, humidity: 65 }, not a prose sentence the widget has to parse. Structured output also makes schema validation possible on the client side, so you catch malformed results before they reach the user.
// Tool with outputSchema - declares the shape of its structured result
server.tool(
  'get_weather_data',
  'Returns current weather for a location as structured data',
  {
    location: z.string().describe('City name or zip code'),
  },
  {
    outputSchema: {
      type: 'object',
      properties: {
        temperature: { type: 'number', description: 'Temperature in celsius' },
        conditions: { type: 'string', description: 'Weather description' },
        humidity: { type: 'number', description: 'Humidity percentage' },
      },
      required: ['temperature', 'conditions', 'humidity'],
    },
  },
  async ({ location }) => {
    const weather = await fetchWeather(location);

    return {
      // Structured result - must conform to outputSchema
      structuredContent: {
        temperature: weather.temp_c,
        conditions: weather.description,
        humidity: weather.humidity,
      },
      // Backwards-compat: also provide a text block for older clients
      content: [{
        type: 'text',
        text: JSON.stringify({
          temperature: weather.temp_c,
          conditions: weather.description,
          humidity: weather.humidity,
        }),
      }],
    };
  }
);
When an outputSchema is declared, the server MUST return a structuredContent object that validates against it. For backwards compatibility, the server SHOULD also return the serialised JSON in a text content block so older clients that do not understand structuredContent still receive the data. Clients SHOULD validate structuredContent against the declared schema before trusting it.
Tool Naming Rules
New in 2025-11-25
The specification now provides explicit guidance on tool names. Following these rules ensures your tools work consistently across all clients and avoids silent failures when a host rejects or truncates an invalid name.
Names are case-sensitive: getUser and GetUser are different tools.
No spaces, commas, or other special characters.
Names SHOULD be unique within a server.
// Valid tool names
'getUser'              // camelCase
'DATA_EXPORT_v2'       // UPPER_SNAKE with version
'admin.tools.list'     // dot-separated namespace

// Invalid names (will cause problems)
'get user'             // space not allowed
'delete,record'        // comma not allowed
'résumé_tool'          // non-ASCII characters
''                     // empty string
Dots are useful for namespacing tools by domain (billing.create_invoice, billing.get_status). This is especially important when a server exposes dozens of tools – clear namespacing helps both the LLM and human operators identify which subsystem a tool belongs to.
Tool Icons
New in 2025-11-25
Tools can now include an icons array for display in host UIs. Icons help users quickly identify tool categories in tool pickers or approval dialogs. Each icon specifies a src URL, a mimeType, and an optional sizes array.
server.tool(
  'send_email',
  'Sends an email through the company mail service',
  { to: z.string().email(), subject: z.string(), body: z.string() },
  {
    annotations: { destructiveHint: true, openWorldHint: true, title: 'Send Email' },
    icons: [
      { src: 'https://cdn.example.com/icons/email-48.png', mimeType: 'image/png', sizes: ['48x48'] },
      { src: 'https://cdn.example.com/icons/email.svg', mimeType: 'image/svg+xml' },
    ],
  },
  async ({ to, subject, body }) => {
    await mailer.send({ to, subject, body });
    return { content: [{ type: 'text', text: `Email sent to ${to}` }] };
  }
);
Icons are optional metadata – they do not affect tool execution. Include multiple sizes so hosts can pick the resolution that fits their UI. SVG icons scale to any size and are a good default choice.
JSON Schema Dialect
New in 2025-11-25
MCP now uses JSON Schema 2020-12 as the default dialect for both inputSchema and outputSchema. If your schema does not include a $schema field, clients and servers MUST treat it as 2020-12. You can still use older drafts (like draft-07) by specifying "$schema": "http://json-schema.org/draft-07/schema#" explicitly, but 2020-12 is the recommended default.
Task-Augmented Execution
New in 2025-11-25 (experimental)
Individual tools can declare whether they support the experimental Tasks API via the execution.taskSupport property. This tells clients whether a tools/call request for this tool can be augmented with a task for deferred result retrieval.
// This tool supports optional task-augmented execution
server.tool(
  'generate_report',
  'Generates a complex report that may take several minutes',
  { reportType: z.string(), dateRange: z.object({ from: z.string(), to: z.string() }) },
  {
    execution: {
      taskSupport: 'optional',   // 'forbidden' (default) | 'optional' | 'required'
    },
  },
  async ({ reportType, dateRange }) => {
    const report = await buildReport(reportType, dateRange);
    return { content: [{ type: 'text', text: report.summary }] };
  }
);
When taskSupport is "optional", the client may include a task ID in the request to get async polling; if it does not, the tool behaves synchronously as usual. When "required", the client MUST provide a task. When "forbidden" (the default), the tool does not participate in the Tasks API at all. See Lesson 47: Tasks API for the full protocol.
Input Validation and Error Categories
Clarified in 2025-11-25
The specification now explicitly states that input validation errors should be returned as tool execution errors (with isError: true), not as JSON-RPC protocol errors. This distinction matters because the LLM can read and react to tool execution errors – for example, it can fix a wrong date format and retry. Protocol errors, by contrast, are treated as infrastructure failures and typically stop the chain.
async ({ date_from, date_to }) => {
  if (new Date(date_from) > new Date(date_to)) {
    // Tool execution error - the LLM can read this and self-correct
    return {
      isError: true,
      content: [{
        type: 'text',
        text: 'Invalid date range: date_from must be before date_to. '
            + `Got from=${date_from}, to=${date_to}.`,
      }],
    };
  }
  // ... proceed with valid input
}
Reserve JSON-RPC protocol errors (thrown exceptions) for true programmer bugs: an unknown tool name, a malformed JSON-RPC envelope, or an internal server crash. Anything the model could plausibly fix by adjusting its arguments belongs in isError: true.
What to Check Right Now
Audit your tool descriptions – for each tool you build, ask: if an LLM read only the name and description, would it know exactly when to use this tool and what it returns? If not, rewrite the description.
Add .describe() to every Zod field – do this as a rule, not an afterthought. The descriptions are part of the tool API surface.
Test isError handling – build a tool that deliberately returns isError: true with an informative message. Test it with the Inspector to see what the LLM would receive.
Check your annotation hints – mark every destructive tool (delete, update, send) with destructiveHint: true and every safe read with readOnlyHint: true. Use the *Hint suffix for all annotation properties.
Consider outputSchema – if any of your tools return data that downstream code (not just the LLM) needs to parse, add an outputSchema and return structuredContent.
Validate your tool names – check that every name uses only A-Za-z0-9_-., is 1-128 characters, and contains no spaces or special characters.
Theory becomes knowledge when you type it. This lesson builds a complete, working MCP server and a complete, working client, from a blank directory to a running system with tool calling. By the end, you will have a tangible artefact – code you wrote, running on your machine – that embodies every concept from the first four lessons. Everything after this lesson builds on this foundation.
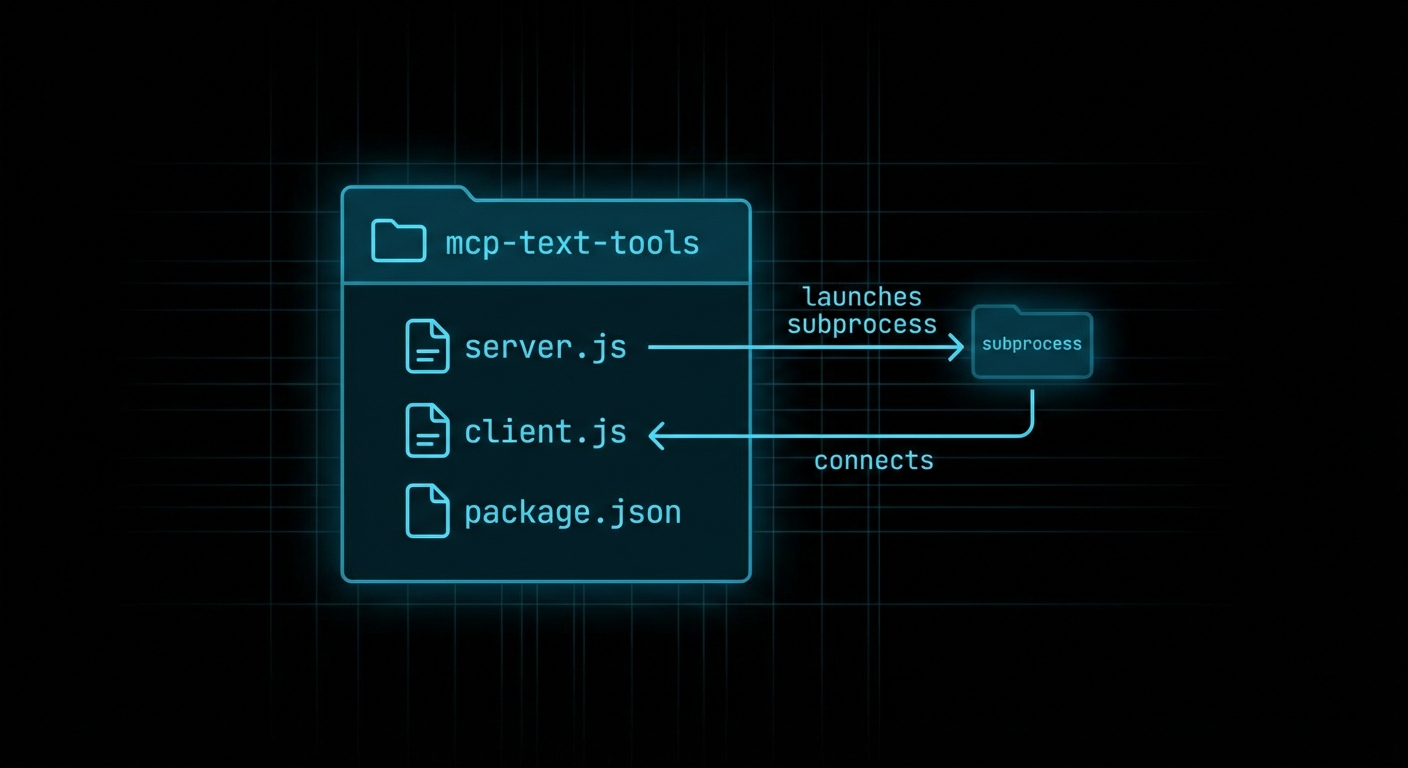
The complete first project: a server with three tools and a client that discovers and calls them.
What We Are Building
We will build a “text tools” MCP server – a server that exposes three tools for working with text: word_count (counts words in a string), reverse_text (reverses a string), and extract_keywords (returns unique words above a minimum length). These are deliberately simple tools – the complexity will come later. The goal right now is to write the wiring, understand what each piece does, and verify the whole thing works end to end.
We will also build a client that connects to the server, discovers its tools, and calls each one. In later lessons, the client will call an LLM and route tool calls from model output. Here, the client calls tools directly so you can see the raw MCP protocol working without an LLM in the middle.
Final project structure:
mcp-text-tools/
  package.json
  .env
  server.js      # MCP server with three tools
  client.js      # MCP client that calls the tools
Building the Server
Start with the package setup:
mkdir mcp-text-tools && cd mcp-text-tools
npm init -y
npm pkg set type=module
npm install @modelcontextprotocol/sdk zod
Now write server.js:
// server.js
import { McpServer } from '@modelcontextprotocol/sdk/server/mcp.js';
import { StdioServerTransport } from '@modelcontextprotocol/sdk/server/stdio.js';
import { z } from 'zod';

const server = new McpServer({
  name: 'text-tools',
  version: '1.0.0',
});

// Tool 1: Count words in a string
server.tool(
  'word_count',
  'Counts the number of words in a text string',
  { text: z.string().min(1).describe('The text to count words in') },
  async ({ text }) => {
    const count = text.trim().split(/\s+/).filter(Boolean).length;
    return {
      content: [{ type: 'text', text: `Word count: ${count}` }],
    };
  }
);

// Tool 2: Reverse a string
server.tool(
  'reverse_text',
  'Reverses the characters in a text string',
  { text: z.string().min(1).describe('The text to reverse') },
  async ({ text }) => ({
    content: [{ type: 'text', text: text.split('').reverse().join('') }],
  })
);

// Tool 3: Extract unique keywords above a minimum length
server.tool(
  'extract_keywords',
  'Extracts unique keywords from text, filtered by minimum character length',
  {
    text: z.string().min(1).describe('The text to extract keywords from'),
    min_length: z.number().int().min(2).max(20).default(4)
      .describe('Minimum keyword length in characters'),
  },
  async ({ text, min_length }) => {
    const words = text
      .toLowerCase()
      .replace(/[^a-z0-9\s]/g, '')
      .split(/\s+/)
      .filter(w => w.length >= min_length);
    const unique = [...new Set(words)].sort();
    return {
      content: [{ type: 'text', text: unique.join(', ') || '(none found)' }],
    };
  }
);

// Start the server on stdio transport
const transport = new StdioServerTransport();
await server.connect(transport);
console.error('text-tools MCP server running on stdio');
A few things to note: console.error is used for server logging (not console.log) because stdio transport uses stdout for protocol messages. Anything written to stdout must be valid JSON-RPC. Log to stderr for human-readable messages.
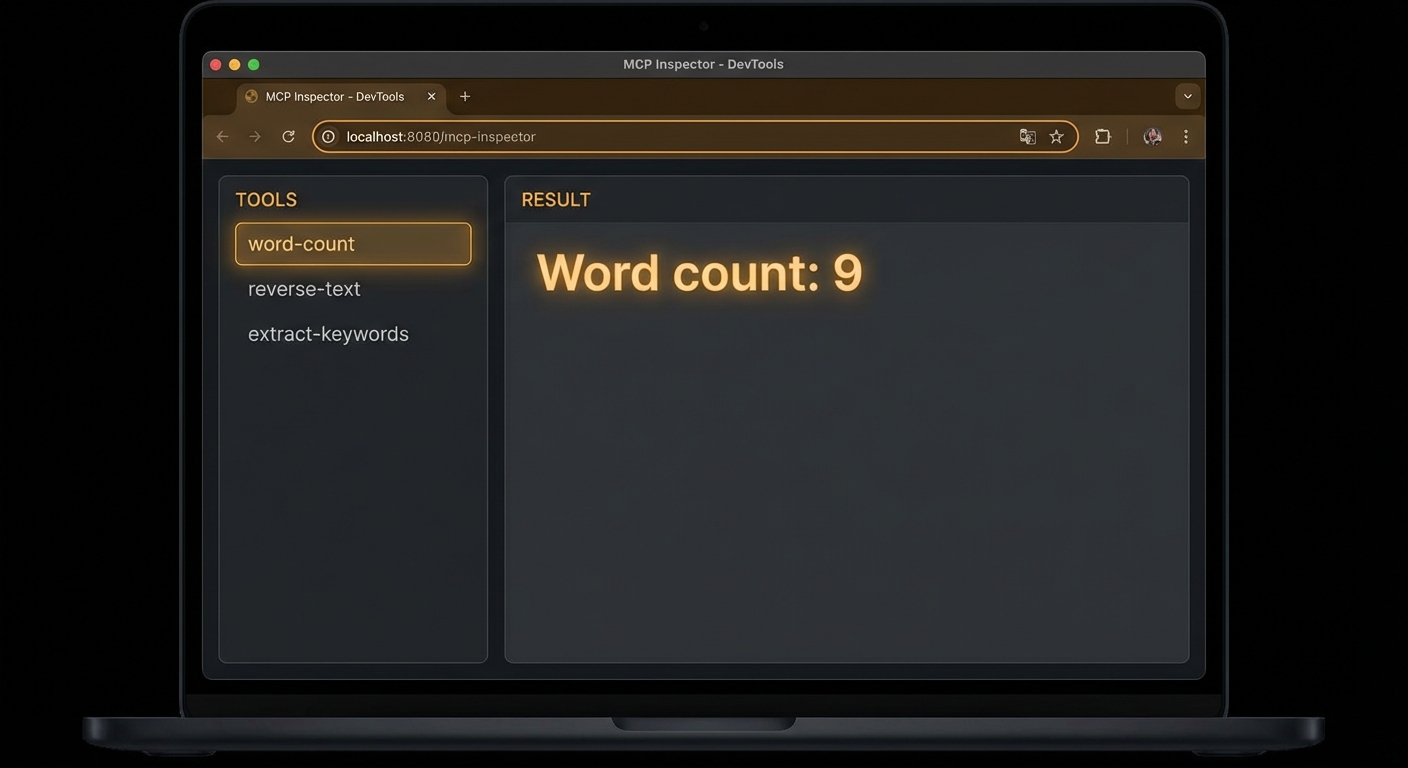
The MCP Inspector showing the text-tools server with all three tools discoverable and callable.
Testing with the Inspector First
Before writing the client, test the server with the MCP Inspector:
Open the URL it prints (usually http://localhost:5173). You should see all three tools listed. Click word_count, enter some text in the text field, and click Run. You should get back a result like Word count: 7. If you do, the server is working correctly. If not, check the error panel for the JSON-RPC response.
Building the Client
Now write client.js – a host that connects to the server, lists tools, and calls each one:
// client.js
import { Client } from '@modelcontextprotocol/sdk/client/index.js';
import { StdioClientTransport } from '@modelcontextprotocol/sdk/client/stdio.js';

// Create the client
const client = new Client(
  { name: 'text-tools-host', version: '1.0.0' },
  { capabilities: {} }
);

// Create the transport - this will launch server.js as a subprocess
const transport = new StdioClientTransport({
  command: 'node',
  args: ['server.js'],
});

// Connect (performs the full MCP handshake)
await client.connect(transport);
console.log('Connected to text-tools server');

// Step 1: Discover what tools the server has
const { tools } = await client.listTools();
console.log('\nAvailable tools:');
for (const tool of tools) {
  console.log(`  ${tool.name}: ${tool.description}`);
  console.log(`    Input schema:`, JSON.stringify(tool.inputSchema, null, 4));
}

// Step 2: Call word_count
console.log('\n--- Calling word_count ---');
const result1 = await client.callTool({
  name: 'word_count',
  arguments: { text: 'The quick brown fox jumps over the lazy dog' },
});
console.log('Result:', result1.content[0].text);

// Step 3: Call reverse_text
console.log('\n--- Calling reverse_text ---');
const result2 = await client.callTool({
  name: 'reverse_text',
  arguments: { text: 'Hello, MCP World!' },
});
console.log('Result:', result2.content[0].text);

// Step 4: Call extract_keywords
console.log('\n--- Calling extract_keywords ---');
const result3 = await client.callTool({
  name: 'extract_keywords',
  arguments: {
    text: 'The Model Context Protocol is an open protocol for AI tool integration',
    min_length: 5,
  },
});
console.log('Result:', result3.content[0].text);

// Clean up
await client.close();
console.log('\nDone. Connection closed.');
Run the client:
node client.js
Expected output:
Connected to text-tools server

Available tools:
  word_count: Counts the number of words in a text string
    Input schema: { ... }
  reverse_text: Reverses the characters in a text string
    Input schema: { ... }
  extract_keywords: Extracts unique keywords from text...
    Input schema: { ... }

--- Calling word_count ---
Result: Word count: 9

--- Calling reverse_text ---
Result: !dlroW PCM ,olleH

--- Calling extract_keywords ---
Result: context, integration, model, open, protocol

Done. Connection closed.
Common First-Project Failures
Case 1: Logging to stdout from a stdio Server
This is the most common first-day mistake. With StdioServerTransport, stdout is the JSON-RPC pipe. If you write anything to stdout that is not valid JSON-RPC, the client will fail to parse it and the connection will break in confusing ways.
// WRONG: stdout output from a stdio server breaks the protocol
console.log('Server started!'); // This goes to stdout - corrupts the pipe

// CORRECT: use stderr for all server-side logging
console.error('Server started!'); // stderr is safe - not part of the protocol

// Or use the MCP logging capability (covered in Lesson 6)
server.server.sendLoggingMessage({ level: 'info', data: 'Server started' });
Case 2: Not Awaiting client.connect()
If you forget to await client.connect(), your subsequent tool calls will race with the initialisation handshake and fail with protocol errors.
When a tool handler throws an exception, the server catches it and returns an error response. But if you want to signal a user-visible error (as opposed to a protocol error), you should return a result with isError: true rather than throwing. Throwing causes a JSON-RPC error response; returning with isError: true returns a normal result that the LLM can read and reason about.
// OK for protocol failures (server bug, network error)
throw new Error('Database connection failed');

// BETTER for user-visible errors the LLM should handle
return {
  isError: true,
  content: [{ type: 'text', text: 'No results found for that query.' }],
};
// The LLM will receive this as tool output and can adjust its response accordingly.
“Tools can signal that a tool call failed by including isError: true in the result. This allows the LLM to reason about the failure and potentially retry or adjust its approach, rather than treating the tool failure as a protocol error.” – MCP Documentation, Tools
What to Check Right Now
Run the full project – build the text-tools server and client from this lesson. Do not copy-paste; type it. The act of typing catches misunderstandings that reading does not.
Inspect it with the Inspector – run npx @modelcontextprotocol/inspector node server.js before running the client. Verify all three tools appear and work.
Add a fourth tool – practice the pattern by adding uppercase_text as a fourth tool. Register it, implement the handler, test with the Inspector, then verify your client discovers it automatically.
Read the error – deliberately introduce a bug (typo in a field name, missing argument) and read the JSON-RPC error response. Understanding error messages now saves hours later.
Setting up a dev environment is the least glamorous part of any course, but it is also the part where the most time gets silently destroyed. This lesson sets up the Node.js MCP development environment properly, once, so you never have to think about it again. We cover the SDK, Zod for schema validation, ESM module configuration, the MCP Inspector, and the small quality-of-life tools that make the workflow fast. Every code example in this course starts from this base.
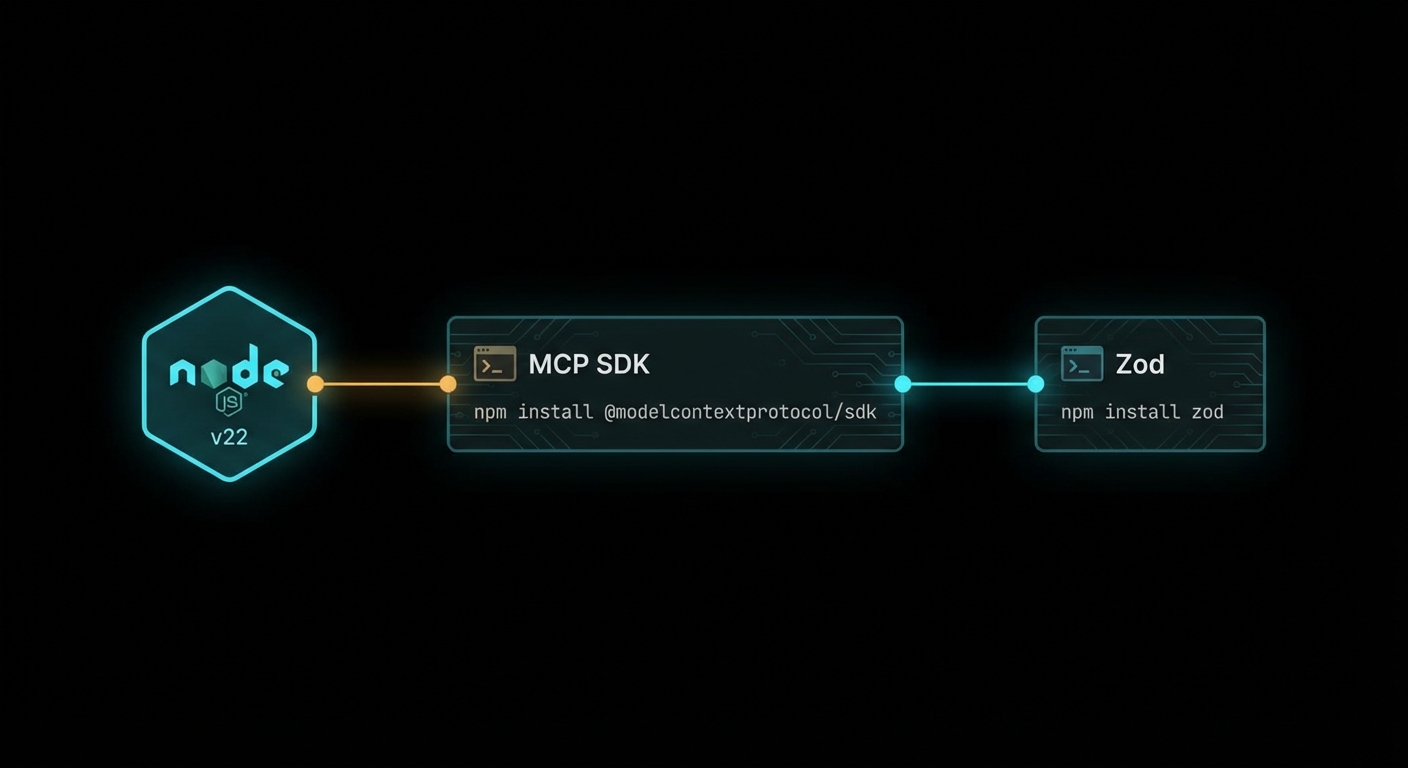
The complete MCP Node.js dev environment: SDK, Zod, ESM, and the Inspector.
Node.js Version and ESM Setup
This course requires Node.js 22 or higher. Node.js 22 is the current LTS release and it ships several features we use throughout the course: native --env-file support (no more dotenv package), the stable node:test built-in test runner, and improved native fetch. Check your version:
node --version
# Should print v22.x.x or higher
# If not: nvm install 22 && nvm use 22
All code in this course uses ESM (ECMAScript Modules) – the import/export syntax. This is the modern Node.js module system and the MCP SDK is distributed as ESM. To use ESM in Node.js, add "type": "module" to your package.json. Here is the base package.json for every project in this course:
With "type": "module", all .js files in your project are treated as ESM. You can use import and export freely. You cannot use require() directly (use createRequire from node:module if you ever need to load a CJS module from an ESM file). File extensions must be explicit in import paths: ./server.js, not ./server.
Installing the MCP SDK and Zod
Two packages cover everything you need to build and run MCP servers and clients:
npm install @modelcontextprotocol/sdk zod
@modelcontextprotocol/sdk is the official MCP implementation. It provides McpServer (for building servers), Client (for building clients), all transport implementations, and the full type definitions. It is the only MCP-specific dependency you need.
zod is a schema validation library. In MCP, it is used to define the input schemas for tools. When you register a tool on an MCP server, you pass a Zod schema that describes what arguments the tool accepts. The SDK uses this schema to generate the JSON Schema that gets advertised to clients, and to validate incoming tool call arguments before your handler runs. Zod v4 is required (v3 has a different API for .describe() on fields).
// Zod schema for a tool that searches a database
import { z } from 'zod';

const SearchSchema = {
  query: z.string().min(1).max(500).describe('The search query string'),
  limit: z.number().int().min(1).max(100).default(10).describe('Max results to return'),
  category: z.enum(['posts', 'users', 'products']).optional().describe('Filter by category'),
};

// The SDK converts this to JSON Schema for the tool manifest:
// { query: { type: 'string', minLength: 1, maxLength: 500, description: '...' }, ... }
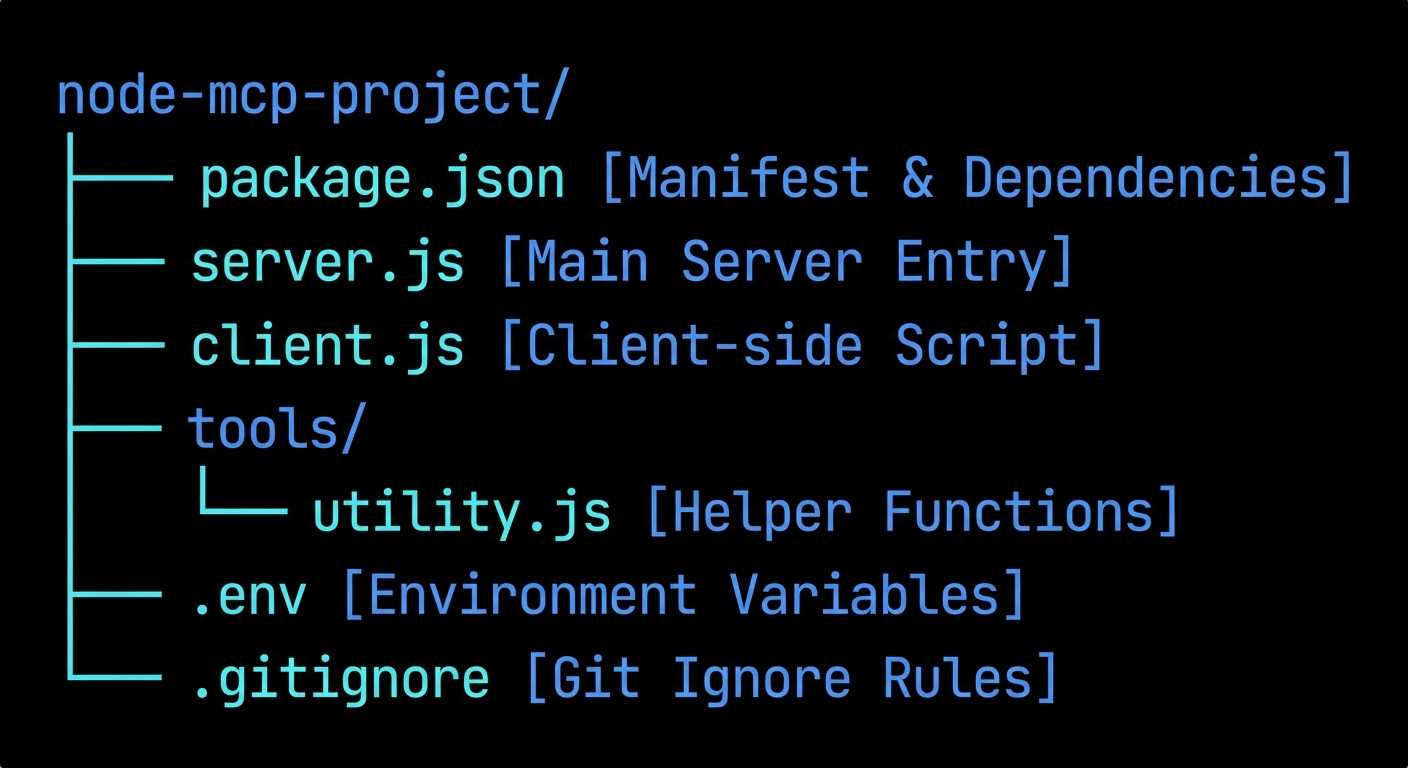
Standard MCP project structure for this course.
Project Structure Convention
Every project in this course follows this directory structure:
my-mcp-project/
  package.json          # "type": "module", dependencies
  .env                  # API keys and config (never committed)
  .gitignore            # includes .env and node_modules
  server.js             # MCP server entry point (or servers/ for multiple)
  client.js             # MCP client / host entry point
  tools/                # One file per tool for larger servers
    search.js
    fetch.js
  resources/            # One file per resource type
    database.js
For API keys, use Node.js 22’s native --env-file flag instead of the dotenv package. This keeps the dependency count low and the setup obvious:
# Run server with env file loaded natively
node --env-file=.env server.js

# Or in package.json scripts
{
  "scripts": {
    "start": "node --env-file=.env server.js",
    "dev": "node --watch --env-file=.env server.js"
  }
}
The --watch flag (Node.js 18+) restarts the process when files change. No nodemon required.
The MCP Inspector
The MCP Inspector is an official tool for testing and debugging MCP servers interactively. It is the most important development tool in your MCP workflow. You can use it without installing anything:
This opens a web UI at http://localhost:5173 (or similar). From the Inspector you can:
See all tools, resources, and prompts the server exposes
Call any tool with custom arguments and see the raw response
Browse resources by URI
Render prompts with template arguments
Watch all JSON-RPC messages in the network panel in real time
The Inspector is the fastest way to verify that your server is working correctly before integrating it with an LLM. Always test with the Inspector first.
Common Environment Failures
Case 1: Using CJS require() in an ESM Project
With "type": "module" in package.json, all .js files are ESM. Using require() will throw ReferenceError: require is not defined in ES module scope.
// WRONG in an ESM project
const { McpServer } = require('@modelcontextprotocol/sdk/server/mcp.js');

// CORRECT
import { McpServer } from '@modelcontextprotocol/sdk/server/mcp.js';
If you need to import a CJS module from ESM (rare), use dynamic import or createRequire:
Unlike bundlers (webpack, Vite), Node.js ESM requires explicit file extensions in relative import paths. Omitting the extension causes a Cannot find module error.
// WRONG
import { myTool } from './tools/search';

// CORRECT
import { myTool } from './tools/search.js';
Case 3: Using Zod v3 with SDK v1
The MCP SDK v1 peer-depends on Zod v4 (not v3). Zod v3 and v4 have different APIs for field descriptions. If you have Zod v3 installed, the .describe() calls on schema fields will behave differently and tool descriptions may be missing from the manifest.
# Check which Zod version you have
npm list zod

# Install Zod v4 explicitly
npm install zod@^4.0.0
“The TypeScript SDK requires Node.js 18 or higher. Node.js 22+ is recommended for native .env file support and the stable built-in test runner.” – MCP TypeScript SDK, README
What to Check Right Now
Create a scratch project – run mkdir mcp-scratch && cd mcp-scratch && npm init -y && npm pkg set type=module && npm install @modelcontextprotocol/sdk zod. This is the baseline for Lesson 5.
Verify zod version – run npm list zod. It should show 4.x.x. If not, npm install zod@latest.
Test the Inspector – run npx @modelcontextprotocol/inspector --help to verify it is reachable. No install needed; it runs from the npm cache.
Add node_modules and .env to .gitignore – these are the two most important things to exclude. Run echo "node_modules/\n.env" > .gitignore.
Protocols are not magic. Under every elegant abstraction is a set of bytes moving between processes, governed by rules that someone wrote down. MCP is no different. The moment you understand exactly what happens on the wire when a client connects to an MCP server – the handshake, the capability negotiation, the request-response cycle, the message format – the whole protocol becomes transparent. And transparent systems are debuggable systems.
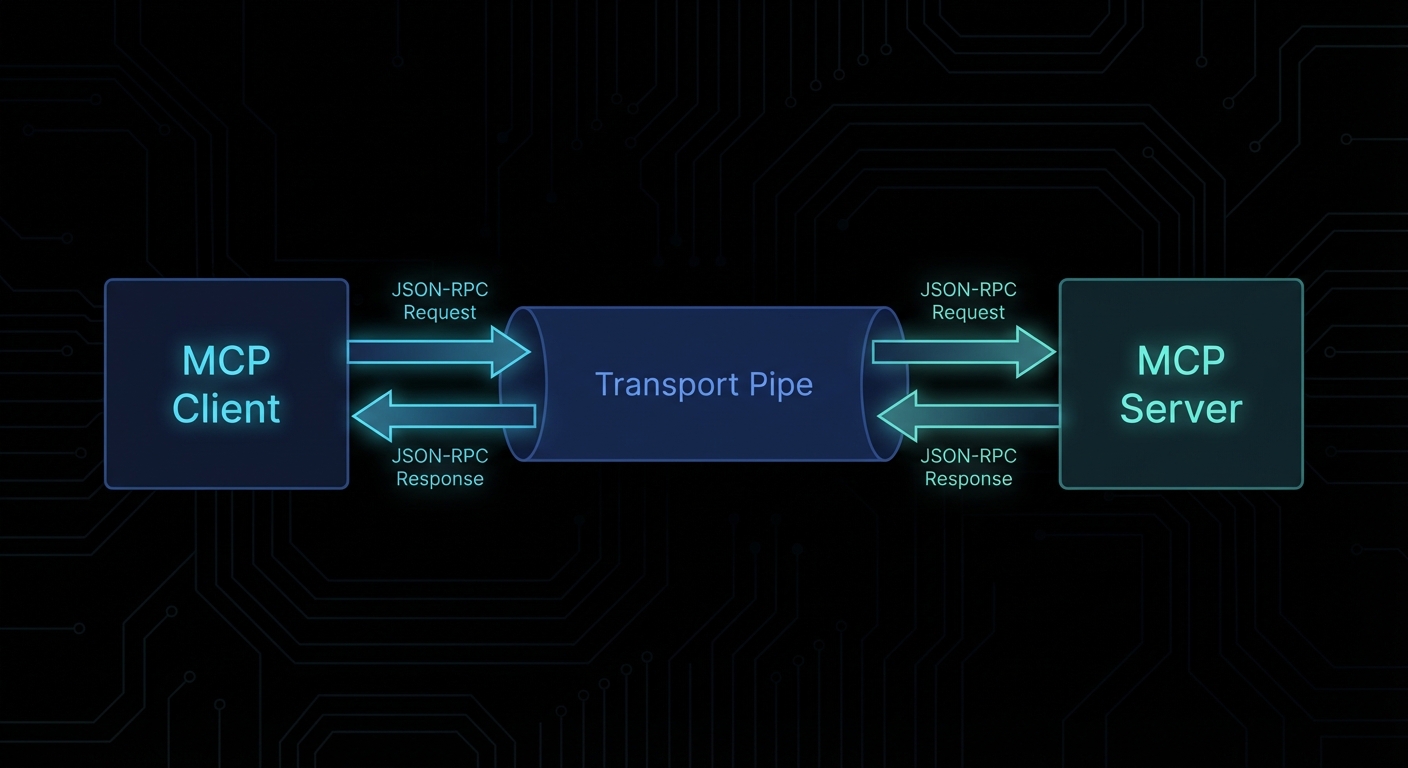
The MCP wire protocol: JSON-RPC 2.0 messages flowing through a stateful connection lifecycle.
JSON-RPC 2.0: The Wire Format
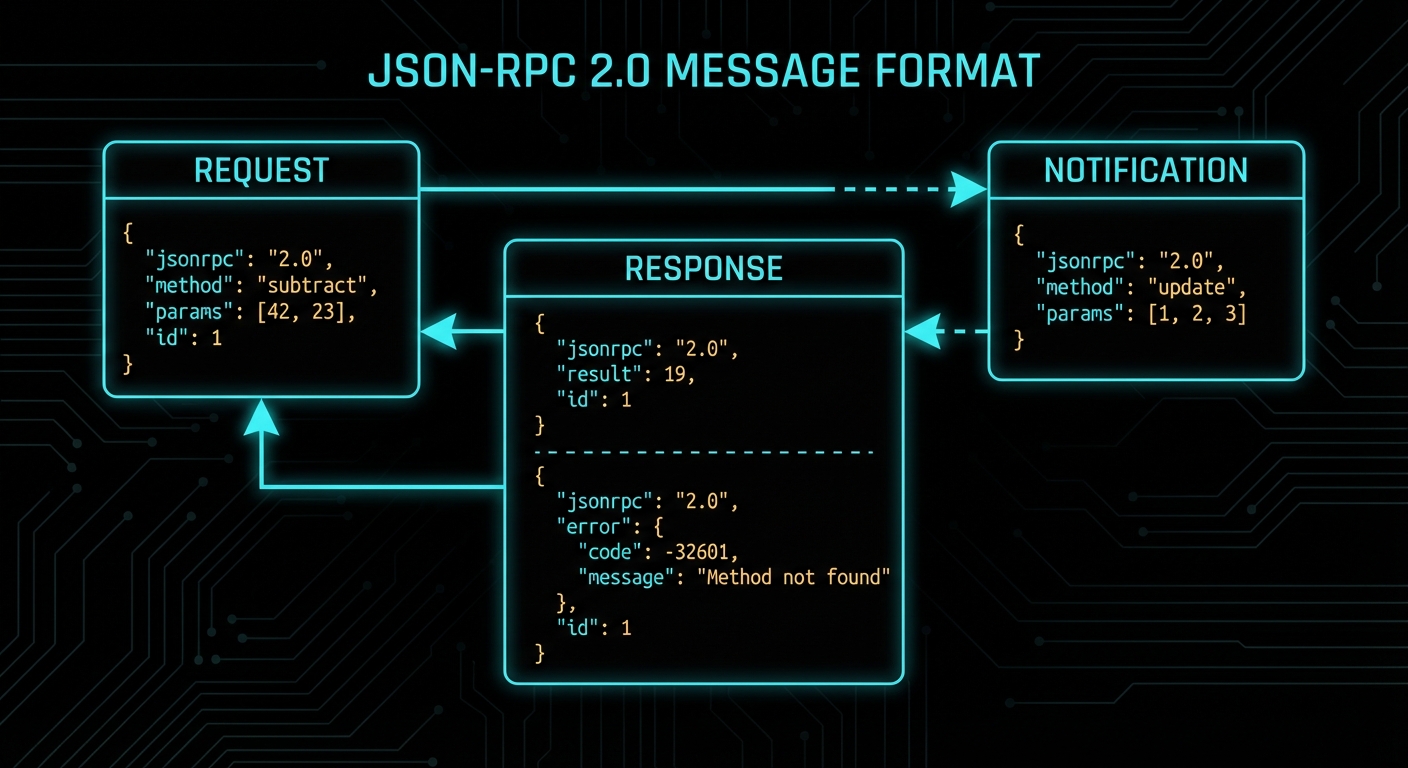
MCP uses JSON-RPC 2.0 as its message format. JSON-RPC is a simple remote procedure call protocol encoded as JSON. Every MCP message is one of four types: a Request, a Response, an Error Response, or a Notification (a one-way message with no response expected).
The id field is how you match responses to requests in an async system. If you send ten requests and get ten responses back in any order, the id tells you which response belongs to which request. Notifications don’t have IDs because they are fire-and-forget.
This matters the moment you open a network trace or debug log. Every MCP problem you will ever diagnose comes down to reading these four message shapes and finding the mismatch – a missing id, an unexpected error code, or a notification that never arrived. Fluency in the wire format is the single most useful debugging skill in the protocol.
“The base protocol uses JSON-RPC 2.0 messages exchanged over a transport layer. Server and client capabilities are negotiated during an initialization phase.” – MCP Specification, Base Protocol
With the message format understood, the next question is ordering: when do these messages get sent, and in what sequence? The connection lifecycle defines exactly that – a strict three-phase flow that every MCP session follows from first contact to shutdown.
The Connection Lifecycle
Every MCP connection goes through a well-defined lifecycle. Understanding this lifecycle is essential for debugging connection problems and for building robust hosts and servers.
The lifecycle has three phases: initialisation, operation, and shutdown.
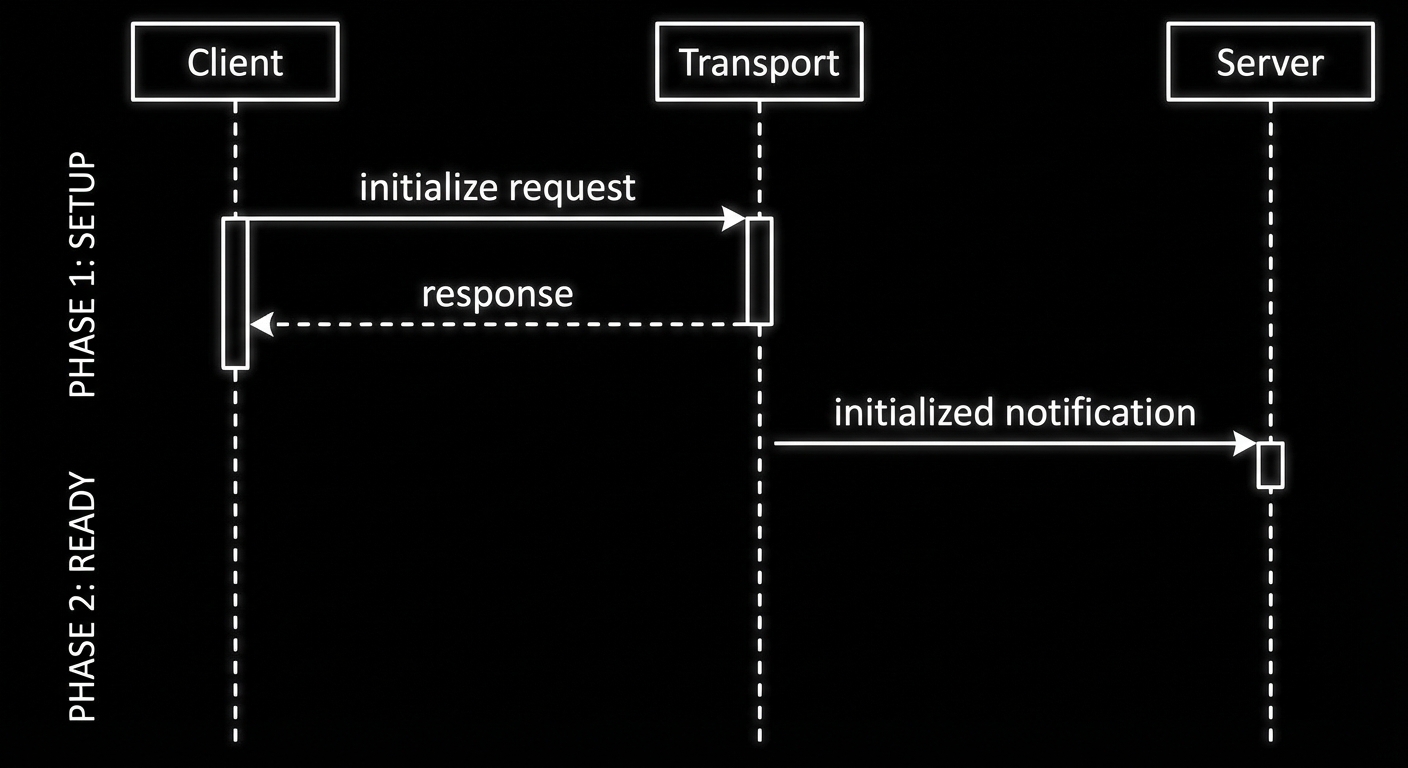
Phase 1: Initialisation
When a client connects to a server, the very first thing that happens is the initialisation handshake. This is not optional and not configurable – it is the protocol’s way of ensuring both sides agree on what they can do together before anything else happens.
The sequence:
Client sends an initialize request, declaring its protocol version and capabilities.
Server responds with its protocol version and capabilities.
Client sends an initialized notification to confirm it received the response.
Both sides are now in the operating phase and can exchange any supported messages.
The three-phase connection lifecycle: initialise, operate, shutdown. Everything else happens in the middle phase.
Phase 2: Operation
After the handshake, the connection is fully operational. Either side can send requests, responses, or notifications, subject to the capabilities they negotiated. The client can call tools/list, tools/call, resources/list, resources/read, prompts/list, prompts/get. The server can send sampling/createMessage requests (if the client declared sampling capability) or notifications about state changes.
Phase 3: Shutdown
Either side can close the connection. With stdio transport, this happens when the process exits. With HTTP/SSE transport, it happens when the connection is closed. The MCP SDK handles shutdown gracefully when you call server.close() or client.close().
The lifecycle ensures orderly communication, but the handshake also decides what each side is allowed to do. The next section unpacks capability negotiation – the mechanism that controls which features are available during the operation phase.
Capability Negotiation in Detail
Capability negotiation determines what each side is allowed to do in the operation phase. If the client does not declare sampling capability, the server cannot send sampling/createMessage requests – the client simply will not handle them. If the server does not declare resources capability, the client calling resources/list will receive a method-not-found error.
This is a safety mechanism. It prevents servers from sending requests that clients cannot handle, and prevents clients from calling methods the server has not implemented. You can inspect negotiated capabilities after connecting:
import { Client } from '@modelcontextprotocol/sdk/client/index.js';
import { StdioClientTransport } from '@modelcontextprotocol/sdk/client/stdio.js';

const client = new Client(
  { name: 'inspector', version: '1.0.0' },
  { capabilities: { sampling: {} } }
);

const transport = new StdioClientTransport({
  command: 'node',
  args: ['./my-server.js'],
});

await client.connect(transport);

// Read back what the server declared it supports
const serverCaps = client.getServerCapabilities();
console.log('Server capabilities:', JSON.stringify(serverCaps, null, 2));

// Read back what the server reported about itself
const serverInfo = client.getServerVersion();
console.log('Server info:', serverInfo);
In a production system, you would check capabilities immediately after connecting to decide what features to offer the user. If the server does not declare resources support, your host should grey out or hide the resource browser rather than letting the user trigger a method-not-found error.
New in 2025-11-25 – The Implementation interface (used for both serverInfo and clientInfo) now includes an optional description field. This provides a human-readable summary of what the server or client does, aligning with MCP registry and discovery formats. Include it when your server might appear in a registry or service mesh where operators need to identify it at a glance.
Common Protocol Failures
Case 1: Sending Requests Before Initialisation Completes
If you attempt to call a tool or list resources before the initialized notification has been exchanged, the server will reject the request with a protocol error. The MCP SDK handles this transparently when you use client.connect(transport) – the connect method waits for the full handshake before resolving. But if you implement a custom transport or bypass the SDK, this is the first thing that will bite you.
// WRONG: Calling tools before connect resolves
const transport = new StdioClientTransport({ command: 'node', args: ['server.js'] });
client.connect(transport); // Don't await this
const tools = await client.listTools(); // Races with initialisation - will fail

// CORRECT: Always await connect
await client.connect(transport);
const tools = await client.listTools(); // Safe: handshake is complete
Case 2: Mismatched Protocol Versions
MCP has versioned specifications. If client and server declare different protocol versions and neither can support the other, the connection fails at initialisation. The current stable version is 2024-11-05; the draft spec has incremental additions. When upgrading SDK versions, check the protocol version the new SDK defaults to and ensure your deployed servers are compatible.
// Always pin to a specific protocol version in production:
const client = new Client(
  { name: 'my-host', version: '1.0.0' },
  {
    capabilities: {},
    // The SDK picks the protocol version based on what server supports
    // Check SDK changelog when upgrading
  }
);
Case 3: Understanding Notification Semantics
Notifications do not have an id field and do not receive a response from the other side. However, sending a notification is still an I/O operation – bytes must be written to the transport. In the MCP SDK, Protocol.notification() is async and returns a Promise that resolves once the message has been flushed to the transport. Awaiting it is correct and recommended – it ensures the write completes before you proceed. Skipping await risks a race condition where the next message is sent before the notification has been flushed.
// CORRECT: await ensures the notification bytes are flushed to the transport
await client.sendNotification({ method: 'notifications/initialized' });

// ALSO CORRECT but risky in fast sequences: the write might not finish
// before your next message if the transport buffers
client.sendNotification({ method: 'notifications/initialized' });
The key distinction: awaiting a notification does not wait for a response from the server (there is none). It waits for the local transport to finish writing. This is the same as await stream.write() in Node.js – you are awaiting the I/O, not a reply.
“Servers MUST NOT send requests to clients before receiving the initialized notification from the client. Clients MUST NOT send requests other than pings before receiving the initialize response from the server.” – MCP Specification, Lifecycle
Each of these failure modes is easy to hit during development and hard to diagnose without seeing the raw messages. The common thread is timing and ordering – sending things too early, expecting responses to notifications, or assuming capabilities that were never negotiated. When something breaks, the JSON-RPC trace is always the first place to look.
What to Check Right Now
Inspect live traffic with the MCP Inspector – run npx @modelcontextprotocol/inspector node your-server.js. The inspector shows every JSON-RPC message, making the protocol visible in real time.
Enable SDK logging – set DEBUG=mcp:* in your environment when developing. The SDK logs all protocol messages, which is invaluable for debugging lifecycle issues.
Validate your capability declarations – if a server feature is not working, check that the server declared the capability and the client did not need to declare a matching client capability first.
Use JSON-RPC error codes correctly – MCP defines standard error codes (-32700 parse error, -32600 invalid request, -32601 method not found, -32602 invalid params, -32603 internal error). Application-level errors use codes in the range -32000 to -32099.
Three roles. One protocol. If you can hold this architecture in your head clearly – host, client, server, what each does, who owns each one, how they talk – then 80% of MCP suddenly makes sense. Most of the confusion beginners have about MCP traces back to fuzzy thinking about these three roles. This lesson is about making that mental model concrete and then keeping it concrete under stress.
The three-role model: Host (the AI application), Client (the protocol connector), Server (the capability provider).
The Host: What the User Runs
The host is the AI application that the end user interacts with. Claude Desktop is a host. VS Code with a Copilot extension is a host. Cursor is a host. Your custom Node.js chat application is a host. The host is the entry point: users direct it, it decides what to do with their input, and it is responsible for controlling the entire MCP lifecycle.
The host has several specific responsibilities in the MCP model:
Creating and managing clients – the host decides which MCP servers to connect to, creates client instances for each one, and manages their lifecycle (connect, reconnect, disconnect).
Security and consent – the host is the security boundary. It must obtain user consent before allowing servers to access data or invoke tools. It decides what each server is allowed to do.
LLM integration – the host is what calls the LLM (OpenAI API, Anthropic API, Gemini API). The model does not participate in the MCP protocol directly. The host takes model output, decides when tool calls need to happen, routes those calls through its clients to the appropriate servers, and feeds the results back to the model.
Aggregating context – if the host connects to multiple servers, it aggregates the available tools, resources, and prompts from all of them before presenting them to the model.
“Hosts are LLM applications that initiate connections to servers in order to access tools, resources, and prompts. The host application is responsible for managing client lifecycles and enforcing security policies.” – Model Context Protocol Specification
A host can maintain connections to multiple servers simultaneously. A typical production host might connect to a database server, a file system server, a calendar server, and a code execution server – all at the same time, each via its own client instance.
The Client: The Protocol Connector
The client is the component inside the host that manages the connection to exactly one MCP server. Each server connection has its own client. Clients are not user-facing – users never interact with clients directly. They are the internal plumbing that translates between what the host needs and what the MCP protocol defines.
The client’s job is well-defined and narrow:
Establish and maintain the transport connection to the server (stdio pipe, HTTP stream, etc.)
Perform the protocol handshake (capability negotiation) when connecting
Send JSON-RPC requests to the server on behalf of the host
Receive and parse JSON-RPC responses and notifications from the server
Optionally: expose client-side capabilities back to the server (sampling, elicitation, roots)
In Node.js, you rarely write a client from scratch. The @modelcontextprotocol/sdk provides a Client class that handles all of this. You instantiate it, point it at a transport, connect it, and then call methods like client.listTools(), client.callTool(), client.listResources().
import { Client } from '@modelcontextprotocol/sdk/client/index.js';
import { StdioClientTransport } from '@modelcontextprotocol/sdk/client/stdio.js';

// One client per server connection
const client = new Client(
  { name: 'my-host-app', version: '1.0.0' },
  { capabilities: {} }
);

const transport = new StdioClientTransport({
  command: 'node',
  args: ['./my-mcp-server.js'],
});

await client.connect(transport);

// Now you can call into the server
const tools = await client.listTools();
console.log('Available tools:', tools.tools.map(t => t.name));
Client to server: a transport layer carries JSON-RPC 2.0 messages in both directions.
The Server: The Capability Provider
The server is what exposes capabilities to the AI ecosystem. A server can be anything that implements the MCP protocol and exposes tools, resources, or prompts. It might be:
A local process launched by the host (stdio server – the most common pattern for developer tools)
A remote HTTP service your team runs (a company’s internal knowledge base, a proprietary database)
A third-party cloud service that publishes an MCP endpoint
The server is the thing you will build most often in this course. When someone says “I wrote an MCP integration for Jira” or “I built an MCP server for my Postgres database”, they mean they built an MCP server that exposes tools for interacting with those systems.
A minimal MCP server in Node.js looks like this:
import { McpServer } from '@modelcontextprotocol/sdk/server/mcp.js';
import { StdioServerTransport } from '@modelcontextprotocol/sdk/server/stdio.js';
import { z } from 'zod';

const server = new McpServer({
  name: 'my-first-server',
  version: '1.0.0',
});

// Register a tool
server.tool(
  'greet',
  'Returns a personalised greeting',
  { name: z.string().describe('The name to greet') },
  async ({ name }) => ({
    content: [{ type: 'text', text: `Hello, ${name}! Welcome to MCP.` }],
  })
);

// Connect and serve
const transport = new StdioServerTransport();
await server.connect(transport);
That is a complete, working MCP server. It has one tool called greet. Any MCP client can connect to it, discover the tool, and invoke it. We will build far more complex servers throughout this course, but every one of them is fundamentally this structure with more tools, resources, and prompts added.
Failure Modes in the Three-Role Model
Case 1: Building the Model Call Inside the Server
A common architectural mistake is putting the LLM API call inside the MCP server – reasoning that “the server needs to be smart, so the server should call the LLM”. This inverts the architecture and breaks the separation of concerns.
// WRONG: Server calling OpenAI directly
server.tool('analyse', 'Analyse a text', { text: z.string() }, async ({ text }) => {
  // This is wrong. The server should not call the LLM.
  // The server is a capability provider; the host is the LLM orchestrator.
  const openai = new OpenAI();
  const result = await openai.chat.completions.create({
    model: 'gpt-4o',
    messages: [{ role: 'user', content: `Analyse: ${text}` }],
  });
  return { content: [{ type: 'text', text: result.choices[0].message.content }] };
});
The correct pattern is to either return the raw data and let the host’s LLM do the analysis, or use the sampling capability to request a model call through the client (covered in Lesson 9). Putting LLM calls inside the server creates tight coupling between your capability provider and a specific LLM provider – exactly what MCP is designed to prevent.
// CORRECT: Server returns data; host's LLM does the analysis
server.tool('get_text', 'Fetch text for analysis', { doc_id: z.string() }, async ({ doc_id }) => {
  const text = await fetchDocumentText(doc_id);
  return { content: [{ type: 'text', text }] };
  // The host will pass this to the LLM for analysis.
  // The server just provides the data.
});
Case 2: One Client Connecting to Multiple Servers
The spec is explicit: each client maintains a connection to exactly one server. Attempting to use a single client instance to talk to multiple servers is not supported by the protocol.
// WRONG: Trying to use one client for two servers
const client = new Client({ name: 'host', version: '1.0.0' }, { capabilities: {} });
await client.connect(transport1);
await client.connect(transport2); // This will error or overwrite the first connection
// CORRECT: One client per server
const dbClient = new Client({ name: 'host-db', version: '1.0.0' }, { capabilities: {} });
const fsClient = new Client({ name: 'host-fs', version: '1.0.0' }, { capabilities: {} });

await dbClient.connect(dbTransport);
await fsClient.connect(fsTransport);

// Each client independently manages its own server connection
const dbTools = await dbClient.listTools();
const fsTools = await fsClient.listTools();
Case 3: Confusing Server Capabilities with Client Capabilities
The MCP spec defines capabilities for both sides of the connection. Server capabilities (tools, resources, prompts, logging, completions) are advertised by the server during the handshake. Client capabilities (sampling, elicitation, roots) are advertised by the client. These are negotiated in both directions. A common mistake is expecting the client to have tools, or the server to do sampling.
// During connection, both sides declare what they support:
const client = new Client(
  { name: 'my-host', version: '1.0.0' },
  {
    capabilities: {
      sampling: {},     // Client tells server: "I can handle sampling requests from you"
      roots: { listChanged: true }, // Client can provide root boundaries
    },
  }
);

// The server then declares its own capabilities:
const server = new McpServer({
  name: 'my-server',
  version: '1.0.0',
  // capabilities are inferred from what you register (tools, resources, prompts)
});
Multi-Server Host Architecture
In production, a host typically manages several server connections. Here is the pattern for a host that aggregates tools from multiple servers:
import { Client } from '@modelcontextprotocol/sdk/client/index.js';
import { StdioClientTransport } from '@modelcontextprotocol/sdk/client/stdio.js';

async function createHostClient(name, command, args) {
  const client = new Client(
    { name: `host-${name}`, version: '1.0.0' },
    { capabilities: {} }
  );
  const transport = new StdioClientTransport({ command, args });
  await client.connect(transport);
  return client;
}

// Create one client per server
const clients = {
  database: await createHostClient('database', 'node', ['servers/db-server.js']),
  filesystem: await createHostClient('filesystem', 'node', ['servers/fs-server.js']),
  calendar: await createHostClient('calendar', 'node', ['servers/calendar-server.js']),
};

// Aggregate all tools for the LLM
const allTools = [];
for (const [name, client] of Object.entries(clients)) {
  const { tools } = await client.listTools();
  allTools.push(...tools.map(t => ({ ...t, _server: name })));
}

console.log(`Total tools available: ${allTools.length}`);
// When the LLM decides to call a tool, you route it to the correct client
// based on the _server tag (or by name convention).
Map your existing AI integrations to the three roles – for any LLM feature you currently maintain, ask: what is the host, what are the servers, where are the clients? This makes the MCP fit (or gap) immediately visible.
Install the MCP SDK – run npm install @modelcontextprotocol/sdk zod in a scratch project. The SDK is the only dependency you need to build your first server (next lesson).
Note the security boundary – in any architecture where you have a host managing multiple clients, think carefully about what each server is allowed to do. The host is the security boundary; it should not grant servers more access than they need.
In 2023, every LLM integration was bespoke. You wrote a plugin for Claude, rewrote it for GPT-4, rewrote it again for the next model, and maintained three diverging codebases that did the same thing. This was fine when AI was a toy. It becomes genuinely untenable when AI is infrastructure. The Model Context Protocol is the answer to that problem – and it arrived at exactly the right time.
Before MCP: N models × M tools = N×M custom integrations. After MCP: N models + M tools = N+M standard implementations.
The Problem MCP Solves
To understand why MCP matters, you need to feel the pain it eliminates. Before MCP, connecting an LLM to an external capability – a database, an API, a file system, a calendar – required you to build a full custom integration for every model-tool combination. If you had three AI models and ten tools, you had thirty integrations to build and maintain. Each one spoke a slightly different language. Each one had different error handling. Each one had different security assumptions.
This is the classic N×M problem. Every new model you add multiplies the integration work by the number of tools you have. Every new tool you add multiplies the work by the number of models. The growth is combinatorial, and combinatorial problems kill engineering teams.
MCP collapses this to N+M. Each model speaks MCP once. Each tool speaks MCP once. They all interoperate. This is exactly what HTTP did for the web, what USB did for peripherals, what LSP (Language Server Protocol) did for programming language tooling. It is a standardisation play, and standardisation plays that work become infrastructure.
“MCP takes some inspiration from the Language Server Protocol, which standardizes how to add support for programming languages across a whole ecosystem of development tools. In a similar way, MCP standardizes how to integrate additional context and tools into the ecosystem of AI applications.” – Model Context Protocol Specification
The LSP analogy is the right one. Before LSP, every code editor had to implement autocomplete, go-to-definition, and rename-symbol for every programming language. After LSP, language implementors write one language server, and every LSP-compatible editor gets the features for free. MCP does the same for AI context. You write one MCP server for your Postgres database, and every MCP-compatible LLM client can use it.
What MCP Actually Is
MCP is an open protocol published by Anthropic in late 2024 and now maintained as a community standard. It defines a structured way for AI applications to request context and capabilities from external servers, using JSON-RPC 2.0 as the wire format. The protocol specifies three kinds of things that servers can expose:
Tools – functions the AI model can call, with a defined input schema and a return value. Think of these as the actions the AI can take: “search the database”, “send an email”, “read a file”.
Resources – data the AI (or the user) can read, addressed by URI. Think of these as the documents and data the AI has access to: “the current user’s profile”, “the contents of this file”, “the current weather”.
Prompts – reusable prompt templates that applications can surface to users. Think of these as saved queries or workflows: “summarise this document”, “review this code for security issues”.
Beyond what servers expose, the protocol also defines what clients can offer back to servers:
Sampling – the ability for a server to request an LLM inference from the client, enabling recursive agent loops where the server needs to “think” about something before responding.
Elicitation – the ability for a server to ask the user a structured question through the client, collecting input it needs to complete a task.
Roots – the ability for a server to query what filesystem or URI boundaries it is allowed to operate within.
The six primitives of MCP: three server-side (tools, resources, prompts) and three client-side (sampling, elicitation, roots).
The Three-Role Architecture
MCP defines three distinct roles in every interaction. Understanding these clearly is essential – confusing them is the most common mistake beginners make when reading the spec.
The Host is the AI application the user is running – Claude Desktop, a VS Code extension, your custom chat interface, Cursor. The host is the entry point for users. It creates and manages one or more MCP clients. It controls what the user sees and decides which servers to connect to.
The Client lives inside the host. Each client maintains exactly one connection to one MCP server. It is the connector, the protocol layer, the thing that speaks JSON-RPC to the server on behalf of the host. When you build an AI chat application, you typically build a client (or use the SDK’s built-in client) that connects to whatever servers your application needs.
The Server is the external capability provider. It could be a local process (a stdio server running on the same machine), a remote HTTP service (a company’s internal API wrapped in MCP), or anything in between. The server exposes tools, resources, and prompts, and it responds to requests from clients.
The key insight: the model itself is not a named role in MCP. The model lives inside the host, and the host decides when to invoke tools based on model output. MCP is not a protocol between the user and the model; it is a protocol between the AI application (host) and capability providers (servers). The model benefits from MCP, but the model does not participate in the protocol directly.
Case 1: Confusing the Client and the Server
A very common confusion when starting with MCP is thinking that the “client” is the end-user’s chat application and the “server” is the LLM API. This is wrong. In MCP terminology:
// WRONG mental model:
// User -> [MCP Client = chat app] -> [MCP Server = OpenAI/Claude API]

// CORRECT mental model:
// User -> [Host = chat app]
//   Host manages -> [MCP Client]
//     MCP Client connects to -> [MCP Server = your tool/data provider]
// Host also calls -> [LLM API = OpenAI/Claude/Gemini, separate from MCP]
The LLM API (OpenAI, Anthropic, Gemini) is not an MCP server. It is what the host uses to process messages. MCP servers are the external capability providers – your database wrapper, your file system access layer, your Slack integration. Keep these two separate and the architecture becomes clear immediately.
Case 2: Thinking MCP Is Only for Claude
Because Anthropic published MCP and Claude Desktop was the first host to support it, many people assume MCP is an Anthropic-specific protocol. It is not. The spec is open. The TypeScript and Python SDKs are MIT-licensed. OpenAI’s Agents SDK supports MCP servers. Google’s Gemini models can be used in MCP hosts. The whole point is interoperability across the ecosystem.
// MCP works with all three major providers:
import OpenAI from 'openai';
import Anthropic from '@anthropic-ai/sdk';
import { GoogleGenerativeAI } from '@google/generative-ai';

// All three can be used as the LLM inside an MCP host.
// The MCP server does not know or care which LLM is calling it.
// It just responds to JSON-RPC requests.
This provider-agnosticism is a feature, not an accident. A well-designed MCP server should work with any compliant host, regardless of which LLM that host uses internally.
Why Now: The Timing of MCP
MCP arrived at exactly the right moment for several reasons that compound:
LLMs are becoming infrastructure. In 2022, LLMs were demos. In 2025-2026, they are production systems at scale. When something becomes infrastructure, the lack of standards becomes genuinely painful. Nobody would tolerate every web server speaking its own custom HTTP dialect. The AI ecosystem was approaching that point of pain when MCP appeared.
Tool calling matured. OpenAI added function calling in 2023. Anthropic added tool use. Google added function declarations. By 2024, every major model supported some form of structured tool invocation. The machinery was there. MCP provided the standard format on top of it.
Agentic AI needed an architecture. Simple chatbots don’t need MCP. A model answering questions from a fixed system prompt doesn’t need MCP. But agentic AI – systems where the model takes actions, uses tools, reads documents, and operates over extended sessions – absolutely needs a structured way to manage capabilities. MCP is that structure.
“MCP provides a standardized way for applications to: build composable integrations and workflows, expose tools and capabilities to AI systems, share contextual information with language models.” – MCP Specification, Overview
MCP vs. Direct Tool Calling: When Each Applies
MCP is not a replacement for all tool calling patterns. It is an architecture for systems of tools, not a required wrapper for every single function call. Understanding when to use MCP and when plain tool calling is enough will save you from over-engineering.
Use direct tool calling (without MCP) when you have a single LLM application with a small, fixed set of tools that never change, never get shared across multiple applications, and have no external deployment concerns. A simple chatbot with three custom tools is not a candidate for MCP.
Use MCP when any of the following apply:
Multiple LLM applications (or multiple LLM providers) need access to the same tools or data
Tools are developed and maintained by different teams from the host application
You want to compose capabilities from third-party MCP servers without writing custom integrations
You need to deploy tool servers independently of the host application (different release cycles, different teams, different scaling requirements)
Security isolation is required between the AI application and the tool execution environment
The MCP ecosystem: multiple hosts (Claude Desktop, VS Code, custom apps) connecting freely to multiple servers (databases, APIs, file systems).
What to Check Right Now
Verify your Node.js version – run node --version. This course requires 22+. Upgrade via nvm install 22 && nvm use 22 if needed.
Read the spec overview – spend 10 minutes on modelcontextprotocol.io/specification. The Overview and Security sections are the most important ones at this stage.
Install the MCP Inspector – run npx @modelcontextprotocol/inspector to get the official GUI for testing MCP servers. You’ll use it constantly from Lesson 5 onwards.
Get your LLM API keys ready – you won’t need them until Part IV, but creating the accounts now avoids waiting when you get there: OpenAI, Anthropic, Google AI Studio.
Every few years, something happens in computing that quietly reshapes everything around it. The UNIX pipe. HTTP. REST. The transformer architecture. And now, in 2026, the Model Context Protocol. If you build software and you haven’t internalised MCP yet, this is your moment. This course will fix that – thoroughly.
The MCP ecosystem: hosts, clients, and servers unified under a single open protocol.
What This Course Is
This is a full university-grade course on the Model Context Protocol – the open standard, published by Anthropic and now maintained by a broad coalition, that lets AI models talk to tools, data sources, and services in a structured, secure, and interoperable way. Think of it as HTTP for AI context: before HTTP, every web server spoke its own dialect; after HTTP, the whole web could talk to each other. MCP does the same thing for the agentic AI layer.
The course runs 53 lessons across 12 Parts, from zero to enterprise. Part I gives you the mental model and the first working server in under an hour. Part XII has you building a full production MCP platform with a registry, an API gateway, and multi-agent orchestration. Everything in between is ordered by dependency – no lesson assumes knowledge that hasn’t been covered yet.
“MCP provides a standardized way for applications to: build composable integrations and workflows, expose tools and capabilities to AI systems, share contextual information with language models.” – Model Context Protocol Specification, Anthropic
All code is in plain Node.js 22 ESM – no TypeScript, no compilation step, no tsconfig to wrestle with. You run node server.js and it works. The point is to teach MCP, not the type system. Where types genuinely help (complex tool schema shapes), JSDoc hints appear inline. Everywhere else, the code is clean signal.
Who This Is For
The course was designed for two audiences who need the same rigour but come at it differently:
University students – third or fourth year CS, AI, or software engineering. You know how to write async JavaScript. You’ve used an LLM API. You want to understand the architecture that makes production agentic systems work, not just the vibes.
Professional engineers and architects – you’re building AI-powered products or evaluating MCP for your organisation. You need the protocol internals, the security model, the enterprise deployment patterns, and a clear comparison of how OpenAI, Anthropic Claude, and Google Gemini each implement the standard differently.
If you’re a beginner to programming, start with the Node.js fundamentals first. If you’re already shipping LLM features to production, you can start from Part IV (provider integrations) and backfill the protocol theory as needed.
Twelve parts. Fifty-three lessons. Ordered strictly by dependency.
The Technology Stack
Every lesson uses the same stack throughout, so you never lose time context-switching:
Runtime: Node.js 22+ with native ESM ("type": "module")
MCP SDK:@modelcontextprotocol/sdk v1 stable (v2 features noted as they ship)
Schema validation:zod v4 for tool input schemas
HTTP transport:@modelcontextprotocol/express or Hono adapter
OpenAI:openai latest – tool calling with GPT-4o and o3
Anthropic:@anthropic-ai/sdk latest – Claude 3.5/3.7 Sonnet
Gemini:@google/generative-ai latest – Gemini 2.0 Flash and 2.5 Pro
Native Node.js extras:--env-file for secrets, node:test for tests
No framework lock-in beyond the MCP SDK itself. All HTTP adapter code works with plain Node.js http if you prefer – the adapter packages are convenience wrappers, not requirements.
Course Curriculum
Fifty-three lessons across twelve parts. Links will go live as each lesson publishes.
The complete stack: Node.js 22 ESM, the MCP SDK, Zod schemas, and all three major LLM providers.
How the Lessons Are Written
Each lesson is designed to be self-contained and longer than comfortable. The goal is that a reader who sits down with the article and a terminal open will finish knowing how to do the thing, not just knowing that the thing exists. That means:
Named failure cases – every lesson covers what goes wrong, specifically, with the exact code that triggers it and the exact fix. Learning from bad examples sticks better than learning from good ones.
Official source quotes – every lesson cites the MCP specification, SDK documentation, or relevant RFC directly. The wording is exact, not paraphrased. The link goes to the actual source document.
Working code – every code block runs. It is tested against the actual SDK version noted at the top of the lesson. Nothing is pseudo-code unless explicitly labelled.
Balance – where a technique has valid alternatives, the lesson says so. A reader should leave knowing when to use the thing taught, and when not to.
“The key words MUST, MUST NOT, REQUIRED, SHALL, SHALL NOT, SHOULD, SHOULD NOT, RECOMMENDED, NOT RECOMMENDED, MAY, and OPTIONAL in this document are to be interpreted as described in BCP 14 when, and only when, they appear in all capitals.” – MCP Specification, Protocol Conventions
The course is sourced from over 77 videos across six major MCP playlists from channels including theailanguage, Microsoft Developer, and CampusX – then substantially expanded with code, official spec references, and architectural analysis that the videos don’t cover. The videos are the floor, not the ceiling.
What to Check Right Now
Verify Node.js 22+ – run node --version. If you’re below 22, install via nodejs.org or nvm install 22.
Install yt-dlp (optional, for running the research tooling) – brew install yt-dlp or pip install yt-dlp.
Get API keys before Part IV – OpenAI, Anthropic, and Google AI Studio keys. Store them in .env files, never in code.