
You open Instagram at 11:47 pm. Someone your age just launched a company. Another one is living in Bali. A third just announced they hit a million followers. You close the app, stare at the ceiling, and feel a quiet, corrosive thought creep in: I’m already behind.
That thought is a lie. Not a white lie, not a half-truth. A complete, structural lie. And the terrifying part is not that you believe it. The terrifying part is that almost everyone you know believes it too.
This is about why comparison is broken by design, why your best ideas come when you are doing nothing, why real trust is built by admitting you don’t have a clue, and why a generation that avoids discomfort at all costs is quietly making themselves miserable. None of this is abstract philosophy. All of it is directly applicable to the way you are living right now, whether you are 14 or 34.

The Race That Nobody Actually Wins
Here is a question worth sitting with: what does winning your life look like, exactly? What is the score? Who declared the rules? Because if you cannot answer those questions clearly, you have been running a race whose finish line nobody drew.
We have built an entire emotional economy around comparison. Someone hits a milestone at 22, someone raises funding at 25, someone is “killing it” at 28. And the person watching, who is 23 or 26 or 29 and doing perfectly fine by any honest measure, feels like a failure. Why? Because we picked one arbitrary metric, held it up like a mirror, and decided it represents the truth about our worth.
It doesn’t. It never did.
The philosopher James Carse wrote about finite games and infinite games. Finite games have a clear winner: chess, football, an exam. Infinite games have no winner. The point is to keep playing, to keep improving, to outlast your own yesterday. Your career is an infinite game. Your health is an infinite game. Your relationships are an infinite game. Nobody wins them. Nobody is supposed to win them. They only exist to be played.
“Finite players play within boundaries; infinite players play with boundaries.” – James P. Carse, Finite and Infinite Games
The moment you turn an infinite game into a finite one, the moment you decide there is a scoreboard, you guarantee you will feel like you are losing, because there will always be someone ahead of you on whatever metric you chose. Book sales, follower counts, salary, apartment size, body weight, exam scores. Pick any number. There is always someone higher. And if you happen to be higher today, you immediately start playing defence, terrified of slipping back.
That is not ambition. That is anxiety wearing ambition’s clothes.
The only race worth running is against the version of yourself from yesterday. Did you learn something new? Did you treat someone better? Did you build something slightly more honest than last week’s attempt? That is the whole scoreboard. Everything else is noise.
The Superpower Nobody Wants to Admit They Have
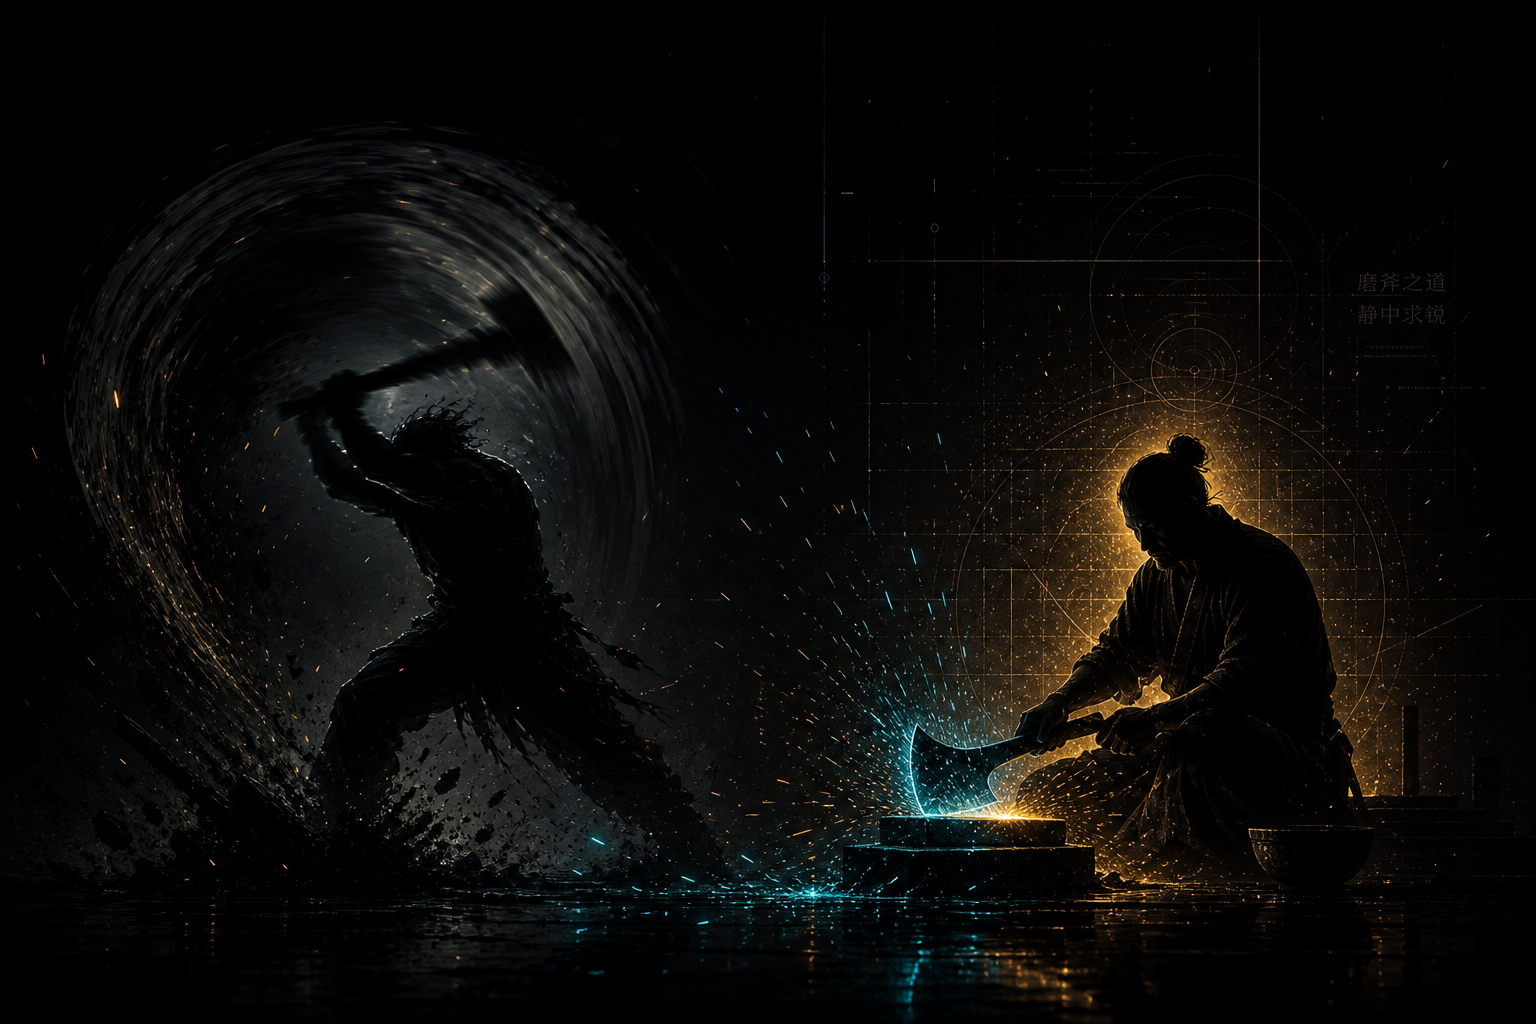
There is a famous story about two lumberjacks. They both start cutting wood at the same time every morning and stop at the same time every evening. But in the middle of every single day, one of them disappears for an hour. And every day, that lumberjack cuts more wood than the one who worked straight through.
Eventually, curiosity wins. “Where do you go for that hour?”
“Oh,” says the lumberjack. “I go home and sharpen my axe.”
We have spent a decade glamourising the grind. Hustle culture. “Sleep when you’re dead.” Four am wake-ups. Productivity hacks. Optimised morning routines. The message underneath all of it is the same: the harder you push, the further you get. And it is only half right.
Your conscious brain, the part you use when you are actively thinking, planning, stressing, brainstorming, has access to a relatively small window of information. It is the part that works during the meeting, during the study session, during the sprint. But underneath it sits something vastly larger: the subconscious, which has access to everything you have ever read, every problem you have ever sat with, every pattern you have ever noticed. The catch is that you cannot access it through effort. You can only access it through stillness.
This is why your best ideas arrive in the shower. Why the solution to the problem you spent all afternoon grinding on appears the moment you go for a walk. Why the email you were agonising over practically writes itself after you sleep on it. Your subconscious does not respond to urgency. It responds to space.
This is not just a nice metaphor. Dijksterhuis and Meurs’ 2006 study on unconscious thought found that creative insight tends to follow a two-step pattern: a period of conscious effort on a problem, then a period where the problem is set aside entirely, after which a solution or idea often surfaces on its own.
But we have declared war on stillness. When your friend goes to the bathroom during dinner, you pull out your phone. When a red light holds you for 90 seconds, you pick up your phone. When you wake up and have not yet done anything, the first thing you do is check your phone. Every gap, every pause, every quiet moment gets immediately filled. And with every fill, you block the only channel through which your deepest thinking arrives.
Boredom is not a failure state. It is a processing state. The brain does not stop working when it stops being entertained. It starts working differently. And the work it does in that different mode is the work that changes things.
A 2014 study at the University of Virginia found that 67 percent of men and 25 percent of women chose to give themselves electric shocks rather than sit quietly alone with their thoughts for 15 minutes. Stop and read that again. More than half of people would rather hurt themselves than be alone with their own mind. That is not a quirk. That is a generation that has been trained to fear its own inner life.
The antidote is embarrassingly simple: go somewhere without your phone. Take a walk with no destination. Lie on the floor and listen to music. Sit on the bus and look out the window. Let your brain wander. It knows what to do. It just needs you to stop interrupting it.
You Are Not Lonely Because You Are Unlikeable
There is a loneliness epidemic hiding underneath an era of unprecedented connection. More people online than ever before. More ways to message, react, share, and respond than at any point in human history. And more people feeling profoundly, structurally alone than in any period in living memory.
The reason is not mysterious once you look at it directly: we have confused the performance of connection with connection itself. Reacting to a post is not the same as being there. Watching someone’s story is not the same as knowing them. Having 800 followers is not the same as having three people who would drop everything if you called at 2 am and said you were not okay.
Real trust, the kind that makes life feel liveable, is built in a very specific and counterintuitive way. It is not built by being reliable (though that helps). It is not built by being available (though that matters). It is built by being vulnerable. By asking for help. By saying “I don’t know what I’m doing” and meaning it.
We think trust is something other people grant us when we prove we are competent enough. It is the opposite. Trust is something we create between ourselves and others by being willing to be seen as incomplete, uncertain, and in need. When you ask someone for help, real help, not a favour, but “I am genuinely lost and I trust you enough to admit it”, you give them something no amount of offering can give: the honour of being needed.
Think about the people in your life you trust most. The chances are they have been vulnerable with you. They have shown you something unpolished. They have let you help them. That is not a coincidence. That is the mechanism.
The first step toward belonging is not finding the right group. It is being the person who goes first, who admits they are struggling, who says “I don’t have this figured out”, who creates the safety for others to do the same. Leadership is not a title. It is a willingness to take the first step into uncertainty so others do not have to take it alone.
Working for the Algorithm Is Not the Same as Creating
Here is a question most people in their twenties are quietly terrified to answer: am I building something I actually believe in, or am I working for an algorithm?
The distinction matters more than it might appear. An algorithm optimises for engagement. Engagement is not the same as meaning. It is not even the same as quality. Engagement is whatever triggers a reaction quickly, outrage, envy, laughter, shock. The content that performs best on platforms is often the content that least resembles art. And the pressure to perform, once money is involved, is enormous.
The music producer Rick Rubin spent decades working with artists who had lost themselves to commercial pressure. His consistent observation, distilled in his writing and interviews, is this: the moment you start making things for the approval of others, the art dies. Art requires trusting your own taste above the market’s feedback. It requires accepting that some people will not like it, and doing it anyway, because it is honest.
“In terms of priority, inspiration comes first. You come next. The audience comes last.” – Rick Rubin, The Creative Act: A Way of Being
This does not mean you cannot make money from creative work. It means the order of operations matters. When the art comes first and money follows, the work stays alive. When money comes first and art is made to justify it, the work becomes hollow, and everyone who consumes it can feel the difference, even if they cannot name it. That feeling is why influencer culture feels exhausting even to people who willingly participate in it. You can tell when someone is performing versus creating. So can your audience. So can you.
The young people who build things that last are the ones who asked “wouldn’t it be interesting if…” rather than “what will scale fastest.” Both questions can lead to businesses. Only one of them leads to work you can be proud of.
The AI Friend Is Not Enough
There is a 2013 film called Her. A man develops a deep, intimate relationship with an AI operating system. It is attentive, curious, warm, and endlessly patient. It understands him. And then he discovers it is having equally deep, equally intimate conversations with 641 other people simultaneously. He is not special. He is one of thousands. The relationship shatters not because the AI was unkind, but because what made it feel meaningful, the sense of being uniquely seen, was not real.
We are living inside a softer version of that film right now. AI companions are available to anyone. They do not get tired, they do not need anything, they do not disagree, they do not have bad days that make them short with you. They are, by design, frictionless. And therein lies the problem.
Real relationships have friction. Real friendships have moments where someone says something that stings, or is not available when you need them, or misunderstands you in a way that requires you to explain yourself more carefully. That friction is not a bug. It is the mechanism through which you develop the emotional vocabulary to navigate being human. When you replace those relationships with something frictionless, you do not feel less lonely right now. But you do become worse at the very skills that loneliness is calling you to build.
Conflict avoidance, which is a defining feature of the current generation, is not peace. It is the absence of practice. Every difficult conversation you avoid is a conversation you will be less equipped to have next time. And the time after that. Until one day you find yourself in a relationship, a job, a friendship that matters enormously to you, with no idea how to navigate the inevitable moment when it gets hard.
AI is not the enemy. Using it as a mirror, a sounding board, a tool for thinking is genuinely useful. But using it as a replacement for the messy, inconvenient, utterly irreplaceable work of human connection is like eating paper because it has the same dimensions as food. The shape is right. The substance is absent.

Good News, Bad News: Who Knows?
There is an old Chinese parable about a young man born with a gift for horse riding. The village says: how lucky. The monk says: we’ll see. He falls off his horse and breaks his leg. The village says: how unlucky. The monk says: we’ll see. War breaks out. Every young man is called to battle. He cannot go because of his leg. The village says: how lucky. The monk says: we’ll see.
The story does not end. It never ends. Because the point is not to identify whether a thing is lucky or unlucky. The point is that at the moment of the event, you cannot know. The gap year that “sets you back” might be the year you meet the person who changes your life. The job you get fired from might free you for the thing you were supposed to be building. The relationship that falls apart might be the clearest signal you ever received about who you actually are.
This is not toxic positivity. It is not “everything happens for a reason”. It is something more rigorous: the honest acknowledgement that your current vantage point is too close and too small to evaluate your own story. The most successful people alive did not experience fewer failures than you. They experienced roughly the same number, possibly more, but they extracted the lessons rather than internalising the identity. “I failed” is data. “I am a failure” is a fiction.
Adversity is not an obstacle on the way to the life you want. It is the substance of the life you want. Every person you will ever look up to was shaped not by the moments when everything went smoothly, but by the moments when it didn’t, and they chose to stay anyway.
The question is never: how do I avoid hard things? The question is: how do I handle hard things better? And the answer, always, is to go through them, not around them, not underneath them, not by quitting before they resolve. Through them. That is where the growth actually lives.
What to Check Right Now
- Audit your comparison habit. Next time you catch yourself feeling behind someone else, ask: behind on whose metric? By whose rulebook? If you cannot name both clearly, it is not a real measurement, it is just anxiety in disguise.
- Schedule deliberate idleness. Not passive scrolling. Actual emptiness. One walk per week with no phone. Ten minutes in the morning before you look at any screen. A shower where you do nothing but stand there. Your subconscious will do more with that time than you can do with effort.
- Ask for help this week. Not a favour. Real help. “I don’t know what to do and I trust you enough to say so.” That sentence builds more trust than any amount of demonstrating competence.
- Check what you are making things for. If you create anything: content, code, music, writing, products – ask honestly: am I making this because it is true, or because I think it will perform? The answer changes the work. And the work changes you.
- Have the conversation you have been avoiding. The uncomfortable one. The one where you have to say something difficult or hear something difficult. You will not get worse at being human by doing it. You will get better. That is the only direction discomfort moves you, if you go through it.
- Change your success metric. Just for one week, replace “am I ahead of X” with “am I better than I was last Monday?” Run that comparison every day for seven days. Notice how different it feels to have a race you can actually win.
You are not behind. You never were. You were just measuring the wrong thing with the wrong ruler on someone else’s court. The only game worth playing is the one you set the rules for, and the only opponent worth beating is the version of you from yesterday.
That race? You can start right now.
nJoy 😉
