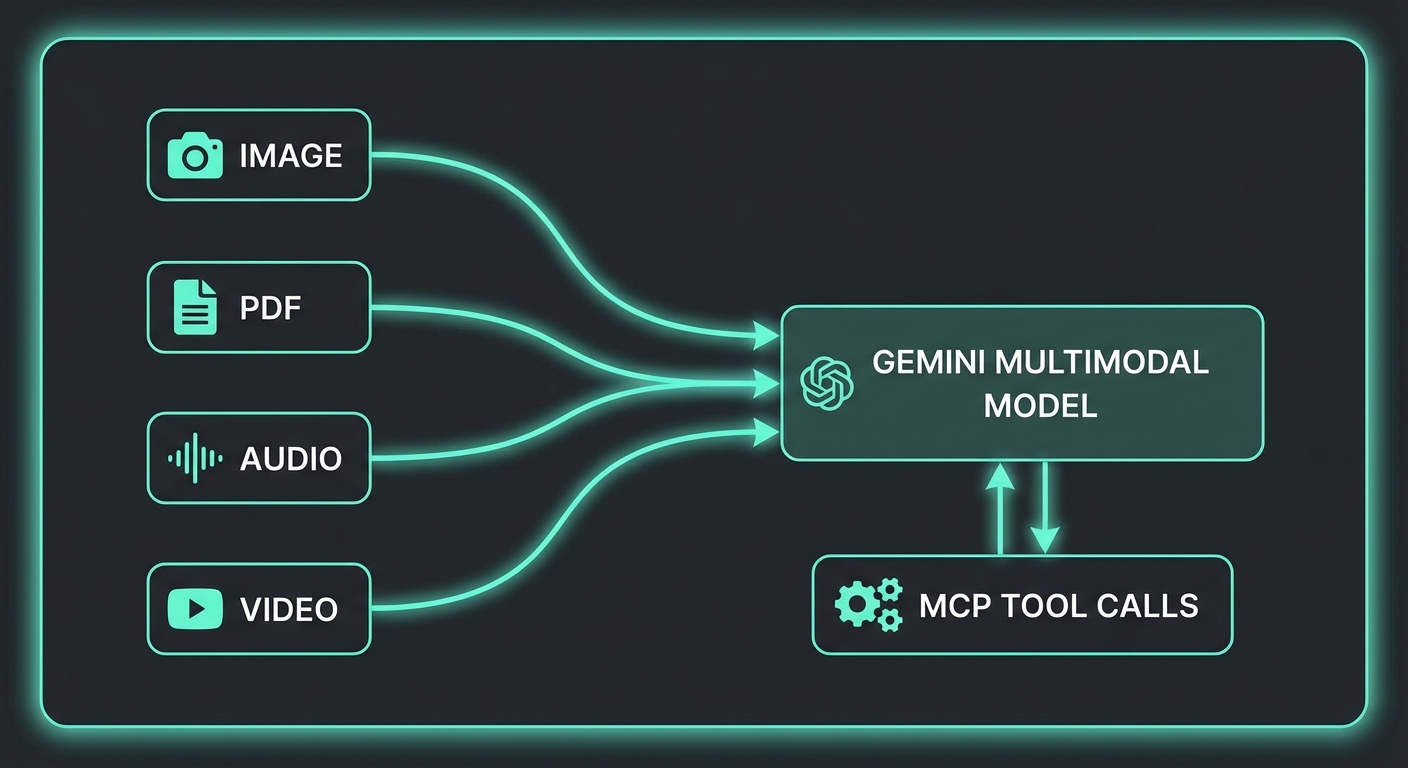
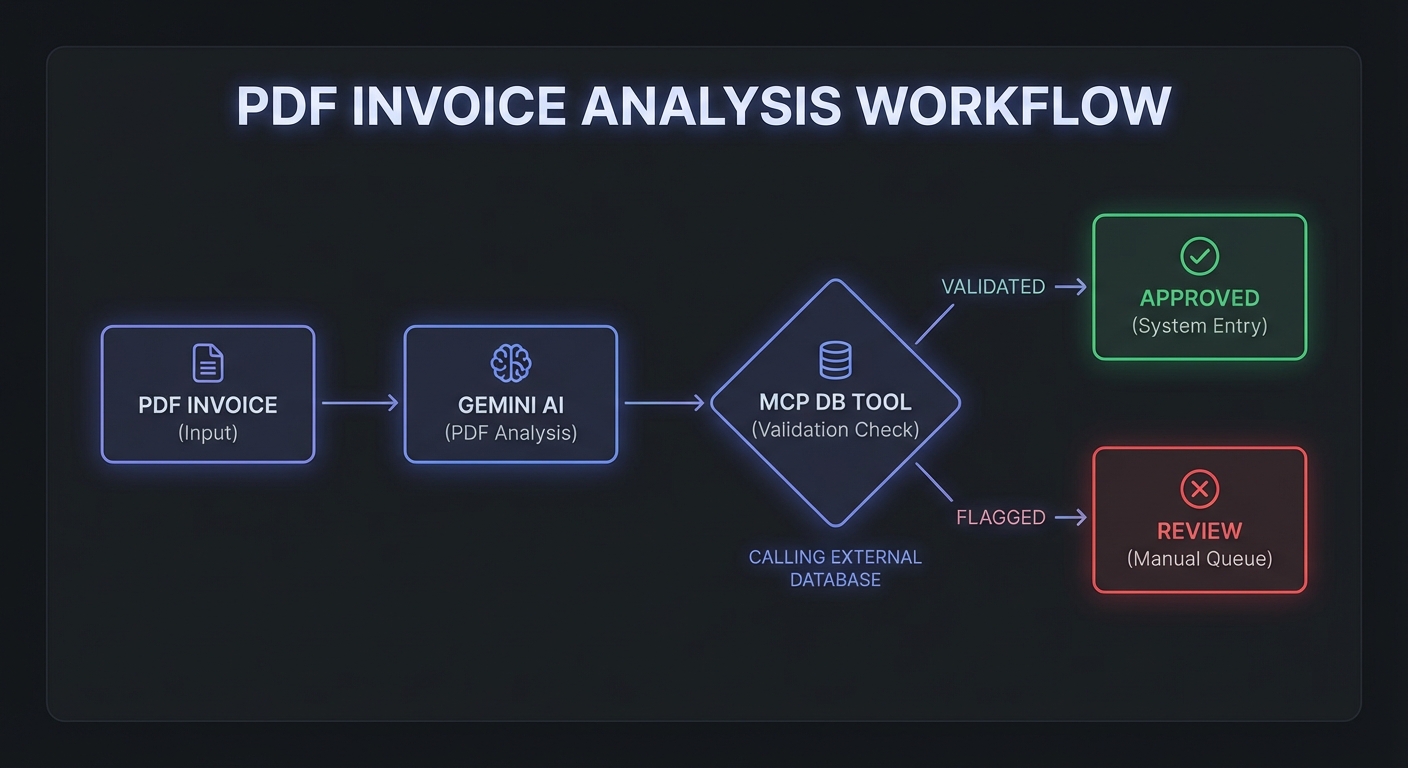
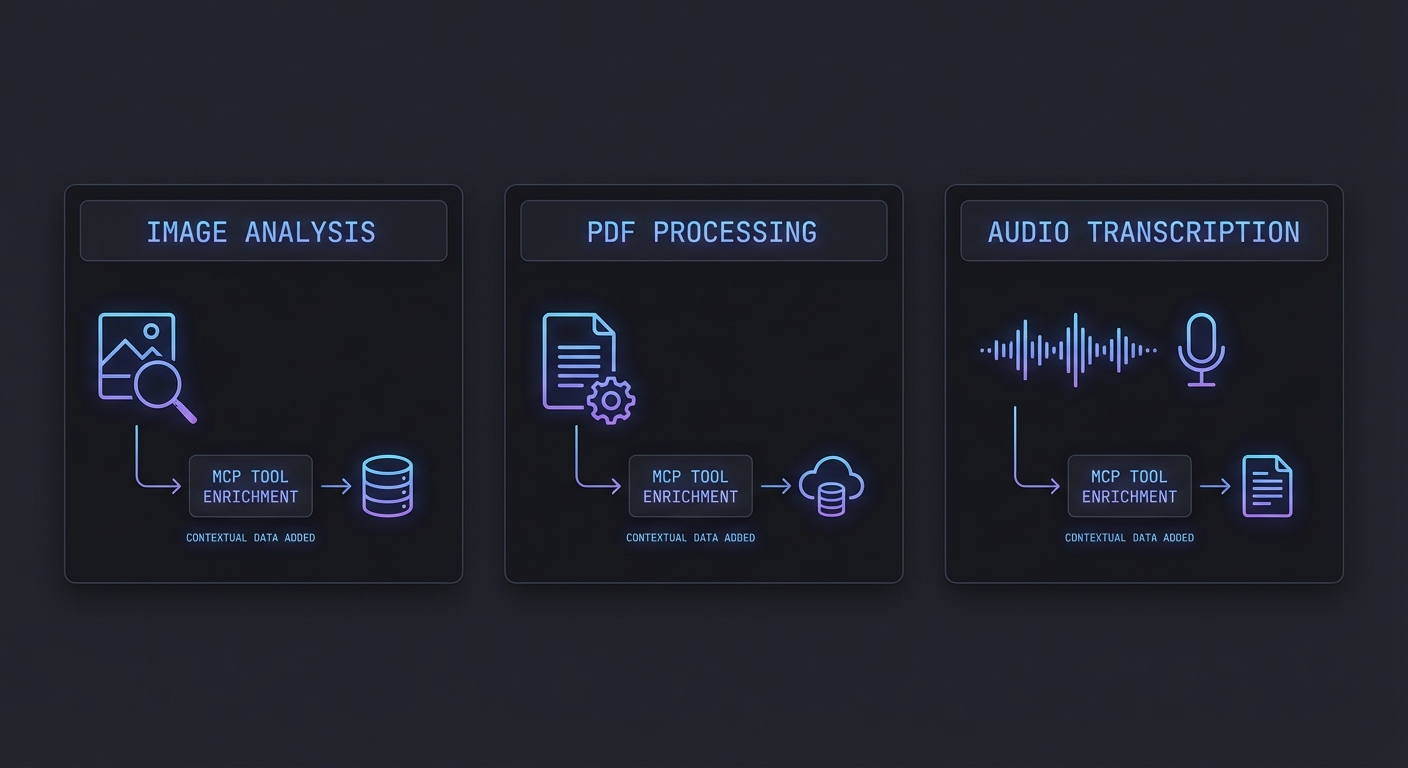
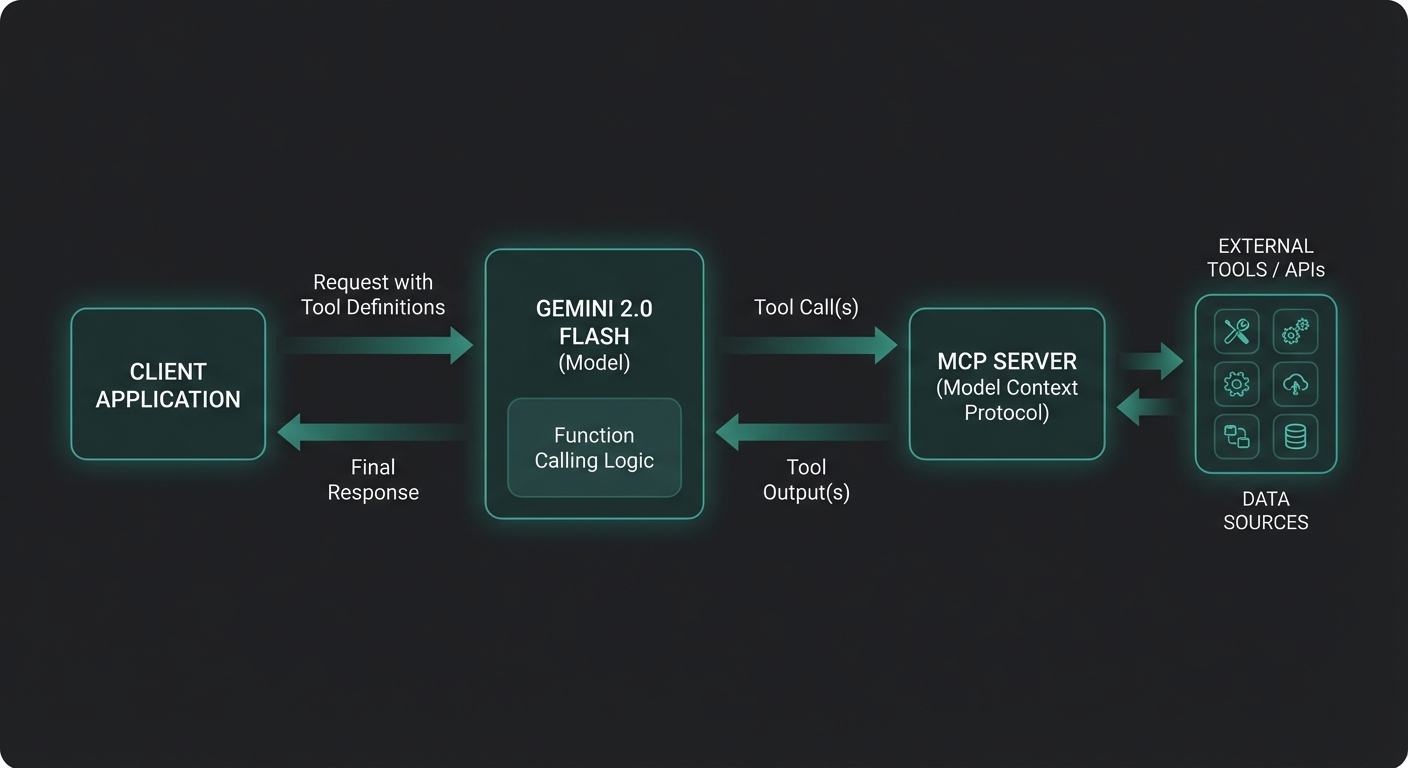
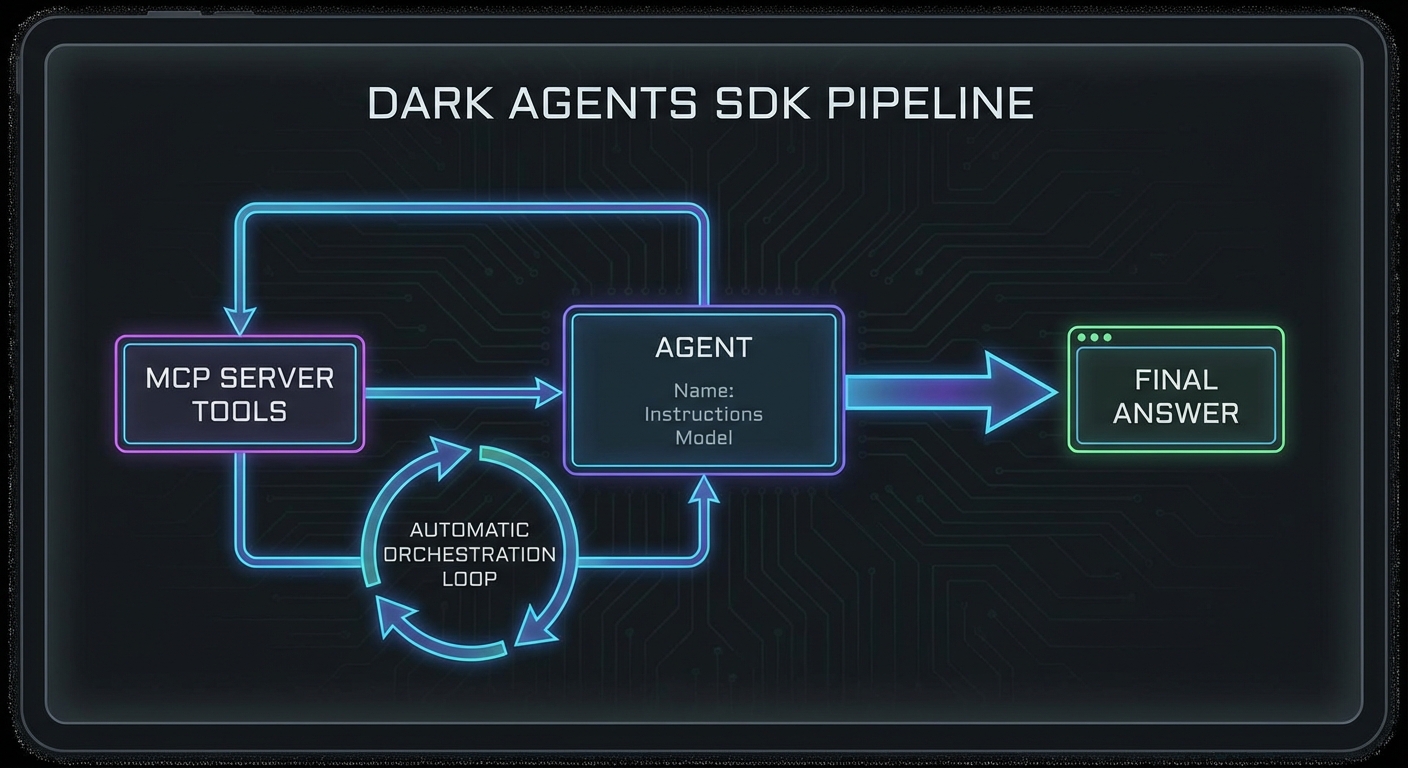
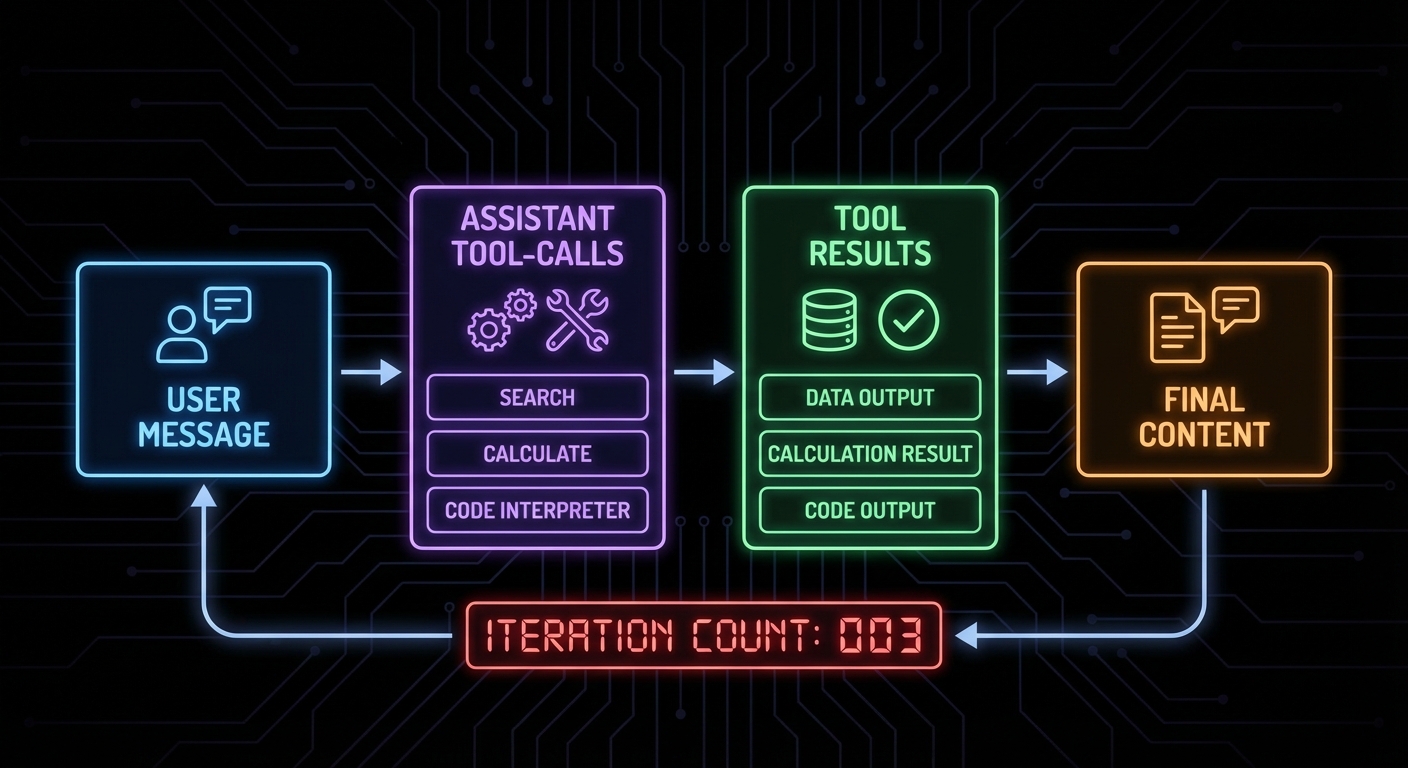
OpenAI released the Responses API and the Agents SDK as a unified approach to building agentic workflows. These are not just new API endpoints – they represent OpenAI’s opinionated view of how production agents should be structured. The Responses API replaces the Chat Completions API for agentic use cases. The Agents SDK wraps it with built-in MCP support, tool orchestration, and a pipeline abstraction that handles the looping automatically. This lesson shows you both layers and where MCP plugs in.
The Agents SDK wraps the Responses API with built-in MCP support and automatic tool orchestration.
The Responses API
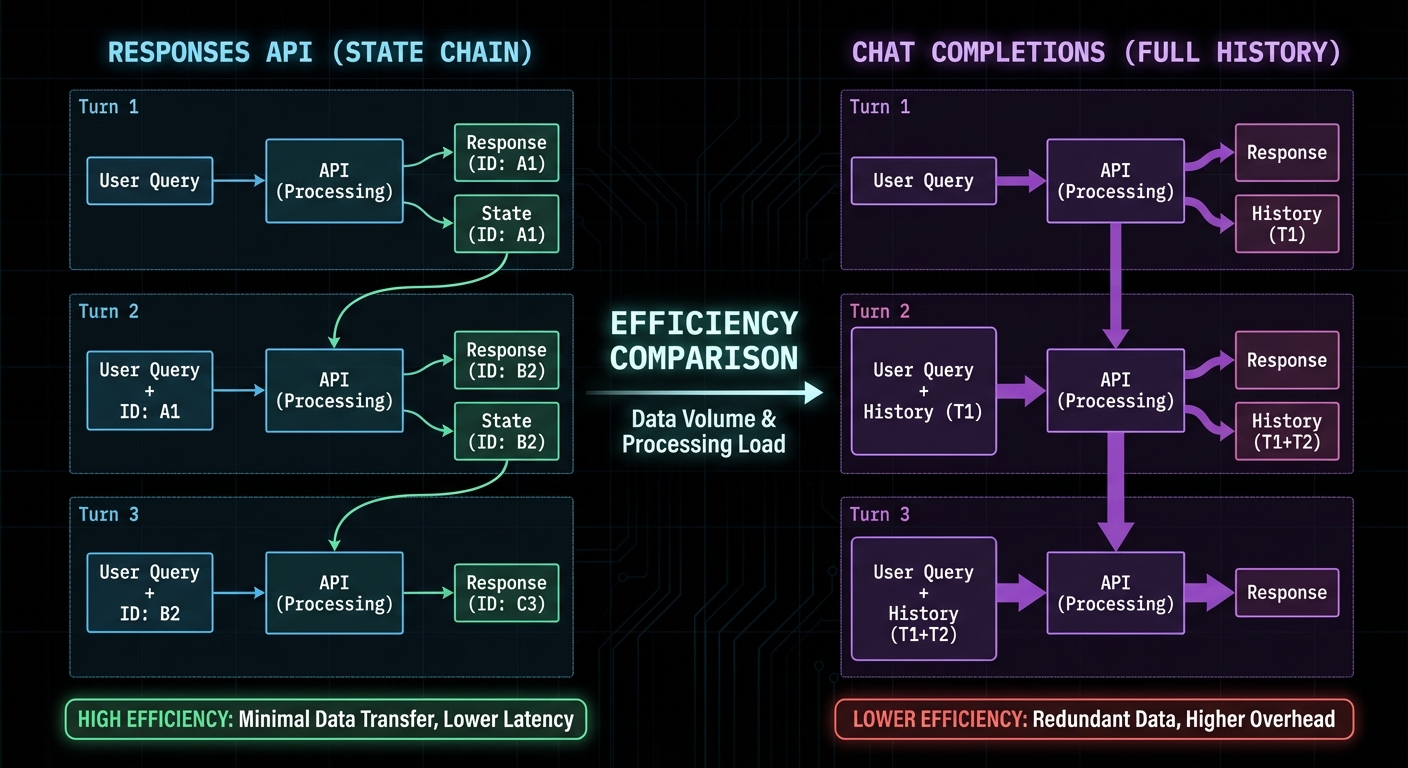
The Responses API (openai.responses.create()) is designed for stateful, multi-turn agentic sessions. Unlike Chat Completions which requires you to manage conversation history manually, the Responses API maintains state server-side via a response ID. You reference previous responses by ID, and the API handles context management including tool call history.
import OpenAI from 'openai';
const openai = new OpenAI({ apiKey: process.env.OPENAI_API_KEY });
// First turn - creates a new response
const response = await openai.responses.create({
model: 'gpt-4o',
input: 'Search for the best laptops under $1000',
tools: openAITools, // Same format as Chat Completions
});
const responseId = response.id; // Save this for continuations
// Continue the conversation using the response ID (no need to re-send history)
const followUp = await openai.responses.create({
model: 'gpt-4o',
input: 'Now filter to only Dell and Lenovo models',
previous_response_id: responseId, // References prior context
tools: openAITools,
});
“The Responses API is designed specifically for agentic workflows. It maintains conversation state server-side, supports native tool execution, and provides a unified interface for building multi-step AI tasks.” – OpenAI API Reference, Responses
The Agents SDK with MCP
The OpenAI Agents SDK (@openai/agents) provides a higher-level abstraction with native MCP support. Instead of writing the tool calling loop yourself, the SDK handles it automatically. You define an agent with tools and an instruction, and the SDK orchestrates the full pipeline.
import { Agent, run, MCPServerStdio } from '@openai/agents';
// Connect to your MCP server via the SDK's native MCP support
const mcpServer = new MCPServerStdio({
name: 'my-tools',
fullCommand: 'node ./my-mcp-server.js',
});
await mcpServer.connect();
// Create an agent with the MCP server's tools
const agent = new Agent({
name: 'Research Assistant',
instructions: `You are a research assistant with access to product search and comparison tools.
Always search for at least 3 options before recommending.
Format your final recommendation as a clear list with prices.`,
tools: await mcpServer.listTools(),
model: 'gpt-4o',
});
// Run the agent - the SDK handles the tool calling loop
const result = await run(agent, 'Find the best wireless headphones under $200');
console.log('Final answer:', result.finalOutput);
// Clean up
await mcpServer.close();
The Agents SDK pipeline: define agent + tools, run with input, SDK handles orchestration automatically.
Handoffs: Multi-Agent Patterns with the SDK
import { Agent, run, handoff } from '@openai/agents';
const searchAgent = new Agent({
name: 'Search Specialist',
instructions: 'You specialise in searching and retrieving product data.',
tools: searchMcpTools,
model: 'gpt-4o-mini', // Cheaper model for search
});
const analysisAgent = new Agent({
name: 'Analysis Specialist',
instructions: 'You specialise in comparing and recommending products based on data.',
tools: analysisMcpTools,
model: 'gpt-4o', // Smarter model for complex reasoning
handoffs: [handoff(searchAgent, 'Use search specialist when you need more data')],
});
const result = await run(analysisAgent, 'Compare the top 5 gaming laptops');
console.log(result.finalOutput);
Failure Modes with the Responses API and Agents SDK
Case 1: Not Handling Tool Call Errors in the Responses API
// The Responses API may return partial results if a tool fails
// Always check response.status and handle incomplete states
const response = await openai.responses.create({ ... });
if (response.status === 'incomplete') {
console.error('Response incomplete:', response.incomplete_details);
// Handle: retry, use partial output, or escalate
}
Case 2: State Leakage Between Responses API Sessions
// previous_response_id links responses in a chain
// If you reuse an ID from a different user's session, state leaks
// Always scope response IDs to the authenticated user's session store
const userSession = sessions.get(userId);
const response = await openai.responses.create({
previous_response_id: userSession.lastResponseId || undefined,
...
});
userSession.lastResponseId = response.id;
What to Check Right Now
Try the Agents SDK first – if you are building a new agent, start with the Agents SDK. The automatic tool loop saves significant boilerplate.
Use the Responses API for long sessions – for multi-turn conversations with many tool calls, the Responses API’s server-side state management avoids sending large context windows repeatedly.
Test handoff behaviour – if using multi-agent handoffs, test the edge case where the receiving agent decides it does not need to hand off again and loops back incorrectly.
Check the Agents SDK version – the SDK is actively developed. Pin the version in package.json and read the changelog when upgrading: npm install @openai/agents.
Tool calling with a single round-trip response is the entry point. But production MCP applications need streaming – the ability to show intermediate results to users as the model thinks – and structured outputs, which guarantee that the model’s final answer conforms to a schema you define. This lesson adds both to your OpenAI + MCP integration, covering the streaming tool call parsing mechanics and the structured output patterns that prevent hallucinated schemas in production.
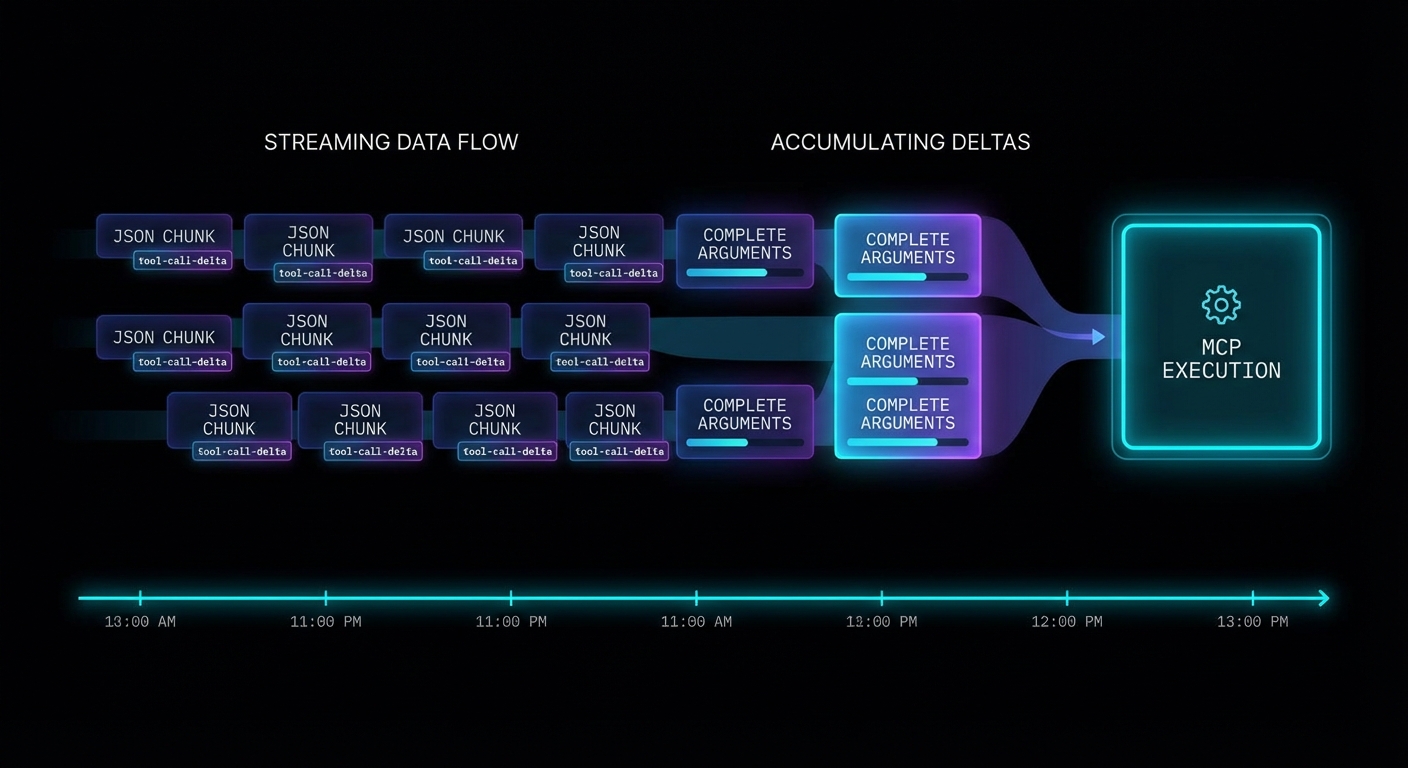
When you stream a completion that includes tool calls, the tool call arguments arrive incrementally as delta chunks. You must accumulate them before you can parse and execute the tool. The pattern is: buffer all deltas, detect when a tool call is complete, then execute through MCP.
import OpenAI from 'openai';
import { Client } from '@modelcontextprotocol/sdk/client/index.js';
import { StdioClientTransport } from '@modelcontextprotocol/sdk/client/stdio.js';
const openai = new OpenAI({ apiKey: process.env.OPENAI_API_KEY });
const mcpClient = new Client({ name: 'streaming-host', version: '1.0.0' }, { capabilities: {} });
await mcpClient.connect(new StdioClientTransport({ command: 'node', args: ['server.js'] }));
const { tools: mcpTools } = await mcpClient.listTools();
const openAITools = mcpTools.map(t => ({
type: 'function',
function: { name: t.name, description: t.description, parameters: t.inputSchema },
}));
async function runStreamingWithTools(userMessage) {
const messages = [{ role: 'user', content: userMessage }];
while (true) {
// Stream the completion
const stream = await openai.chat.completions.create({
model: 'gpt-4o',
messages,
tools: openAITools,
stream: true,
});
// Accumulate the full response
let assistantMessage = { role: 'assistant', content: '', tool_calls: [] };
const toolCallMap = {}; // index -> accumulated tool call
for await (const chunk of stream) {
const delta = chunk.choices[0]?.delta;
if (!delta) continue;
// Stream text content to UI
if (delta.content) {
assistantMessage.content += delta.content;
process.stdout.write(delta.content); // Real-time output
}
// Accumulate tool call deltas
if (delta.tool_calls) {
for (const tcDelta of delta.tool_calls) {
const idx = tcDelta.index;
if (!toolCallMap[idx]) {
toolCallMap[idx] = { id: '', type: 'function', function: { name: '', arguments: '' } };
}
const tc = toolCallMap[idx];
if (tcDelta.id) tc.id += tcDelta.id;
if (tcDelta.function?.name) tc.function.name += tcDelta.function.name;
if (tcDelta.function?.arguments) tc.function.arguments += tcDelta.function.arguments;
}
}
}
assistantMessage.tool_calls = Object.values(toolCallMap);
messages.push(assistantMessage);
// No tool calls = we have the final answer
if (assistantMessage.tool_calls.length === 0) {
return assistantMessage.content;
}
// Execute all accumulated tool calls through MCP
const toolResults = await Promise.all(
assistantMessage.tool_calls.map(async (tc) => {
const args = JSON.parse(tc.function.arguments);
console.error(`\n[tool] Calling: ${tc.function.name}`);
const result = await mcpClient.callTool({ name: tc.function.name, arguments: args });
const text = result.content.filter(c => c.type === 'text').map(c => c.text).join('\n');
return { role: 'tool', tool_call_id: tc.id, content: text };
})
);
messages.push(...toolResults);
}
}
const answer = await runStreamingWithTools('What are the best products under $50?');
console.log('\n\nFinal:', answer);
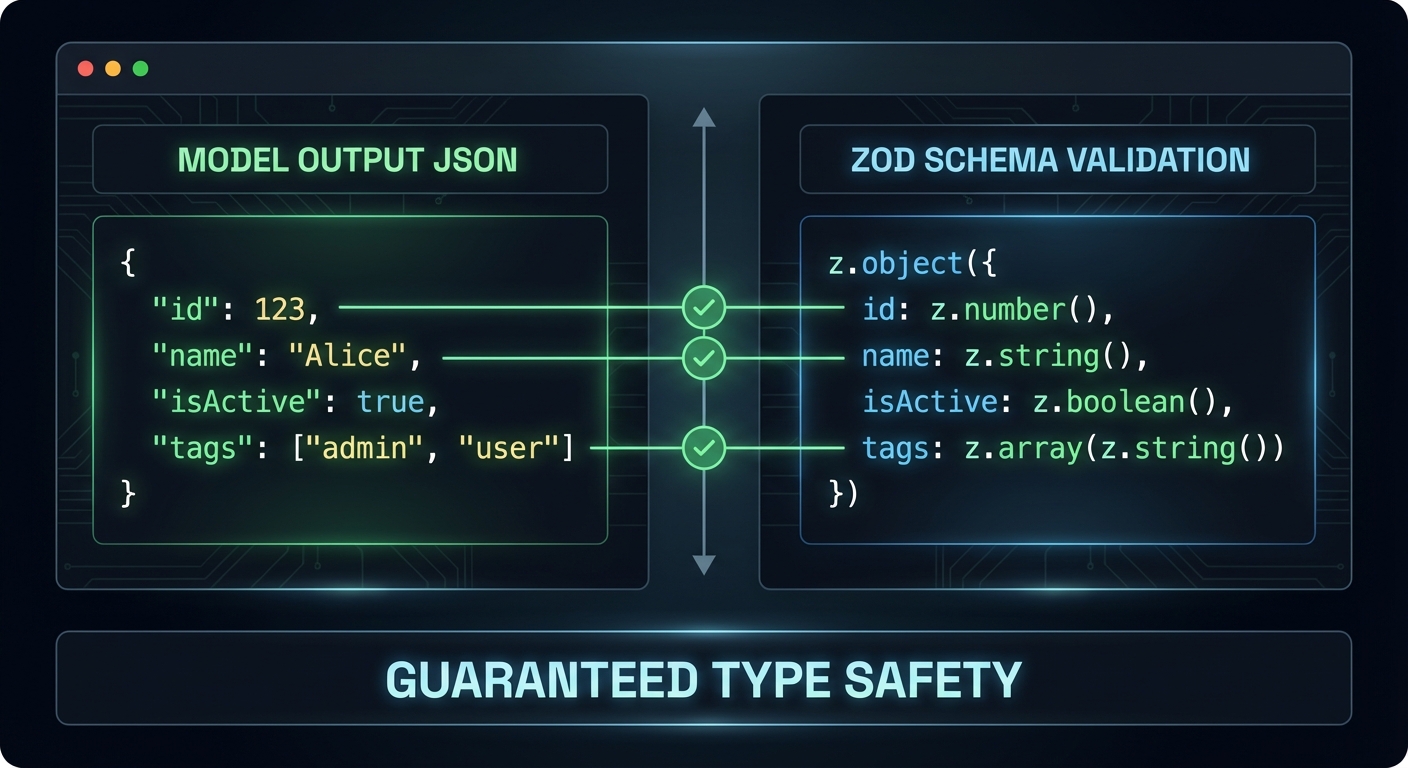
Structured outputs: the model is forced to return JSON that matches your exact schema – no hallucinated fields.
Structured Outputs with MCP Tool Results
OpenAI’s structured outputs feature forces the model to return JSON that exactly matches a schema you specify. This is different from JSON mode (which just returns valid JSON) – structured outputs guarantee that every required field is present and every value is the correct type. You can use structured outputs for the final answer even when intermediate steps use tool calls.
import { z } from 'zod';
import { zodResponseFormat } from 'openai/helpers/zod.js';
// Define the schema for the final answer
const ProductRecommendationSchema = z.object({
recommendations: z.array(z.object({
product_name: z.string(),
price: z.number(),
reason: z.string(),
confidence: z.enum(['high', 'medium', 'low']),
})),
total_products_checked: z.number(),
search_strategy: z.string(),
});
// Use structured output for the final response
const finalResponse = await openai.beta.chat.completions.parse({
model: 'gpt-4o',
messages: [
...conversationHistory,
{ role: 'user', content: 'Based on the search results, provide your top 3 recommendations.' },
],
response_format: zodResponseFormat(ProductRecommendationSchema, 'product_recommendations'),
});
const recommendations = finalResponse.choices[0].message.parsed;
// recommendations is now typed as ProductRecommendation - guaranteed to match schema
console.log(recommendations.recommendations[0].product_name);
“Structured Outputs is a feature that ensures the model will always generate responses that adhere to your supplied JSON Schema, so you don’t need to worry about the model omitting a required key, or hallucinating an invalid enum value.” – OpenAI Documentation, Structured Outputs
Failure Modes with Streaming Tool Calls
Case 1: Parsing Arguments Before All Deltas Arrive
// WRONG: Parsing tool call arguments during streaming
for await (const chunk of stream) {
const delta = chunk.choices[0]?.delta;
if (delta.tool_calls?.[0]?.function?.arguments) {
const args = JSON.parse(delta.tool_calls[0].function.arguments); // WRONG - may be partial JSON
await mcpClient.callTool({ ... });
}
}
// CORRECT: Accumulate all deltas first, then parse
// (As shown in the complete streaming loop above)
Case 2: Missing tool_call_id in Tool Result Messages
// WRONG: tool_call_id missing or mismatched
messages.push({ role: 'tool', content: result }); // Missing tool_call_id
// CORRECT: Each tool result must include the exact tool_call_id
messages.push({ role: 'tool', tool_call_id: tc.id, content: result });
What to Check Right Now
Test streaming with a multi-tool query – ask a question that forces two tool calls in sequence. Verify the streaming output is coherent and the final answer is correct.
Add a progress indicator – during streaming, show a spinner or partial text. Users should see something happening, not a blank screen for 10 seconds.
Use structured outputs for all final answers – wherever your application needs to parse the model’s response programmatically, use structured outputs. It eliminates an entire class of parsing bugs.
Handle stream errors – wrap the for await (const chunk of stream) loop in a try-catch. Network errors during streaming are common and need graceful handling.
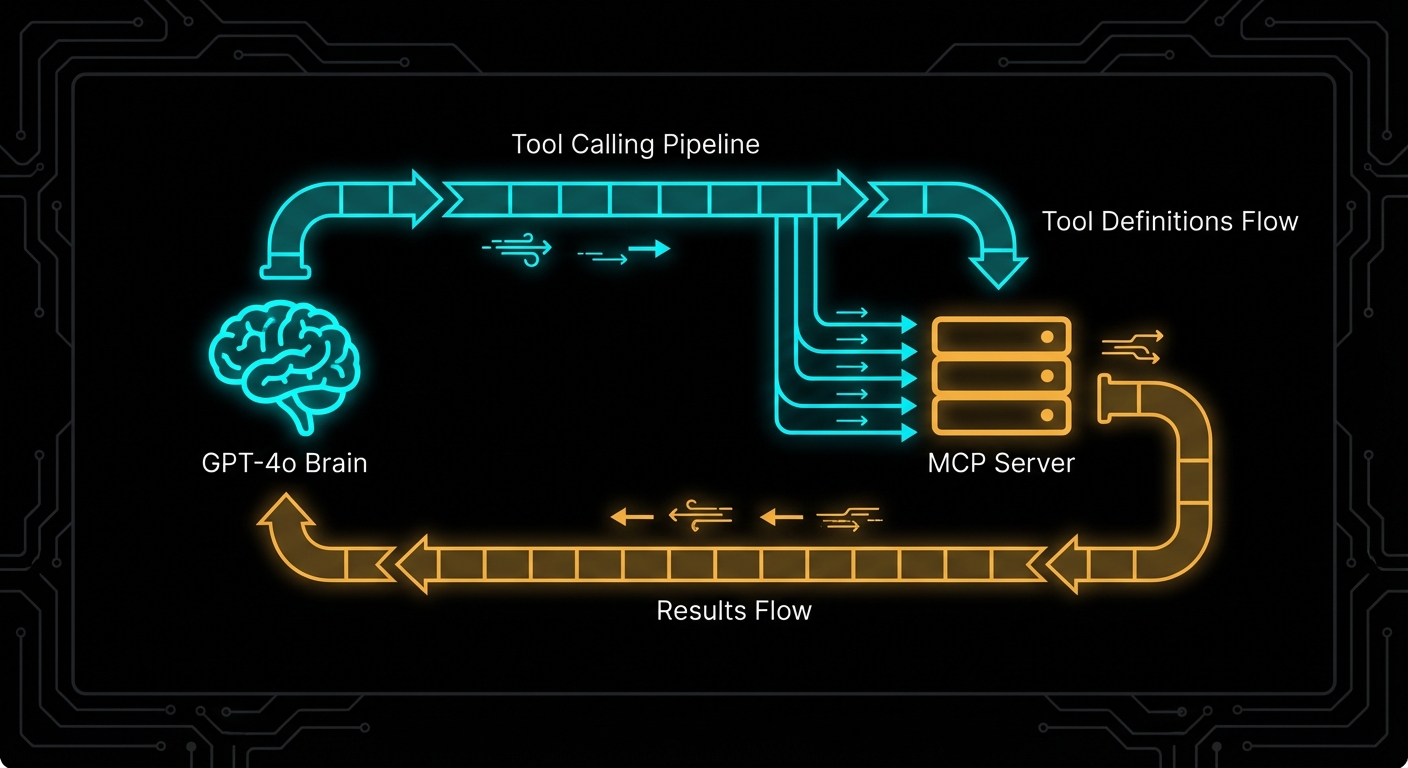
OpenAI’s tool calling is where MCP integration becomes immediately tangible. You have an MCP server with tools registered on it. You have a GPT-4o or o3 model that needs to use those tools. The integration is three steps: list tools from MCP, convert them to OpenAI’s function format, run the completion loop. This lesson builds that integration from scratch, explains every conversion step, and covers the failure modes that will break your agent in the middle of a production run.
OpenAI + MCP: the tool calling loop – list tools, generate, route tool calls to MCP, feed results back.
The OpenAI Tool Calling Model
OpenAI’s tool calling (formerly function calling) works by providing the model with a list of functions it can invoke. When the model decides to use a tool, the API returns a response with tool_calls instead of content. Your application executes the tool, then appends the result to the conversation and calls the API again. This loop continues until the model returns content with no pending tool calls.
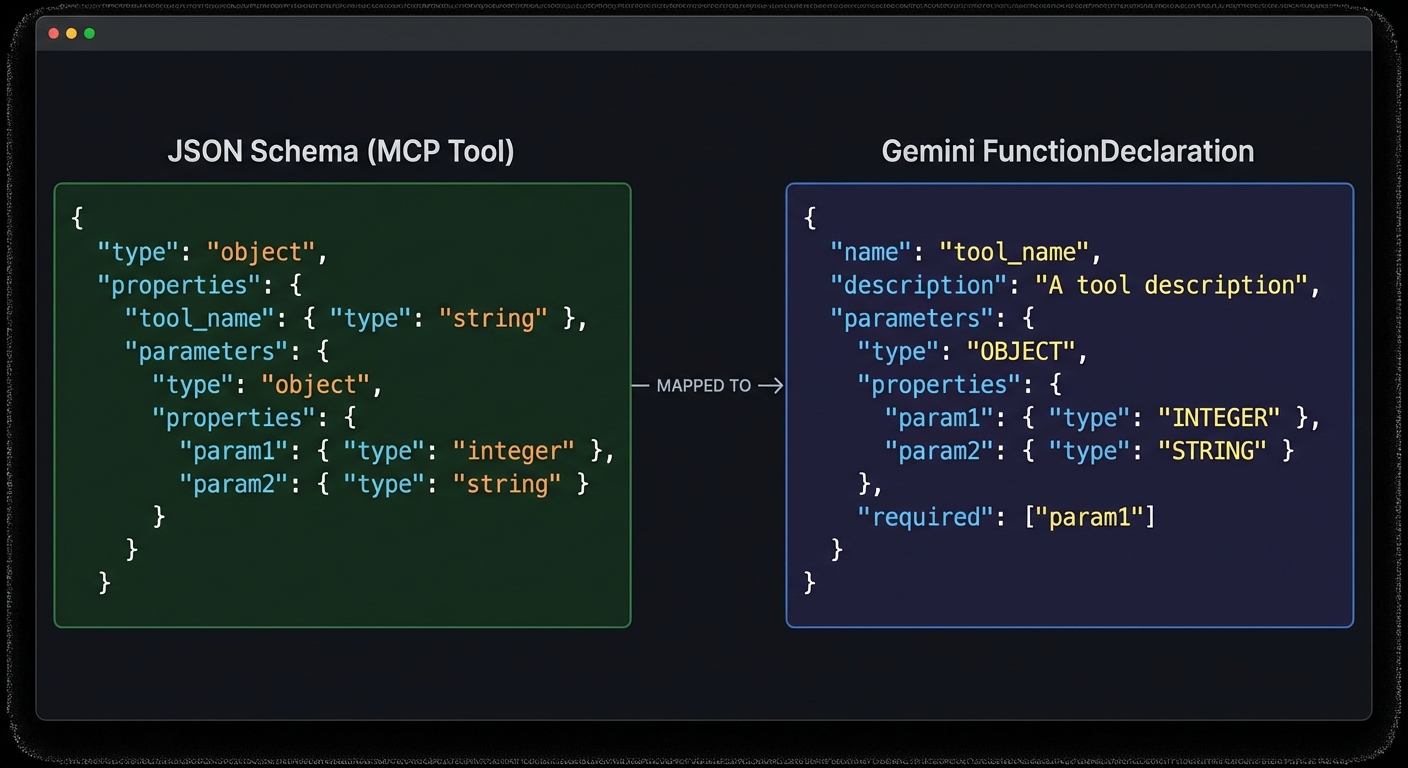
MCP tools map cleanly onto OpenAI’s function schema. The conversion is mechanical: take the MCP tool’s name, description, and JSON Schema, and wrap them in OpenAI’s format.
“Tool calls allow models to call user-defined tools. Tools are specified in the request by the user, and the model can call them during message generation.” – OpenAI Documentation, Function Calling
The Complete Integration: MCP Client + OpenAI Loop
// mcp-openai-host.js
import OpenAI from 'openai';
import { Client } from '@modelcontextprotocol/sdk/client/index.js';
import { StdioClientTransport } from '@modelcontextprotocol/sdk/client/stdio.js';
const openai = new OpenAI({ apiKey: process.env.OPENAI_API_KEY });
// Step 1: Connect to MCP server
const mcpClient = new Client(
{ name: 'openai-host', version: '1.0.0' },
{ capabilities: {} }
);
const transport = new StdioClientTransport({
command: 'node',
args: ['./my-mcp-server.js'],
env: process.env,
});
await mcpClient.connect(transport);
// Step 2: Discover tools and convert to OpenAI format
const { tools: mcpTools } = await mcpClient.listTools();
const openAITools = mcpTools.map(tool => ({
type: 'function',
function: {
name: tool.name,
description: tool.description,
parameters: tool.inputSchema,
},
}));
console.log(`Loaded ${openAITools.length} tools from MCP server`);
// Step 3: Build the tool-calling loop
async function runWithTools(userMessage) {
const messages = [{ role: 'user', content: userMessage }];
while (true) {
const response = await openai.chat.completions.create({
model: 'gpt-4o',
messages,
tools: openAITools,
tool_choice: 'auto', // Let the model decide
});
const choice = response.choices[0];
const message = choice.message;
// Append the assistant message to conversation
messages.push(message);
// If no tool calls, we have the final answer
if (choice.finish_reason !== 'tool_calls') {
return message.content;
}
// Execute each tool call through MCP
const toolResults = await Promise.all(
message.tool_calls.map(async (toolCall) => {
const args = JSON.parse(toolCall.function.arguments);
console.log(`Calling tool: ${toolCall.function.name}`, args);
const result = await mcpClient.callTool({
name: toolCall.function.name,
arguments: args,
});
// Format result for OpenAI
const resultText = result.content
.filter(c => c.type === 'text')
.map(c => c.text)
.join('\n');
return {
role: 'tool',
tool_call_id: toolCall.id,
content: resultText,
};
})
);
// Append all tool results to conversation
messages.push(...toolResults);
// Loop back to get the model's response to the tool results
}
}
// Run it
const answer = await runWithTools('Find the top 5 electronics products under $100');
console.log('\nFinal answer:', answer);
await mcpClient.close();
The tool calling loop: send messages, get tool_calls, execute via MCP, append results, repeat until final content.
Using GPT-4o vs o3 with MCP Tools
Different OpenAI models have different tool calling behaviours. GPT-4o is the most reliable for agentic tool use: it calls tools precisely, handles multi-tool scenarios well, and respects tool descriptions. The o3 and o3-mini reasoning models think before calling tools, which improves accuracy on complex multi-step tasks but adds latency and cost.
// For fast, reliable tool calling:
model: 'gpt-4o'
// For complex reasoning tasks where accuracy matters more than speed:
model: 'o3-mini'
// o3 supports a different parameter for "thinking budget":
const response = await openai.chat.completions.create({
model: 'o3',
messages,
tools: openAITools,
reasoning_effort: 'medium', // 'low', 'medium', 'high'
});
Failure Modes with OpenAI + MCP
Case 1: Not Handling Multiple Simultaneous Tool Calls
GPT-4o can call multiple tools in a single response. If you only handle the first tool call, you will get protocol errors when the model expects all tool call results before it continues.
// WRONG: Only handles first tool call
const toolCall = message.tool_calls[0];
const result = await mcpClient.callTool({ name: toolCall.function.name, arguments: ... });
// CORRECT: Handle all tool calls, run them in parallel
const toolResults = await Promise.all(
message.tool_calls.map(async (toolCall) => { ... })
);
messages.push(...toolResults);
Case 2: Infinite Tool Call Loops
If a tool always returns data that prompts another tool call, the loop never terminates. Set a maximum iteration count.
const MAX_ITERATIONS = 10;
let iterations = 0;
while (true) {
if (++iterations > MAX_ITERATIONS) {
throw new Error(`Tool calling loop exceeded ${MAX_ITERATIONS} iterations`);
}
// ... rest of loop
}
Case 3: Passing MCP Tool Input Schema Directly Without Validation
OpenAI requires tool parameter schemas to be valid JSON Schema. MCP’s inputSchema is JSON Schema, so it should work – but some edge cases (like Zod’s default values, which add non-standard keys) can cause OpenAI API errors. Strip unknown keys before passing to OpenAI.
// Safe schema extraction
function safeInputSchema(mcpTool) {
const schema = mcpTool.inputSchema;
// OpenAI does not accept 'default' at the schema root level
// Strip it to avoid API validation errors
const { default: _, ...safeSchema } = schema;
return safeSchema;
}
What to Check Right Now
Test tool conversion – print your OpenAI tools array and verify each tool has the correct name, description, and parameter schema.
Run with gpt-4o-mini first – use the cheaper model during development to iterate faster and avoid burning GPT-4o quota on debugging.
Log tool calls and results – add logging every time a tool is called and its result received. This makes agentic debugging dramatically easier.
Cap iteration count – always set a maximum loop iteration and handle the case where the model runs out of allowed turns.
Security is not a feature you add after the transport works. It is the transport design. An MCP server exposed over HTTP without TLS, without CORS validation, and without Host header checking is not a development shortcut – it is a vulnerability waiting to be exploited. This lesson covers the three most important transport-level security controls for MCP HTTP servers: TLS termination, CORS policy, and Host header validation. Get these right before your server ever sees production traffic.
Three layers of transport security: TLS (encryption), CORS (browser origin control), Host header validation (DNS rebinding protection).
TLS: Why Plaintext MCP Is Unacceptable
Any MCP server that carries sensitive data (API keys, user data, database queries, file contents) must use TLS. Over plaintext HTTP, anyone between the client and server can read and modify the JSON-RPC stream. Tool arguments, resource contents, and sampling responses are all exposed. For local development, this is tolerable. For any remote server – even internal company servers – TLS is mandatory.
The simplest production approach: terminate TLS at nginx or a load balancer, and run your Node.js MCP server on HTTP internally. This keeps TLS certificate management at the infrastructure layer.
# nginx.conf for TLS-terminated MCP server
server {
listen 443 ssl;
server_name mcp.mycompany.com;
ssl_certificate /etc/ssl/certs/mycompany.crt;
ssl_certificate_key /etc/ssl/private/mycompany.key;
ssl_protocols TLSv1.2 TLSv1.3;
ssl_ciphers ECDHE-ECDSA-AES128-GCM-SHA256:ECDHE-RSA-AES128-GCM-SHA256;
location /mcp {
proxy_pass http://localhost:3000;
proxy_http_version 1.1;
proxy_set_header Upgrade $http_upgrade;
proxy_set_header Connection 'upgrade';
proxy_set_header Host $host;
proxy_set_header X-Real-IP $remote_addr;
proxy_buffering off; # Critical for SSE
proxy_read_timeout 3600s; # Long timeout for SSE connections
proxy_cache off;
}
}
“For remote MCP servers, all communication MUST use TLS to protect against eavesdropping and tampering. Servers MUST validate client authentication before processing any requests.” – MCP Specification, Transport Security
CORS: Controlling Browser Access
If your MCP server will be accessed from browser-based hosts (web applications that call the MCP endpoint directly from JavaScript), you must configure CORS. Without CORS headers, the browser will block cross-origin requests. With overly permissive CORS (Access-Control-Allow-Origin: *), any website can make requests to your server on behalf of your users.
// Correct CORS configuration for MCP HTTP servers
import cors from 'cors';
const ALLOWED_ORIGINS = [
'https://myapp.example.com',
'https://staging.myapp.example.com',
// For development only:
'http://localhost:5173',
];
app.use('/mcp', cors({
origin: (origin, callback) => {
// Allow requests with no origin (server-to-server, curl)
if (!origin) return callback(null, true);
if (ALLOWED_ORIGINS.includes(origin)) return callback(null, true);
callback(new Error(`CORS: Origin ${origin} not allowed`));
},
methods: ['GET', 'POST', 'DELETE', 'OPTIONS'],
allowedHeaders: ['Content-Type', 'mcp-session-id', 'Authorization'],
credentials: true, // If you use cookie-based auth
}));
CORS origin allowlist: only listed origins can make browser-side requests to your MCP server.
Host Header Validation: DNS Rebinding Protection
DNS rebinding attacks allow malicious websites to make requests to your localhost MCP server even through browser CORS restrictions. The attack works by pointing a DNS entry to 127.0.0.1 and then making requests with a spoofed Host header. Validating the Host header prevents this class of attack for local servers.
// Host header validation middleware
function validateHost(allowedHosts) {
return (req, res, next) => {
const host = req.headers.host;
if (!host) return res.status(400).send('Missing Host header');
const hostname = host.split(':')[0]; // Strip port
if (!allowedHosts.includes(hostname)) {
console.error(`[security] Rejected request with Host: ${host}`);
return res.status(403).send('Forbidden: Invalid Host header');
}
next();
};
}
// For a local development server, allow only localhost
app.use('/mcp', validateHost(['localhost', '127.0.0.1']));
// For a production server, allow your actual domain
// app.use('/mcp', validateHost(['mcp.mycompany.com']));
Putting It All Together: Security Middleware Stack
// Complete security middleware stack for production MCP server
import helmet from 'helmet';
import rateLimit from 'express-rate-limit';
app.use(helmet({
contentSecurityPolicy: {
directives: {
defaultSrc: ["'self'"],
},
},
}));
// Host validation
app.use('/mcp', validateHost([process.env.MCP_ALLOWED_HOST || 'localhost']));
// CORS
app.use('/mcp', cors({ origin: ALLOWED_ORIGINS, methods: ['GET', 'POST', 'DELETE'] }));
// Rate limiting
app.use('/mcp', rateLimit({
windowMs: 60 * 1000,
max: 100,
standardHeaders: true,
legacyHeaders: false,
}));
// Request size limit
app.use('/mcp', express.json({ limit: '2mb' }));
// Then your MCP handler
app.post('/mcp', handleMcpRequest);
app.get('/mcp', handleMcpRequest);
Failure Modes in Transport Security
Case 1: Using Wildcard CORS in Production
// NEVER in production - allows any origin to call your MCP server
app.use(cors({ origin: '*' }));
// ALWAYS use an explicit allowlist in production
app.use(cors({ origin: ALLOWED_ORIGINS }));
Case 2: Running an HTTP MCP Server on a Public Port Without Auth
// WRONG: Public port, no auth, no TLS
app.listen(3000); // Accessible to the internet on port 3000 - anyone can call your tools
// CORRECT: Bind to localhost and terminate TLS at nginx
app.listen(3000, '127.0.0.1'); // Only accessible locally; nginx handles TLS externally
What to Check Right Now
Scan your server with nmap – nmap -sV localhost -p 3000. Verify it binds only to 127.0.0.1 in production builds.
Test CORS with curl -H “Origin:” – curl -X OPTIONS http://localhost:3000/mcp -H "Origin: https://evil.com". The server should return a 403 or no CORS headers.
Check Host header handling – curl http://localhost:3000/mcp -H "Host: evil.com". Your server should reject requests with non-allowlisted Host headers.
Enable TLS on every non-local deployment – use Let’s Encrypt with certbot --nginx for automatic certificate management. There is no excuse for plaintext in 2026.
The MCP SDK’s StreamableHTTPServerTransport is framework-agnostic at the core, but wiring it up to Express, Hono, or any other HTTP framework requires adapters. Good adapters are thin – they translate between the framework’s request/response model and the transport’s expectations without adding logic of their own. This lesson shows you how to build those adapters correctly for Express and Hono, covers the common configuration patterns, and explains why each choice matters for production deployment.
HTTP adapters: thin wrappers that plug the MCP transport into your HTTP framework of choice.
Express Adapter Pattern
Express is the most widely used Node.js HTTP framework and the safest choice for teams that want maximum ecosystem compatibility. Here is the production-ready Express adapter pattern:
// mcp-server-express.js
import express from 'express';
import { McpServer } from '@modelcontextprotocol/sdk/server/mcp.js';
import { StreamableHTTPServerTransport } from '@modelcontextprotocol/sdk/server/streamableHttp.js';
import { z } from 'zod';
import { randomUUID } from 'node:crypto';
const app = express();
app.use(express.json({ limit: '4mb' })); // Increase limit for large tool inputs
// Session registry
const sessions = new Map();
function createMcpServer() {
const server = new McpServer({ name: 'api-server', version: '1.0.0' });
server.tool('ping', 'Check server health', {}, async () => ({
content: [{ type: 'text', text: 'pong' }],
}));
return server;
}
// Shared handler for POST and GET
async function handleMcpRequest(req, res) {
const sessionId = req.headers['mcp-session-id'];
let transport;
if (sessionId && sessions.has(sessionId)) {
transport = sessions.get(sessionId);
} else if (!sessionId && req.method === 'POST') {
// New session on first POST
transport = new StreamableHTTPServerTransport({
sessionIdGenerator: () => randomUUID(),
onsessioninitialized: (id) => {
sessions.set(id, transport);
// Clean up session when transport closes
transport.onclose = () => sessions.delete(id);
},
});
const mcpServer = createMcpServer();
await mcpServer.connect(transport);
} else {
res.status(400).json({ error: 'Invalid or missing session' });
return;
}
await transport.handleRequest(req, res, req.body);
}
app.post('/mcp', handleMcpRequest);
app.get('/mcp', handleMcpRequest);
app.delete('/mcp', (req, res) => {
const sessionId = req.headers['mcp-session-id'];
sessions.delete(sessionId);
res.sendStatus(200);
});
// Health check
app.get('/health', (req, res) => res.json({ status: 'ok', sessions: sessions.size }));
const PORT = process.env.PORT || 3000;
app.listen(PORT, () => console.error(`MCP server on :${PORT}`));
“The Streamable HTTP transport can be integrated with any HTTP server framework. The key requirement is that the server must handle POST requests for client-to-server messages and GET requests for server-to-client SSE streams.” – MCP Documentation, Transports
Hono Adapter Pattern
Hono is a lightweight, ultra-fast web framework designed for edge runtimes (Cloudflare Workers, Deno Deploy, Bun) as well as Node.js. Its smaller footprint and native Web API compatibility make it attractive for MCP servers that need to run at the edge.
// mcp-server-hono.js
import { Hono } from 'hono';
import { serve } from '@hono/node-server';
import { McpServer } from '@modelcontextprotocol/sdk/server/mcp.js';
import { StreamableHTTPServerTransport } from '@modelcontextprotocol/sdk/server/streamableHttp.js';
import { randomUUID } from 'node:crypto';
const app = new Hono();
const sessions = new Map();
app.post('/mcp', async (c) => {
const sessionId = c.req.header('mcp-session-id');
const body = await c.req.json();
let transport;
if (sessionId && sessions.has(sessionId)) {
transport = sessions.get(sessionId);
} else {
transport = new StreamableHTTPServerTransport({
sessionIdGenerator: () => randomUUID(),
onsessioninitialized: (id) => sessions.set(id, transport),
});
const mcpServer = createMcpServer();
await mcpServer.connect(transport);
}
// Hono uses Web API Request/Response - convert for the transport
// The SDK transport.handleRequest accepts both Node.js and Web API style
return new Response(await transport.handlePostRequest(body, sessionId));
});
app.get('/mcp', async (c) => {
const sessionId = c.req.header('mcp-session-id');
const transport = sessions.get(sessionId);
if (!transport) return c.json({ error: 'Session not found' }, 404);
// Return SSE stream
const stream = await transport.createSSEStream();
return new Response(stream, {
headers: {
'Content-Type': 'text/event-stream',
'Cache-Control': 'no-cache',
},
});
});
serve({ fetch: app.fetch, port: 3000 });
Express: maximum ecosystem compatibility. Hono: edge runtimes, minimal footprint. Both work with the MCP SDK.
Middleware for MCP Endpoints
MCP endpoints benefit from the same middleware patterns as any HTTP API – request logging, rate limiting, correlation IDs, and error handling. Here is a middleware stack for a production MCP endpoint:
// Express middleware stack for MCP
import rateLimit from 'express-rate-limit';
// Rate limiting - protect against DoS
const mcpLimiter = rateLimit({
windowMs: 60 * 1000, // 1 minute
max: 100, // 100 requests per minute per IP
message: { error: 'Too many requests' },
skip: (req) => req.headers['mcp-session-id'] && sessions.has(req.headers['mcp-session-id']),
});
// Request logging
app.use('/mcp', (req, res, next) => {
const start = Date.now();
res.on('finish', () => {
console.error(`[mcp] ${req.method} ${req.url} ${res.statusCode} ${Date.now() - start}ms`);
});
next();
});
// Apply rate limit before handler
app.post('/mcp', mcpLimiter, handleMcpRequest);
app.get('/mcp', handleMcpRequest);
Failure Modes with HTTP Adapters
Case 1: Forgetting express.json() Middleware
Without express.json(), Express will not parse the POST body. The transport will receive undefined as the body and produce confusing parse errors.
// WRONG: No body parser
const app = express();
app.post('/mcp', handleMcpRequest); // req.body is undefined
// CORRECT: Parse JSON bodies
const app = express();
app.use(express.json());
app.post('/mcp', handleMcpRequest); // req.body is the parsed JSON object
Case 2: Sharing a Single McpServer Instance Across All Sessions
If tool handlers have per-session state (user context, authentication tokens, active database transactions), sharing one McpServer instance across all sessions will mix state between users. Create a new McpServer per session, or design tools to be stateless.
// RISKY: Shared server instance if tools have per-session state
const sharedServer = createMcpServer(); // Fine only if all tools are stateless
// SAFE: New server per session (slightly more overhead but guarantees isolation)
onsessioninitialized: (id) => {
const sessionServer = createMcpServer(); // Fresh instance per session
sessionServer.connect(transport);
}
What to Check Right Now
Choose Express for Node.js, Hono for edge – if you are deploying to a standard VPS or Docker container, Express is the safer choice. If you need Cloudflare Workers or Deno Deploy, use Hono.
Add a health endpoint – every MCP HTTP server should have a GET /health endpoint that returns session count and server status. This is essential for load balancer health checks.
Apply rate limiting before your MCP handler – without rate limiting, a single client can exhaust your server with rapid requests. Use express-rate-limit or equivalent.
Monitor session count – sessions that are never cleaned up will consume memory. Log the session count on the health endpoint and alert if it grows unboundedly.
stdio works beautifully for local tools, but the moment you want to share an MCP server across a network – serving multiple clients, deploying to a container, integrating with a third-party host over the internet – you need HTTP transport. The MCP specification defines Streamable HTTP as the canonical remote transport: HTTP POST for client-to-server requests, Server-Sent Events (SSE) for server-to-client streaming. This lesson covers the protocol mechanics, the implementation pattern, and the hard-won lessons about making streaming work reliably in production.
Streamable HTTP: POST for requests, SSE for streaming responses – the MCP remote transport standard.
The Streamable HTTP Protocol
The Streamable HTTP transport uses a single HTTP endpoint (typically /mcp) and the following request flow:
Client to server: HTTP POST with Content-Type: application/json containing the JSON-RPC message(s). The client must include a session ID header (mcp-session-id) after the connection is established.
Server to client (immediate response): HTTP 200 with Content-Type: application/json containing the JSON-RPC response. For a single request-response pair with no streaming.
Server to client (streaming): HTTP 200 with Content-Type: text/event-stream (SSE). The server keeps the connection open and pushes events as they arrive. This is used for long-running tools, progress notifications, and sampling requests.
Server to client (async): HTTP GET to the MCP endpoint opens an SSE stream for the server to push unsolicited notifications (resource updates, tool list changes, etc.).
// Client side: use the Streamable HTTP transport
import { Client } from '@modelcontextprotocol/sdk/client/index.js';
import { StreamableHTTPClientTransport } from '@modelcontextprotocol/sdk/client/streamableHttp.js';
const client = new Client(
{ name: 'my-http-host', version: '1.0.0' },
{ capabilities: {} }
);
const transport = new StreamableHTTPClientTransport(
new URL('https://my-mcp-server.example.com/mcp')
);
await client.connect(transport);
const tools = await client.listTools();
console.log('Available tools:', tools.tools.map(t => t.name));
Unlike stdio, this transport lets your MCP server exist independently of any single host process. The server can be deployed as a standalone service, shared across a team, or exposed to third-party clients over the internet. That independence is what makes HTTP the right choice for any non-local use case.
“The HTTP with SSE transport uses Server-Sent Events for server-to-client streaming while using HTTP POST for client-to-server communication. This allows servers to stream results and send notifications to clients.” – MCP Documentation, Transports
Building a Streamable HTTP Server
The MCP SDK provides a StreamableHTTPServerTransport that handles all the protocol mechanics. You attach it to any HTTP server framework – Express, Hono, Fastify, or Node’s built-in http module.
import { McpServer } from '@modelcontextprotocol/sdk/server/mcp.js';
import { StreamableHTTPServerTransport } from '@modelcontextprotocol/sdk/server/streamableHttp.js';
import { z } from 'zod';
import express from 'express';
const app = express();
app.use(express.json());
const server = new McpServer({ name: 'remote-server', version: '1.0.0' });
server.tool(
'get_weather',
'Gets current weather for a city',
{ city: z.string().describe('City name') },
async ({ city }) => {
const data = await fetchWeather(city);
return {
content: [{ type: 'text', text: `${city}: ${data.temp}Β°C, ${data.condition}` }],
};
}
);
// Session management: one transport per client session
const sessions = new Map();
app.post('/mcp', async (req, res) => {
const sessionId = req.headers['mcp-session-id'];
let transport;
if (sessionId && sessions.has(sessionId)) {
transport = sessions.get(sessionId);
} else {
// New session
transport = new StreamableHTTPServerTransport({
sessionIdGenerator: () => crypto.randomUUID(),
onsessioninitialized: (id) => sessions.set(id, transport),
});
await server.connect(transport);
}
await transport.handleRequest(req, res);
});
app.get('/mcp', async (req, res) => {
const sessionId = req.headers['mcp-session-id'];
const transport = sessions.get(sessionId);
if (!transport) return res.status(404).send('Session not found');
await transport.handleRequest(req, res);
});
app.delete('/mcp', async (req, res) => {
const sessionId = req.headers['mcp-session-id'];
sessions.delete(sessionId);
res.status(200).send('Session terminated');
});
app.listen(3000, () => console.error('MCP HTTP server running on :3000'));
HTTP session management: each client gets a session ID, mapped to its own transport instance.
The server setup above handles basic request-response patterns. But the real power of HTTP transport is streaming: the ability to push progress updates, intermediate results, and server-initiated notifications to the client while a long-running operation is still in flight.
SSE Streaming in Practice
When a tool produces results progressively (e.g. a long-running data processing job), the server can stream intermediate progress via SSE notifications before sending the final result:
server.tool(
'process_large_dataset',
'Processes a large dataset with progress streaming',
{ dataset_id: z.string(), chunk_size: z.number().default(1000) },
async ({ dataset_id, chunk_size }, { server: serverInstance }) => {
const dataset = await loadDataset(dataset_id);
const totalRows = dataset.length;
let processed = 0;
for (let i = 0; i < dataset.length; i += chunk_size) {
const chunk = dataset.slice(i, i + chunk_size);
await processChunk(chunk);
processed += chunk.length;
// Stream progress via SSE notification
serverInstance.server.notification({
method: 'notifications/progress',
params: {
progressToken: dataset_id,
progress: processed,
total: totalRows,
},
});
}
return {
content: [{
type: 'text',
text: `Processed ${processed} rows from dataset ${dataset_id}`,
}],
};
}
);
In a production system, you would combine progress streaming with timeout handling and cancellation support. If a client disconnects mid-stream, the server should detect the closed connection and abort the in-progress work to avoid wasting resources on results nobody will receive.
Failure Modes with Streamable HTTP
Case 1: No Session Management - One Transport for All Clients
Creating a single global transport instance and sharing it across all HTTP requests corrupts all sessions. Each client connection needs its own transport instance.
// WRONG: Single global transport - all sessions corrupt each other
const globalTransport = new StreamableHTTPServerTransport({ ... });
await server.connect(globalTransport);
app.post('/mcp', async (req, res) => {
await globalTransport.handleRequest(req, res); // All clients share state - WRONG
});
// CORRECT: Per-session transport instances (as shown above)
This is one of the most common bugs when building HTTP-based MCP servers. The corruption is subtle: two clients may receive each other's responses, or a notification intended for one session leaks into another. It often only surfaces under concurrent load, making it hard to reproduce locally.
Case 2: SSE Connection Not Kept Alive
SSE connections must be kept open by the server for the duration of the session. Intermediate proxies (nginx, load balancers, CDNs) may buffer responses or close idle connections. Set appropriate headers and configure proxy timeouts.
// When using Express with SSE, set headers to prevent buffering
res.setHeader('Cache-Control', 'no-cache');
res.setHeader('X-Accel-Buffering', 'no'); // Nginx: disable buffering
res.setHeader('Connection', 'keep-alive');
// For nginx: proxy_read_timeout 3600s; proxy_buffering off;
Together, these two failure modes highlight the fundamental challenge of HTTP transport: you are responsible for connection lifecycle management that stdio handles automatically. Session isolation and keep-alive behavior are things you must actively get right, not things that work by default.
SSE Polling and Server-Initiated Disconnection
New in 2025-11-25
Earlier versions of Streamable HTTP assumed the server would keep SSE connections open indefinitely. The 2025-11-25 spec clarifies that servers may disconnect SSE streams at will, enabling a polling model for environments where long-lived connections are impractical (load balancers with short timeouts, serverless functions, horizontally scaled clusters).
The key change: clients can always resume a stream by sending a GET request to the MCP endpoint, regardless of whether the original stream was created by a POST or a GET. The server includes event IDs that encode stream identity, allowing the client to reconnect and pick up where it left off.
// Client: reconnect after server disconnects the SSE stream
async function connectWithReconnect(mcpUrl, lastEventId = null) {
const headers = { Accept: 'text/event-stream' };
if (lastEventId) {
headers['Last-Event-ID'] = lastEventId; // Resume from where we left off
}
const response = await fetch(mcpUrl, { method: 'GET', headers });
const reader = response.body.getReader();
const decoder = new TextDecoder();
let currentEventId = lastEventId;
while (true) {
const { done, value } = await reader.read();
if (done) {
// Server closed the stream - reconnect after a brief delay
console.log('Stream ended, reconnecting...');
await new Promise(r => setTimeout(r, 1000));
return connectWithReconnect(mcpUrl, currentEventId);
}
const text = decoder.decode(value);
// Parse SSE events, track event IDs for resumption
for (const line of text.split('\n')) {
if (line.startsWith('id:')) currentEventId = line.slice(3).trim();
if (line.startsWith('data:')) handleMessage(JSON.parse(line.slice(5)));
}
}
}
Event IDs should encode stream identity so that the server can distinguish reconnection attempts from new connections. The spec does not prescribe a format, but a common pattern is to include both a session identifier and a sequence number in the event ID.
Origin Validation
Clarified in 2025-11-25
Servers MUST respond with HTTP 403 Forbidden for requests with invalid Origin headers in the Streamable HTTP transport. This prevents cross-origin attacks where a malicious web page attempts to connect to a local MCP server running on localhost. Always validate the Origin header against an allowlist before processing any request.
What to Check Right Now
Test with curl - send a raw HTTP POST to your server: curl -X POST http://localhost:3000/mcp -H 'Content-Type: application/json' -d '{"jsonrpc":"2.0","id":1,"method":"initialize",...}'
Verify SSE with the browser - open your /mcp GET endpoint in a browser with DevTools open. The Network tab should show the SSE stream with events appearing in real time.
Configure nginx for SSE - in any production deployment, add proxy_buffering off and proxy_read_timeout 3600s to your nginx location block for the MCP endpoint.
Implement session cleanup - sessions that are never explicitly terminated will accumulate. Add a TTL or a periodic cleanup job to the sessions Map.
The transport layer is what carries JSON-RPC messages between client and server. MCP defines multiple transports, and choosing the right one for your use case is the first architectural decision you make when building a server. The stdio transport – using standard input and standard output – is the right choice for local, on-machine server processes, and it is the most widely deployed transport in the MCP ecosystem today. This lesson covers what it is, how it works, when to use it, and when not to.
stdio transport: the host launches the server as a subprocess and communicates over stdin/stdout pipes.
How stdio Transport Works
With stdio transport, the host launches the MCP server as a child process. JSON-RPC messages are sent to the server via its stdin and received from the server via its stdout. Each message is delimited by a newline character. The server’s stderr is typically forwarded to the host’s logs for debugging. The server process lives for as long as the client needs it and is terminated when the client disconnects or the host exits.
This is a well-understood pattern in Unix tooling – it is how shells pipe data between commands (cat file | grep pattern | wc -l). MCP adopts it for the same reason: simplicity, no network setup required, OS-managed process isolation, and easy integration with any host that can launch subprocesses.
// Server side: connect to stdio transport
import { McpServer } from '@modelcontextprotocol/sdk/server/mcp.js';
import { StdioServerTransport } from '@modelcontextprotocol/sdk/server/stdio.js';
const server = new McpServer({ name: 'my-server', version: '1.0.0' });
// ... register tools, resources, prompts ...
const transport = new StdioServerTransport();
await server.connect(transport);
// Server is now listening on stdin, writing to stdout
// Client side: launch server as subprocess
import { Client } from '@modelcontextprotocol/sdk/client/index.js';
import { StdioClientTransport } from '@modelcontextprotocol/sdk/client/stdio.js';
const client = new Client({ name: 'my-host', version: '1.0.0' }, { capabilities: {} });
const transport = new StdioClientTransport({
command: 'node', // The command to launch the server
args: ['./server.js'], // Arguments
env: { // Environment variables for the subprocess
...process.env,
DATABASE_URL: process.env.DATABASE_URL,
},
cwd: '/path/to/project', // Working directory (optional)
});
await client.connect(transport);
// The transport has launched server.js as a subprocess
// and established stdin/stdout communication
“The stdio transport is ideal for local integrations and command-line tools. It allows processes to communicate through standard input and output streams, making it simple to implement and easy to debug.” – MCP Documentation, Transports
stdio in Configuration Files
Most MCP hosts (Claude Desktop, VS Code extensions, Cursor) use a configuration file that lists servers with their launch commands. The host reads this file and launches each server as a stdio subprocess when needed. Understanding this format is essential for distributing your MCP server.
The standard MCP server configuration format used by Claude Desktop, VS Code, and other hosts.
stdio vs HTTP Transport: When to Use Each
Factor
stdio
HTTP/SSE
Deployment
Local machine only
Local or remote
Multiple clients
One client per process
Many concurrent clients
Network setup
None required
Ports, TLS, CORS
Security isolation
OS process isolation
Network + auth required
Sharing
Not shareable
Shareable across team/internet
State persistence
Lives with host process
Independent lifetime
Failure Modes with stdio
Case 1: Writing to stdout from Server Code
The most common stdio failure. Anything written to stdout by the server process becomes part of the JSON-RPC stream and corrupts the protocol. Use stderr for all logging.
// WRONG: console.log goes to stdout and corrupts the JSON-RPC stream
console.log('Server started');
console.log('Processing request...');
// CORRECT: Use stderr for all server-side output
console.error('Server started');
process.stderr.write('Processing request...\n');
// OR: Use the MCP logging notification capability
server.server.sendLoggingMessage({ level: 'info', data: 'Server started' });
Case 2: Blocking the Event Loop in stdio Server
stdio servers run in a single Node.js process. If a tool handler blocks the event loop (synchronous file read, a tight computation loop), all other requests to the server will queue up and timeout. Always use async I/O in tool handlers.
Run your server through cat – a quick sanity check: echo '{"jsonrpc":"2.0","id":1,"method":"initialize","params":{"protocolVersion":"2024-11-05","clientInfo":{"name":"test","version":"1.0"},"capabilities":{}}}' | node server.js. You should see a JSON-RPC response on stdout and any logs on stderr.
Check for stdout pollution – search your server code for console.log and replace with console.error. Any package that logs to stdout will also cause issues.
Use the Inspector as a stdio test harness – npx @modelcontextprotocol/inspector node server.js gives you a complete GUI client for your stdio server.
Handle SIGTERM gracefully – when the host terminates your server, it sends SIGTERM. Handle it to close database connections and flush logs: process.on('SIGTERM', cleanup).
A server that can read any file anywhere on the filesystem is a security disaster waiting to happen. Roots are MCP’s answer to the containment problem: a mechanism for clients to tell servers exactly which filesystem paths and URIs they are permitted to access. It is not just a security feature – it is also a scoping feature. Roots let the host say “this AI assistant is allowed to work with the files in this project directory”, giving the server a clear operational boundary without restricting it to a fixed list of resources.
Roots: the host tells the server which paths it is allowed to work with, enforcing operational boundaries.
What Roots Are
A root is a URI that defines a boundary of the client’s environment that the server may access. A root most commonly represents a directory on the filesystem (file:///Users/alice/my-project), but it can also be any URI scheme meaningful to the server (https://api.mycompany.com/v1, git://my-org/my-repo). The server should limit its operations to within the URIs provided as roots.
Roots flow from client to server: the client announces its roots when the server requests them via the roots/list method. The client can also notify the server when roots change via the roots/list_changed notification.
// Client: declare roots capability
const client = new Client(
{ name: 'my-ide', version: '1.0.0' },
{
capabilities: {
roots: {
listChanged: true, // Client will notify when roots change
},
},
}
);
// Client: respond to roots/list requests from the server
import { ListRootsRequestSchema } from '@modelcontextprotocol/sdk/types.js';
client.setRequestHandler(ListRootsRequestSchema, async () => ({
roots: [
{
uri: 'file:///Users/alice/my-project',
name: 'My Project',
},
{
uri: 'file:///Users/alice/shared-libs',
name: 'Shared Libraries',
},
],
}));
// Notify server when workspace changes (e.g. user opens a different project)
await client.sendNotification({
method: 'notifications/roots/list_changed',
});
Roots create operational zones: the server is guided to stay within declared URIs and avoid everything else.
Server-Side Roots Usage
On the server side, you request the current roots at startup or whenever you need to know the operational scope. Use roots to validate that requested resource URIs fall within allowed boundaries before accessing them.
import { McpServer } from '@modelcontextprotocol/sdk/server/mcp.js';
import { z } from 'zod';
import path from 'node:path';
import fs from 'node:fs/promises';
import { fileURLToPath } from 'node:url';
const server = new McpServer({ name: 'fs-server', version: '1.0.0' });
// Helper: check if a path is within any declared root
async function isWithinRoots(targetPath, serverInstance) {
const { roots } = await serverInstance.listRoots();
const fileRoots = roots
.filter(r => r.uri.startsWith('file://'))
.map(r => fileURLToPath(r.uri));
const normalised = path.resolve(targetPath);
return fileRoots.some(root => normalised.startsWith(path.resolve(root)));
}
server.tool(
'read_file',
'Reads a file from within the allowed workspace roots',
{ file_path: z.string().describe('Path to the file to read') },
async ({ file_path }, { server: serverInstance }) => {
// Check the path is within declared roots before reading
const allowed = await isWithinRoots(file_path, serverInstance);
if (!allowed) {
return {
isError: true,
content: [{
type: 'text',
text: `Access denied: ${file_path} is outside the allowed workspace roots.`,
}],
};
}
const content = await fs.readFile(file_path, 'utf8');
return { content: [{ type: 'text', text: content }] };
}
);
“Roots represent URI boundaries that define the scope of client access. Servers SHOULD use roots as guidance for what resources and operations to offer, respecting the boundaries set by the client.” – MCP Specification, Roots
Roots for Non-Filesystem URIs
Roots are not limited to file paths. Any URI scheme can be a root, which allows hosts to scope server access to particular API endpoints, repository namespaces, or any other URI-addressed resource space.
// API roots example
client.setRequestHandler(ListRootsRequestSchema, async () => ({
roots: [
{ uri: 'https://api.mycompany.com/v1/projects/42', name: 'Project 42 API' },
{ uri: 'https://api.mycompany.com/v1/users/me', name: 'My User API' },
],
}));
// The server checks that any API call it makes is within these URIs:
async function isApiAllowed(endpoint, serverInstance) {
const { roots } = await serverInstance.listRoots();
return roots.some(r => endpoint.startsWith(r.uri));
}
Failure Modes with Roots
Case 1: Server Ignoring Roots Entirely
Roots are advisory in the current spec – the protocol does not force enforcement on the server. This means a badly implemented server can simply ignore the roots and access anything it wants. In a security-conscious deployment, the host should use OS-level sandboxing (chroot, Docker volumes, seccomp filters) to enforce the boundaries that roots only hint at.
// RISKY: Server trusts roots only, no OS enforcement
// A malicious or buggy server can bypass this
const allowed = await isWithinRoots(userProvidedPath, serverInstance);
if (allowed) await fs.readFile(userProvidedPath); // Only guarded by protocol hint
// SAFER: Add OS-level enforcement too
// Run the server process in a Docker container with volume mounts limited to the root dirs:
// docker run --volume /Users/alice/my-project:/workspace:ro my-mcp-server
Case 2: Not Handling roots/list_changed
If the user changes the active workspace (opens a different project, switches repositories), the client sends roots/list_changed. If the server caches the roots from startup and ignores this notification, it will use stale root information for all subsequent operations.
Declare roots capability on your clients – if you build a host that has a concept of a workspace or project, declare roots and implement the handler. This is what makes your server integration “workspace-aware”.
Validate paths against roots in every file-touching tool – add the isWithinRoots check to every tool that reads or writes files. Do this before any fs.readFile or fs.writeFile call.
Test path traversal attempts – try passing ../../../etc/passwd to a file-reading tool and verify the roots check catches it.
Combine roots with OS isolation – in production, run server processes in containers with volume mounts restricted to the declared roots. Advisory protocol constraints are not a substitute for OS-level isolation.
Some tools cannot complete without asking the user a question. “Which account should I debit?” “What is the date range for this report?” “Are you sure you want to delete all 200 records?” These are not questions an LLM should guess at. They require explicit, structured input from the human in the loop. Elicitation is MCP’s mechanism for this – it lets a server, while handling a request, ask the user for information through the client’s UI, wait for the answer, and then continue. It is a synchronous human-in-the-loop pattern baked into the protocol.
Elicitation: the server pauses tool execution, asks the user a structured question, and resumes with the answer.
How Elicitation Works
When a server needs user input, it sends an elicitation/create request to the client. The request includes a message (explaining what information is needed) and a JSON schema describing the expected response format. The client presents this to the user in whatever UI is appropriate – a dialog box, a prompt, a form – and returns the user’s structured response. The server receives the answer and continues processing.
Elicitation is a client capability – the server can only use it if the client declared elicitation support during initialisation. If the client does not support elicitation, the server must handle the lack of user input gracefully (skip the step, use defaults, or return an error with a clear explanation).
// Client: declare elicitation support
const client = new Client(
{ name: 'my-host', version: '1.0.0' },
{
capabilities: {
elicitation: {
form: {}, // In-band structured data collection
url: {}, // Out-of-band URL navigation (New in 2025-11-25)
},
},
}
);
// Client: implement the elicitation handler
import { ElicitRequestSchema } from '@modelcontextprotocol/sdk/types.js';
client.setRequestHandler(ElicitRequestSchema, async (request) => {
const { message, requestedSchema } = request.params;
// Show UI to user - implementation is host-specific
const userResponse = await showElicitationDialog(message, requestedSchema);
if (userResponse === null) {
// User dismissed/cancelled
return { action: 'cancel' };
}
return {
action: 'accept',
content: userResponse, // Must match requestedSchema
};
});
Why this matters: the handler is the trust boundary between protocol messages and your UI. In a real project you would validate userResponse against requestedSchema before returning accept, and you would time out slow users so the server does not hang forever.
Elicitation schemas: flat JSON schemas that define the exact structure of the user’s expected answer.
The client pieces only declare and route elicitation; the server still decides when to pause a tool and what shape of answer it needs. The next example shows a full tool handler that elicits structured confirmation before a side effect.
Server-Side Elicitation Usage
import { McpServer } from '@modelcontextprotocol/sdk/server/mcp.js';
import { z } from 'zod';
const server = new McpServer({ name: 'payment-server', version: '1.0.0' });
server.tool(
'process_payment',
'Processes a payment transaction with user confirmation',
{
amount: z.number().positive().describe('Amount in USD'),
recipient: z.string().describe('Recipient name or email'),
},
async ({ amount, recipient }, { server: serverInstance }) => {
// Elicit confirmation before processing
const confirmation = await serverInstance.elicitInput({
message: `You are about to send $${amount.toFixed(2)} to ${recipient}. Please confirm the payment account:`,
requestedSchema: {
type: 'object',
properties: {
account_id: {
type: 'string',
description: 'Your account ID to debit (format: ACC-XXXXXXXX)',
},
confirmed: {
type: 'boolean',
description: 'Confirm you want to proceed with this payment',
},
},
required: ['account_id', 'confirmed'],
},
});
if (confirmation.action === 'cancel') {
return { content: [{ type: 'text', text: 'Payment cancelled by user.' }] };
}
if (!confirmation.content.confirmed) {
return { content: [{ type: 'text', text: 'Payment declined - user did not confirm.' }] };
}
const result = await processPayment({
amount,
recipient,
accountId: confirmation.content.account_id,
});
return { content: [{ type: 'text', text: `Payment ${result.transactionId} processed successfully.` }] };
}
);
Why this pattern matters: money-moving and irreversible actions are where silent model guesses hurt the most. In a real project you would keep the elicitation copy short, show the same numbers the server will use, and log the outcome for audit without storing secrets in the model context.
“Elicitation allows servers to request additional information from users during tool execution. This enables interactive workflows where user input is needed to complete tasks, while maintaining a clear separation between the AI model and the human oversight layer.” – MCP Specification, Elicitation
Elicitation Schema Constraints
The schema for an elicitation request is deliberately restricted compared to full JSON Schema. This is intentional – the schema must be renderable by any client UI, which means it cannot be arbitrarily complex. The spec defines a “flat” schema: a single object with primitive properties (string, number, boolean, or enum). No nested objects, no arrays, no $ref references.
// VALID elicitation schema - flat, primitive properties only
{
type: 'object',
properties: {
name: { type: 'string', description: 'Your full name' },
age: { type: 'number', description: 'Your age in years' },
agree_to_terms: { type: 'boolean', description: 'Do you agree to the terms?' },
plan: { type: 'string', enum: ['basic', 'pro', 'enterprise'], description: 'Choose a plan' },
},
required: ['name', 'agree_to_terms'],
}
// INVALID: Nested objects not allowed in elicitation schemas
{
type: 'object',
properties: {
address: {
type: 'object', // This will fail - nested objects not permitted
properties: { street: { type: 'string' } },
},
},
}
If you need a richer form, split it into sequential elicitations or collect details before the tool runs. The flat schema trade-off keeps portable clients implementable; planning your UX around that limit avoids spec violations at runtime.
Failure Modes with Elicitation
Case 1: Not Handling cancel Action
Users can always cancel an elicitation. If your tool handler does not check for the cancel action, it will try to proceed with undefined data and crash or produce garbage output.
// BAD: No cancel check
const response = await serverInstance.elicitInput({ ... });
await processData(response.content.value); // Will throw if action was 'cancel'
// GOOD: Always check the action
const response = await serverInstance.elicitInput({ ... });
if (response.action !== 'accept') {
return { content: [{ type: 'text', text: 'Action cancelled.' }] };
}
await processData(response.content.value);
Case 2: Using Elicitation When a Tool Parameter Would Suffice
Elicitation is for input the server cannot know at design time – confirmation of a specific action, a password, runtime context. If the information can be a tool argument, make it a tool argument. Elicitation adds a round-trip to the user and breaks the automated flow.
// WRONG: Using elicitation for something that should be an arg
server.tool('delete_record', '...', { id: z.string() }, async ({ id }, ctx) => {
const confirm = await ctx.server.elicitInput({ message: 'Confirm deletion?', ... });
// Should this really need an interactive prompt? Or is --confirm a better pattern?
});
// BETTER: Use tool annotations + let the host handle confirmation
server.tool(
'delete_record',
'Permanently deletes a record',
{ id: z.string(), confirm: z.boolean().describe('Set true to confirm permanent deletion') },
{ annotations: { destructiveHint: true } },
async ({ id, confirm }) => {
if (!confirm) return { isError: true, content: [{ type: 'text', text: 'Set confirm=true to proceed.' }] };
await db.delete(id);
return { content: [{ type: 'text', text: `Deleted ${id}` }] };
}
);
URL Mode Elicitation
New in 2025-11-25
Form mode elicitation passes user data through the MCP client – the client renders the form, collects the response, and relays it back to the server. This is fine for non-sensitive data like preferences, date ranges, or confirmation flags. But some workflows need the user to enter credentials, sign a document, or complete an OAuth flow in a secure context where the MCP client should never see the raw data. URL mode solves this by directing the user to an external URL for the sensitive interaction.
When a server sends a URL mode elicitation, the client opens the target URL (in a browser or embedded webview), and the user interacts directly with the server’s web page. The sensitive data (password, API key, payment info) stays between the user and the server’s web endpoint. The MCP client only learns whether the user completed or cancelled the flow.
// Server: elicit via URL mode for credential entry
const result = await serverInstance.elicitInput({
mode: 'url',
message: 'Please sign in to your GitHub account to grant repository access.',
url: 'https://auth.example.com/github/connect?session=abc123',
});
if (result.action === 'cancel') {
return { content: [{ type: 'text', text: 'GitHub authentication cancelled.' }] };
}
// result.action === 'accept' means the user completed the flow
// The server's web endpoint already has the credential from the callback
const repos = await fetchGitHubRepos(sessionId);
return { content: [{ type: 'text', text: `Connected. Found ${repos.length} repositories.` }] };
The specification requires that servers MUST NOT use form mode for sensitive information. If your tool needs a password, API key, or payment detail, use URL mode. The client MUST display the target domain and get user consent before navigating. This is a trust boundary: the user decides whether to visit the URL, and the MCP client never touches the sensitive data.
Clients declare URL mode support in their capabilities: { elicitation: { form: {}, url: {} } }. A client that only supports form mode omits the url key. For backwards compatibility, an empty elicitation: {} object is treated as form-only. Servers MUST check the client’s declared capabilities before sending a URL mode request.
Titled and Multi-Select Enums
New in 2025-11-25
Earlier versions of elicitation only supported bare enums: enum: ['basic', 'pro', 'enterprise']. The 2025-11-25 spec adds titled enums (human-readable labels for each option) and multi-select enums (the user can pick more than one value). These make elicitation forms more usable without adding nested schema complexity.
// Titled enum: each option has a display label
const response = await serverInstance.elicitInput({
message: 'Select your deployment region:',
requestedSchema: {
type: 'object',
properties: {
region: {
type: 'string',
enum: ['us-east-1', 'eu-west-1', 'ap-southeast-1'],
enumNames: ['US East (Virginia)', 'EU West (Ireland)', 'Asia Pacific (Singapore)'],
description: 'AWS region for deployment',
},
},
required: ['region'],
},
});
// Multi-select enum: user picks one or more values
const tagsResponse = await serverInstance.elicitInput({
message: 'Tag this record (select all that apply):',
requestedSchema: {
type: 'object',
properties: {
tags: {
type: 'array',
items: {
type: 'string',
enum: ['urgent', 'billing', 'technical', 'feature-request'],
enumNames: ['Urgent', 'Billing Issue', 'Technical Support', 'Feature Request'],
},
description: 'One or more tags for this support ticket',
},
},
required: ['tags'],
},
});
Titled enums prevent the user from seeing raw enum values like us-east-1 when the client renders the form – instead they see “US East (Virginia)”. Multi-select enums use an array wrapper around the enum type. Both features keep the schema flat and portable across client UIs.
Default Values in Elicitation Schemas
New in 2025-11-25
All primitive types in elicitation schemas now support a default value. The client pre-fills the form field with the default, reducing friction for the common case while still letting the user override when needed.
Defaults reduce the number of fields the user has to actively fill in. For high-frequency workflows (daily exports, recurring queries), a well-chosen default turns a multi-field form into a single-click confirmation.
What to Check Right Now
Map your interactive flows – identify any workflow in your application that requires user input mid-execution. These are elicitation candidates.
Keep schemas flat – validate your elicitation schemas against the spec constraints: flat object, primitive values only, no nested objects or arrays.
Always handle cancel and decline – every elicitation can result in cancel (user dismissed) or decline (user responded negatively). Handle all three outcomes.
Check client support first – before calling elicitInput, check client.getClientCapabilities()?.elicitation. If the client does not support it, fall back to tool-argument-based confirmation.
Use URL mode for sensitive data – passwords, API keys, and payment details MUST go through URL mode, never form mode. Check that the client declares url in its elicitation capabilities before sending a URL mode request.
Add defaults to common fields – pre-fill format, limit, and toggle fields so the user can confirm with one click in routine workflows.
Here is the mind-bending part of MCP: servers can ask the LLM for help. In the standard model, the flow is one-way – host calls LLM, LLM calls tool, tool runs on server, result goes back. Sampling reverses one arrow. It lets a server, while handling a request, ask the host’s LLM to generate text – and then use that generated text in its response. This is recursive AI, and it is what enables genuinely intelligent MCP servers that reason about their own actions.
Sampling: the server requests an LLM inference from the client, enabling server-side reasoning loops.
The Sampling Flow
Sampling works as follows: a server handling a tool call decides it needs to “think” before it can respond. It sends a sampling/createMessage request to the client. The client receives this, shows the pending sampling request to the user (or approves it automatically based on policy), then calls the actual LLM API, and returns the result to the server. The server uses the result to complete its work and returns the final tool response to the original caller.
The critical point: the server does not know which LLM the client is using. It just asks for “a language model response” and gets back generated text. This maintains provider-agnosticism even for server-side reasoning.
// Client configuration to enable sampling
const client = new Client(
{ name: 'my-host', version: '1.0.0' },
{
capabilities: {
sampling: {}, // Must declare this to receive sampling requests from servers
},
}
);
// Client must handle incoming sampling requests
client.setRequestHandler(CreateMessageRequestSchema, async (request) => {
const { messages, maxTokens, temperature } = request.params;
// Here the host calls its actual LLM
const openai = new OpenAI();
const response = await openai.chat.completions.create({
model: 'gpt-4o',
messages: messages.map(m => ({
role: m.role,
content: typeof m.content === 'string' ? m.content : m.content.text,
})),
max_tokens: maxTokens || 1000,
temperature: temperature || 0.7,
});
return {
role: 'assistant',
content: { type: 'text', text: response.choices[0].message.content },
model: 'gpt-4o',
stopReason: 'endTurn',
};
});
Why this matters: without capabilities.sampling the server cannot request completions at all, and without a handler every sampling call fails the tool mid-flight. In a real project you would centralise LLM calls here so quotas, logging, and redaction policies stay in one place on the host.
A server using sampling to analyse data before returning a structured response.
Server-Side Sampling Usage
On the server side, you request sampling through the server’s sampling capability. Here is a server that uses sampling to classify user intent before deciding which database to query:
import { McpServer } from '@modelcontextprotocol/sdk/server/mcp.js';
import { z } from 'zod';
const server = new McpServer({ name: 'smart-search', version: '1.0.0' });
server.tool(
'intelligent_search',
'Searches across databases, routing the query based on intent',
{ query: z.string().describe('The search query') },
async ({ query }, { server: serverInstance }) => {
// Use sampling to classify the query intent
const classification = await serverInstance.createMessage({
messages: [{
role: 'user',
content: {
type: 'text',
text: `Classify this search query into one of: products, users, orders, docs.\nQuery: "${query}"\nRespond with only the category name.`,
},
}],
maxTokens: 10,
});
const category = classification.content.text.trim().toLowerCase();
// Route to the appropriate search function
let results;
switch (category) {
case 'products': results = await searchProducts(query); break;
case 'users': results = await searchUsers(query); break;
case 'orders': results = await searchOrders(query); break;
default: results = await searchDocs(query);
}
return { content: [{ type: 'text', text: JSON.stringify(results) }] };
}
);
In a real project you would treat the classification step as a bounded, cheap call (low maxTokens, strict prompt) and keep routing logic easy to unit test. If the model returns an unexpected label, fall back to a safe default path instead of failing the whole tool.
“Sampling allows servers to request LLM completions through the client, enabling sophisticated agentic behaviors while maintaining security through human oversight. The client retains control over which model is used and what requests are permitted.” – MCP Documentation, Sampling
Sampling Parameters
The sampling/createMessage request supports model preferences and sampling parameters. These are preferences, not requirements – the client may choose to ignore them if they conflict with its policy or available models.
Those preferences are negotiation, not a guarantee: the host may pin a single approved model or ignore cost and speed hints for compliance. Use them to express intent, then document what your client actually honours so server authors know what to expect.
Failure Modes with Sampling
Case 1: Using Sampling for Every Decision
Sampling adds latency and cost. Using it for decisions that can be made with deterministic code (string matching, regex, a simple lookup) is waste. Reserve sampling for genuinely ambiguous situations where LLM understanding adds real value.
// WASTEFUL: Sampling for something a regex handles
const isEmail = await serverInstance.createMessage({
messages: [{ role: 'user', content: { type: 'text', text: `Is "${input}" an email address? Yes or No.` } }],
maxTokens: 5,
});
// BETTER: Just use a regex
const isEmail = /^[^@]+@[^@]+\.[^@]+$/.test(input);
Why this matters: every sampling round trip adds latency and billed tokens. In a real project you would profile hot tools and replace LLM branches with deterministic code wherever the spec is stable.
Case 2: Infinite Sampling Loops
If a server uses sampling and the LLM response triggers another tool call that uses sampling again, you can create infinite loops. Always set a maximum recursion depth and terminate if exceeded.
Starting with spec version 2025-11-25, servers can include tools and toolChoice parameters in a sampling/createMessage request. This lets the server constrain which tools the LLM may call during the sampling turn. Without this, the LLM during sampling would either have no tools at all or the full tool set – there was no way for the server to scope the tools available during a recursive inference.
// Server: sampling request with constrained tool set
const response = await serverInstance.createMessage({
messages: [{
role: 'user',
content: {
type: 'text',
text: 'Look up the current status of order ORD-12345 and summarise it.',
},
}],
maxTokens: 500,
tools: [
{
name: 'get_order_status',
description: 'Look up the current status of an order by ID',
inputSchema: {
type: 'object',
properties: {
orderId: { type: 'string', description: 'The order ID' },
},
required: ['orderId'],
},
},
],
toolChoice: { type: 'auto' }, // 'auto' | 'none' | { type: 'tool', name: '...' }
});
The tools array defines the tool definitions available during this specific sampling turn. The toolChoice parameter controls how the LLM selects tools: "auto" lets the model decide, "none" disables tool use entirely, and { type: 'tool', name: 'get_order_status' } forces a specific tool. This is useful when a server needs the LLM to do a lookup-then-reason task: you provide only the lookup tool, the LLM calls it, gets the data, and writes a summary.
The client is responsible for actually executing the tool calls the LLM makes during sampling. The client returns the final assistant message to the server, including any tool results in the conversation. This keeps the server out of the tool execution loop during its own sampling request – the client manages the entire multi-turn tool-use conversation internally.
What to Check Right Now
Declare sampling on your client – if you want servers to be able to use sampling, your client must declare capabilities: { sampling: {} }. Without this, sampling requests from servers will be rejected.
Implement a sampling handler – if you build a host application, implement the CreateMessageRequestSchema handler. An unimplemented handler will cause all sampling requests to fail silently.
Show sampling requests to users – the spec emphasises human oversight. Production hosts should surface pending sampling requests to users and allow approval/rejection.
Cap sampling depth – any server that uses sampling recursively must have a maximum depth limit. Without it, one malformed query can run up unbounded costs.