
This capstone builds the most complete MCP application in the course: an enterprise AI assistant with OAuth 2.0 authentication, RBAC tool access control, full audit logging, rate limiting, and a multi-provider backend. It brings together patterns from every major part of the course into a single deployable system. Deploy it and you have a production-ready enterprise AI assistant that your security team can audit and your compliance team can sign off on.
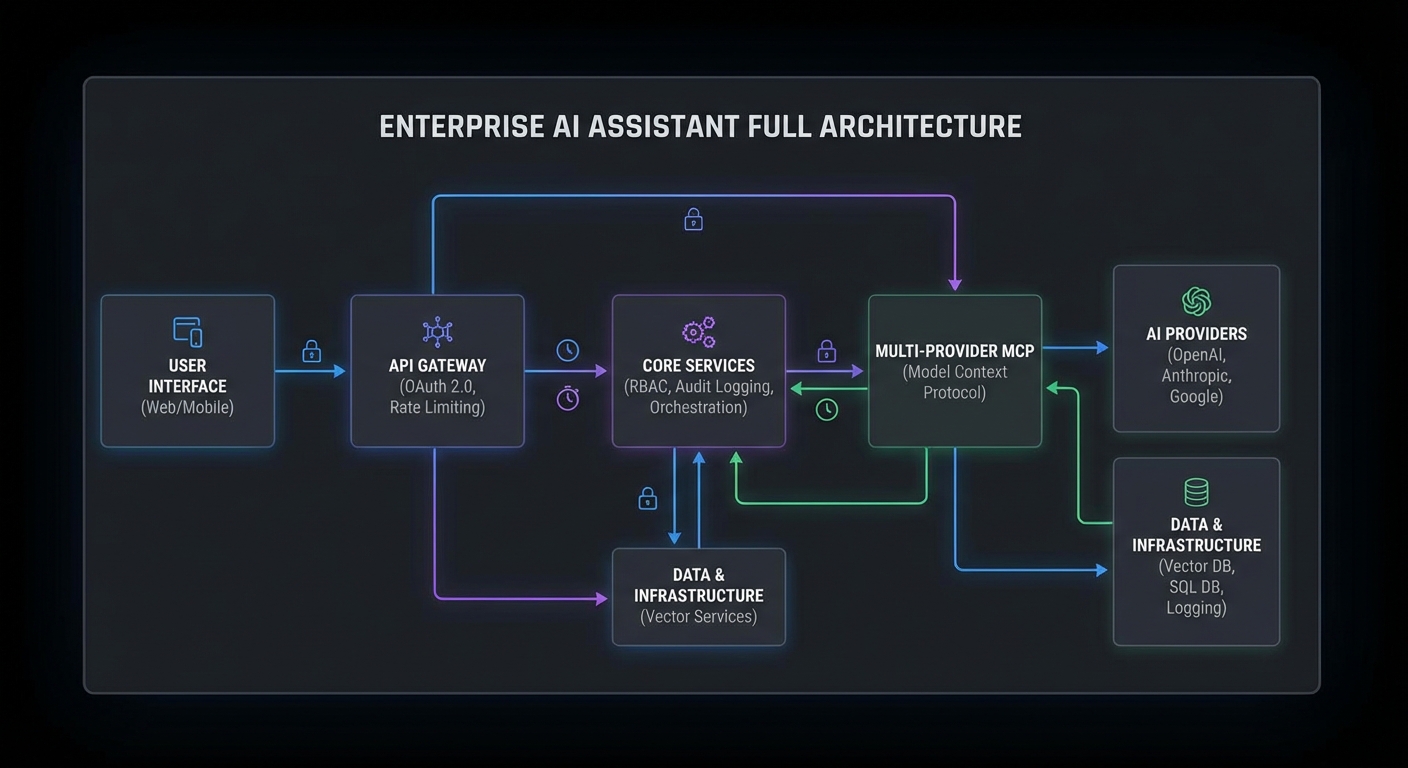
System Architecture
enterprise-assistant/
├── gateway/
│   ├── server.js          (HTTP API gateway with auth + rate limiting)
│   ├── auth.js            (OAuth 2.0 token validation, JWKS)
│   ├── rbac.js            (Role-to-scope mapping, tool filtering)
│   ├── audit.js           (Structured audit logging)
│   └── rate-limiter.js    (Per-user rate limiting with Redis)
├── agent/
│   ├── router.js          (Multi-provider routing: OpenAI/Claude/Gemini)
│   └── executor.js        (Tool loop with retry, timeout, token budget)
├── servers/
│   ├── knowledge-server.js (Knowledge base search)
│   └── actions-server.js   (Business action tools)
└── docker-compose.yml
The Gateway Server
// gateway/server.js
import express from 'express';
import { validateToken, getRolesFromToken } from './auth.js';
import { getScopeFromRoles, getAllowedTools } from './rbac.js';
import { AuditLogger } from './audit.js';
import { createRateLimiter } from './rate-limiter.js';
import { createAgent } from '../agent/router.js';

const app = express();
app.use(express.json());

const auditLog = new AuditLogger();
const rateLimiter = createRateLimiter(60);  // 60 req/min per user

// Health check
app.get('/health', (req, res) => res.json({ status: 'ok', uptime: process.uptime() }));
app.get('/metrics', (req, res) => res.end(getPrometheusMetrics()));

// Main API endpoint
app.post('/api/ask', async (req, res) => {
  const requestId = crypto.randomUUID();

  // 1. Authenticate
  const authHeader = req.headers.authorization;
  if (!authHeader?.startsWith('Bearer ')) {
    return res.status(401).json({ error: 'Bearer token required' });
  }

  let claims;
  try {
    claims = await validateToken(authHeader.slice(7));
  } catch {
    return res.status(401).json({ error: 'Invalid token' });
  }

  // 2. Rate limit
  try {
    await rateLimiter.consume(claims.sub);
  } catch (rl) {
    res.setHeader('Retry-After', Math.ceil(rl.msBeforeNext / 1000));
    return res.status(429).json({ error: 'Rate limit exceeded' });
  }

  // 3. Determine role and scope
  const roles = getRolesFromToken(claims);
  const scope = getScopeFromRoles(roles);

  // 4. Get question
  const { question, preferredProvider } = req.body;
  if (!question?.trim()) return res.status(400).json({ error: 'question is required' });

  // 5. Build and run the agent
  const agent = await createAgent({ scope, preferredProvider });

  // 6. Run with audit logging
  await auditLog.write({
    eventId: requestId,
    eventType: 'api_request',
    actor: { userId: claims.sub, roles },
    request: { question: question.slice(0, 100) },
    scope: scope.split(' '),
  });

  try {
    const answer = await agent.run(question);

    await auditLog.write({
      eventId: requestId,
      eventType: 'api_response',
      actor: { userId: claims.sub },
      outcome: { success: true },
    });

    res.json({ answer, requestId });
  } catch (err) {
    await auditLog.write({
      eventId: requestId,
      eventType: 'api_error',
      actor: { userId: claims.sub },
      outcome: { success: false, error: err.message },
    });
    res.status(500).json({ error: 'Agent execution failed', requestId });
  } finally {
    await agent.close();
  }
});

const PORT = process.env.PORT ?? 3000;
app.listen(PORT, () => console.log(`Enterprise assistant listening on :${PORT}`));
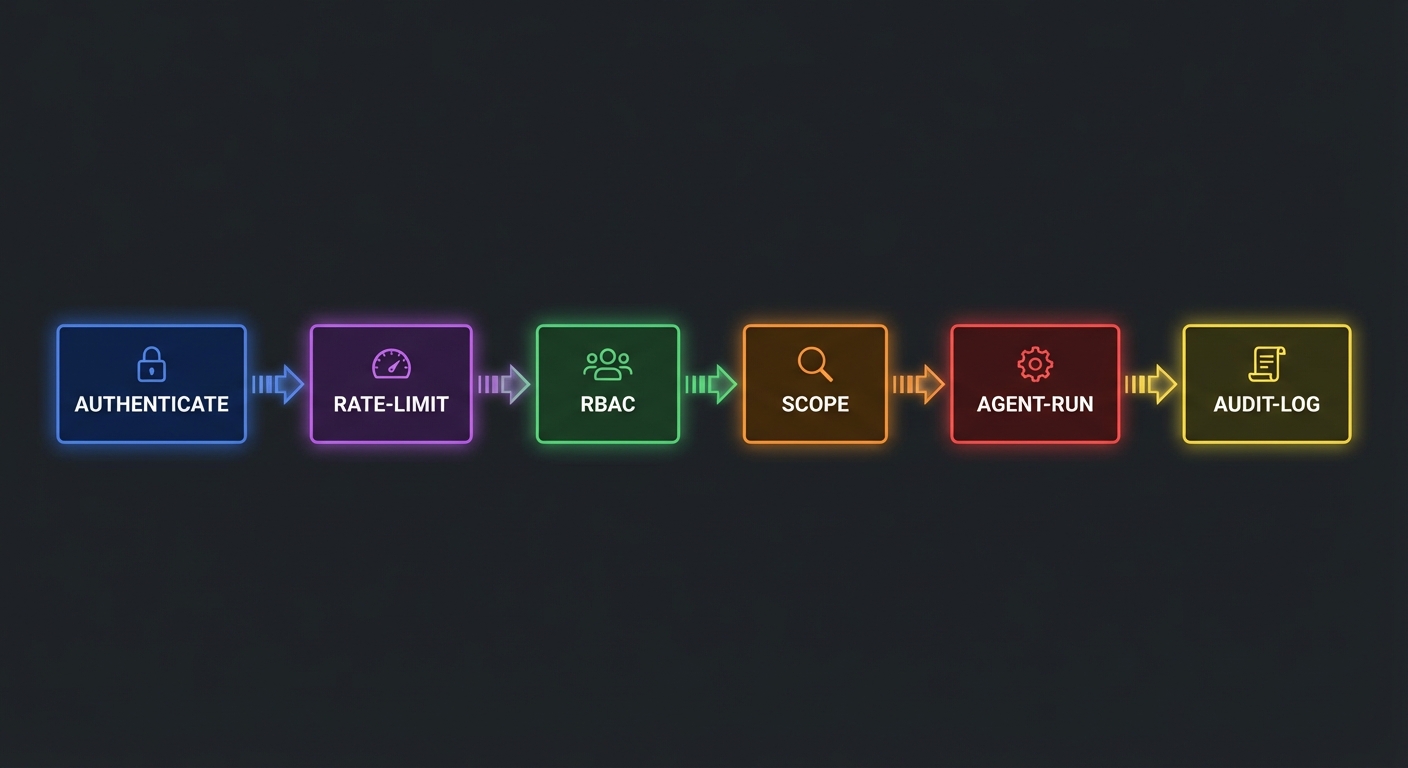
The six-stage pipeline (authenticate, rate limit, resolve roles, validate input, run agent, audit) is the same request lifecycle used by production API gateways at companies like Stripe and Shopify. Each stage can reject the request independently, and the audit log captures the outcome regardless of success or failure. This is what compliance teams actually review during security audits.
Notice that the agent is created fresh per request and closed in the finally block. This prevents one user’s MCP session state from leaking into another user’s query. It costs a bit more in connection overhead, but the isolation guarantee is worth it for a multi-tenant system.
RBAC Configuration
// gateway/rbac.js
const ROLE_SCOPES = {
  employee: 'knowledge:read',
  manager: 'knowledge:read actions:read',
  admin: 'knowledge:read knowledge:write actions:read actions:write',
};

const SCOPE_TOOLS = {
  'knowledge:read': ['search_knowledge', 'get_article', 'list_categories'],
  'knowledge:write': ['create_article', 'update_article', 'publish_article'],
  'actions:read': ['get_ticket', 'list_tickets', 'get_report'],
  'actions:write': ['create_ticket', 'update_ticket', 'trigger_alert'],
};

export function getScopeFromRoles(roles) {
  return [...new Set(roles.flatMap(r => (ROLE_SCOPES[r] ?? '').split(' ')).filter(Boolean))].join(' ');
}

export function getAllowedTools(scope, allTools) {
  const allowed = new Set(
    scope.split(' ').flatMap(s => SCOPE_TOOLS[s] ?? [])
  );
  return allTools.filter(t => allowed.has(t.name));
}
A misconfigured RBAC map is one of the most dangerous bugs in this system. If you accidentally give the employee role actions:write scope, every employee can trigger alerts and modify tickets through the AI assistant. Always test your scope mapping with unit tests, and consider adding a “dry run” mode that logs what a user would be allowed to do without actually executing anything.
Multi-Provider Agent Router
// agent/router.js - select provider based on question complexity
import { OpenAIProvider } from './providers/openai.js';
import { ClaudeProvider } from './providers/claude.js';
import { GeminiProvider } from './providers/gemini.js';
import { getAllowedTools } from '../gateway/rbac.js';

export async function createAgent({ scope, preferredProvider = 'auto' }) {
  // Load MCP servers
  const mcpClients = await connectMcpServers();
  const allTools = await aggregateTools(mcpClients);
  const scopedTools = getAllowedTools(scope, allTools);

  // Select provider
  const question = '';  // Provider selection is done at query time
  const providerKey = preferredProvider === 'auto'
    ? selectProvider(question)
    : preferredProvider;

  const Provider = { openai: OpenAIProvider, claude: ClaudeProvider, gemini: GeminiProvider }[providerKey];
  const provider = new Provider({ maxTurns: 12, tokenBudget: 50_000 });

  return {
    async run(question) {
      return provider.run(question, scopedTools, mcpClients);
    },
    async close() {
      await Promise.all(mcpClients.map(c => c.close()));
    },
  };
}
The multi-provider router gives you vendor resilience. If OpenAI has an outage, you can fall back to Claude or Gemini without changing any application code. In practice, teams also use this pattern for cost optimization – routing simple queries to cheaper models and complex analytical questions to more capable ones.
Deployment
services:
  gateway:
    build: .
    ports: ["3000:3000"]
    environment:
      OPENAI_API_KEY: ${OPENAI_API_KEY}
      ANTHROPIC_API_KEY: ${ANTHROPIC_API_KEY}
      GEMINI_API_KEY: ${GEMINI_API_KEY}
      JWKS_URL: ${JWKS_URL}
      REDIS_URL: redis://redis:6379
    depends_on: [redis]
    healthcheck:
      test: ["CMD", "wget", "-qO-", "http://localhost:3000/health"]
      interval: 30s; timeout: 5s; retries: 3

  redis:
    image: redis:7-alpine
    volumes: ["redis-data:/data"]

volumes:
  redis-data:
The Docker Compose file gives you a single docker compose up to launch the entire stack locally. Redis handles both rate limiting state and session caching. For production, you would swap the single Redis container for a managed service (like AWS ElastiCache or GCP Memorystore) and add TLS termination in front of the gateway.
nJoy 😉