
Remote MCP servers exposed over HTTP need authentication. The MCP specification recommends OAuth 2.0 with PKCE for browser-based and CLI clients. This lesson covers the complete OAuth 2.0 flow for MCP: the authorization server setup, the protected resource server, the client-side PKCE dance, and the token refresh lifecycle. When you finish this lesson your MCP server will reject unauthenticated connections and correctly scope what each authenticated client can access.
Why OAuth 2.0 for MCP
MCP servers are effectively APIs. They expose tools, resources, and prompts that can access sensitive data, execute code, or modify state. Without authentication, any client that knows the server URL can use those capabilities. OAuth 2.0 provides:
- Authentication: Only clients that obtain a valid token can connect
- Authorization: Tokens can carry scopes that limit which tools and resources a client can access
- Delegation: A human user can authorize a client to act on their behalf without sharing passwords
- Revocation: Access can be revoked immediately by invalidating the token
In practice, every MCP server you expose over HTTP is an unauthenticated attack surface until you layer on OAuth. Even internal servers benefit from token-based auth, because lateral movement between compromised services is one of the most common patterns in real-world breaches.
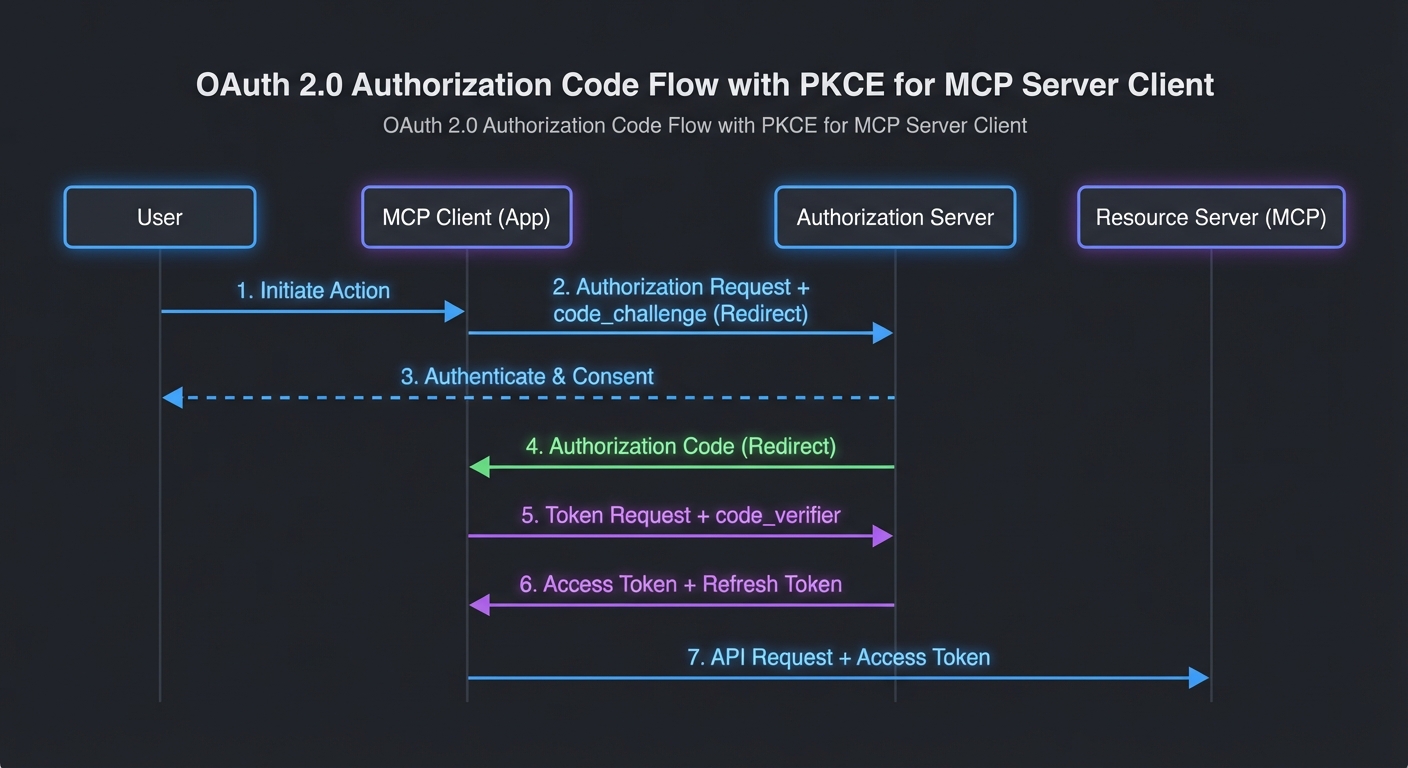
The MCP OAuth Flow
The flow follows OAuth 2.0 Authorization Code + PKCE (RFC 7636):
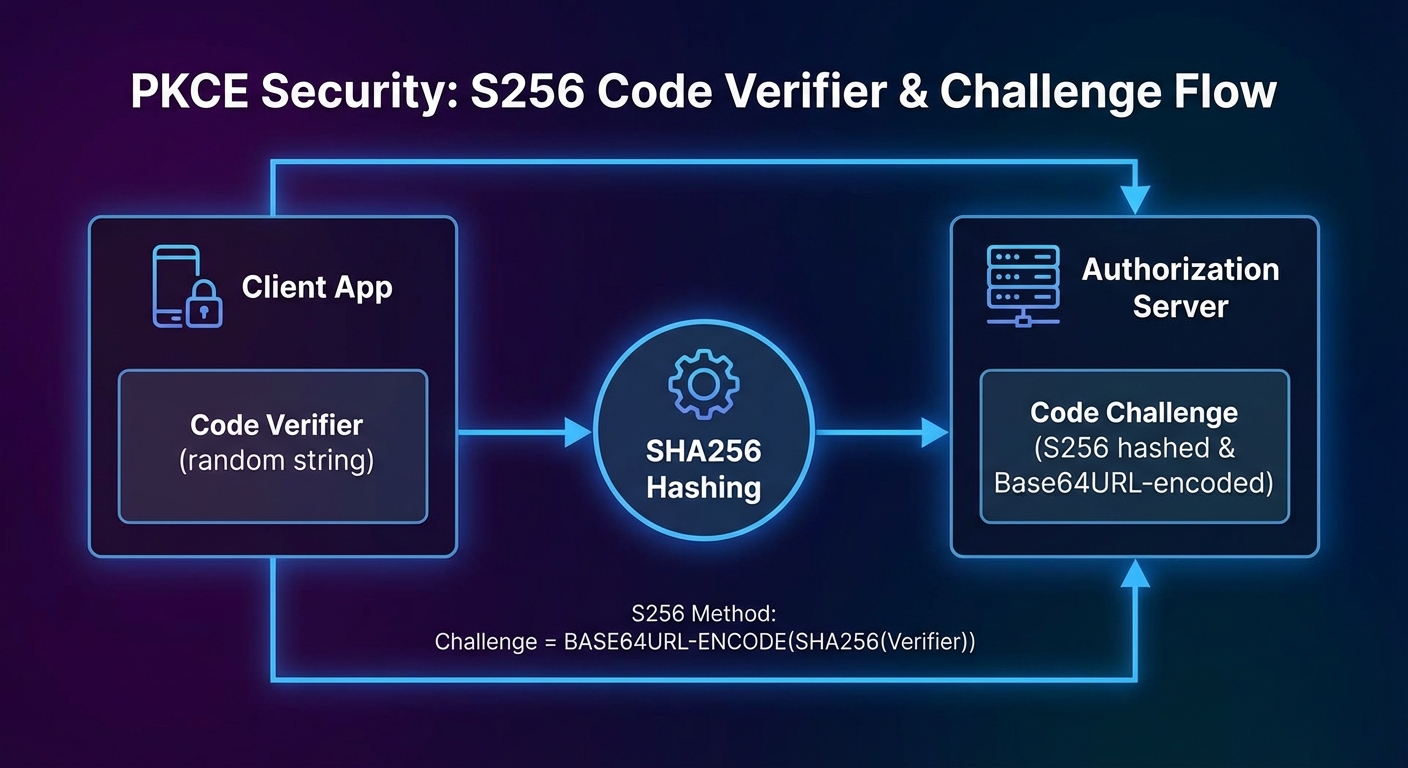
// Step 1: Client generates PKCE code verifier and challenge
import crypto from 'node:crypto';

function generatePkce() {
  const verifier = crypto.randomBytes(32).toString('base64url');
  const challenge = crypto.createHash('sha256').update(verifier).digest('base64url');
  return { verifier, challenge };
}

// Step 2: Client redirects user to authorization URL
function buildAuthUrl(config, pkce, state) {
  const params = new URLSearchParams({
    response_type: 'code',
    client_id: config.clientId,
    redirect_uri: config.redirectUri,
    scope: config.scopes.join(' '),
    state,
    code_challenge: pkce.challenge,
    code_challenge_method: 'S256',
  });
  return `${config.authorizationEndpoint}?${params}`;
}

// Step 3: User authorizes, gets redirected back with code
// Step 4: Client exchanges code for tokens
async function exchangeCode(config, code, pkce) {
  const response = await fetch(config.tokenEndpoint, {
    method: 'POST',
    headers: { 'Content-Type': 'application/x-www-form-urlencoded' },
    body: new URLSearchParams({
      grant_type: 'authorization_code',
      client_id: config.clientId,
      redirect_uri: config.redirectUri,
      code,
      code_verifier: pkce.verifier,
    }),
  });
  if (!response.ok) throw new Error(`Token exchange failed: ${response.status}`);
  return response.json();
}
This matters because MCP clients are often CLI tools or desktop apps that cannot safely store a client secret. PKCE lets these “public clients” prove they initiated the authorization request without holding a long-lived credential. Without PKCE, an attacker who intercepts the authorization code could exchange it for tokens before your client does.
Protecting an MCP Server with Bearer Tokens
import express from 'express';
import { McpServer } from '@modelcontextprotocol/sdk/server/mcp.js';
import { StreamableHTTPServerTransport } from '@modelcontextprotocol/sdk/server/streamable-http.js';

const app = express();

// Token validation middleware
async function requireAuth(req, res, next) {
  const authHeader = req.headers.authorization;
  if (!authHeader?.startsWith('Bearer ')) {
    return res.status(401).json({ error: 'unauthorized', error_description: 'Bearer token required' });
  }
  const token = authHeader.slice(7);
  try {
    // Validate with your auth server (introspection endpoint, or local JWT verification)
    const claims = await validateToken(token);
    req.auth = claims;  // { sub, scope, exp }
    next();
  } catch {
    res.status(401).json({ error: 'invalid_token', error_description: 'Token is invalid or expired' });
  }
}

// Apply auth to the MCP endpoint
app.use('/mcp', requireAuth);

app.post('/mcp', async (req, res) => {
  const transport = new StreamableHTTPServerTransport({ sessionIdGenerator: () => crypto.randomUUID() });
  const server = buildMcpServer(req.auth);  // Pass auth claims to server for per-user tool filtering
  await server.connect(transport);
  await transport.handleRequest(req, res, req.body);
});
The middleware above delegates validation to a validateToken function, which could call a remote introspection endpoint or verify a JWT locally. For most MCP deployments, local JWT verification is faster and avoids a network round-trip on every request. The next section shows how to do that with the jose library.
JWT Validation (Self-Contained Tokens)
import { createRemoteJWKSet, jwtVerify } from 'jose';

// Cache the JWKS (JSON Web Key Set) fetched from your auth server
const JWKS = createRemoteJWKSet(new URL('https://auth.yourcompany.com/.well-known/jwks.json'));

async function validateToken(token) {
  const { payload } = await jwtVerify(token, JWKS, {
    issuer: 'https://auth.yourcompany.com',
    audience: 'mcp-server',
  });
  return payload;
}
Token Refresh Lifecycle in MCP Clients
class TokenManager {
  #accessToken = null;
  #refreshToken = null;
  #expiresAt = 0;

  setTokens({ access_token, refresh_token, expires_in }) {
    this.#accessToken = access_token;
    this.#refreshToken = refresh_token;
    this.#expiresAt = Date.now() + (expires_in - 60) * 1000;  // 60s buffer
  }

  async getAccessToken(config) {
    if (Date.now() < this.#expiresAt) return this.#accessToken;
    if (!this.#refreshToken) throw new Error('Session expired - re-authentication required');

    const response = await fetch(config.tokenEndpoint, {
      method: 'POST',
      headers: { 'Content-Type': 'application/x-www-form-urlencoded' },
      body: new URLSearchParams({
        grant_type: 'refresh_token',
        client_id: config.clientId,
        refresh_token: this.#refreshToken,
      }),
    });
    if (!response.ok) throw new Error('Token refresh failed');
    this.setTokens(await response.json());
    return this.#accessToken;
  }
}

// Use it in the MCP transport
const tokenManager = new TokenManager();
const transport = new StreamableHTTPClientTransport(new URL(MCP_SERVER_URL), {
  requestInit: async () => ({
    headers: { Authorization: `Bearer ${await tokenManager.getAccessToken(oauthConfig)}` },
  }),
});
A subtle pitfall here: if the refresh token itself has expired or been revoked, the getAccessToken call will fail with no way to recover except re-authenticating the user. In long-running MCP clients like IDE extensions, you should catch this failure and prompt the user to re-authorize rather than silently failing all subsequent tool calls.
Using an Existing Auth Provider
For production, use an existing OAuth 2.0 provider rather than building your own authorization server:
- Auth0: Managed OAuth + JWKS endpoint, simple Node.js SDK
- Google OAuth 2.0: For Google Workspace integrations
- GitHub OAuth: For developer-facing MCP tools
- Keycloak: Self-hosted, enterprise IAM with fine-grained authorization
Whichever provider you choose, the MCP server side stays the same: validate the Bearer token, extract claims, and pass them into the server builder. The provider handles user management, consent screens, and token issuance so you can focus on MCP-specific authorization logic.
Client ID Metadata Documents (CIMD)
New in 2025-11-25
Dynamic Client Registration (DCR) requires every client to register with every authorization server it connects to. This creates friction: the client must exchange a registration request, store a per-server client_id, and handle registration failures. Client ID Metadata Documents (CIMD) replace DCR for most use cases by letting the client publish a metadata document at a well-known URL and use that URL as its client_id.
The flow works like this: the client chooses a URL it controls (e.g. https://my-mcp-client.example.com/.well-known/oauth-client) and serves a JSON document at that URL describing itself. When the client sends an authorization request to any MCP server, it uses the URL as its client_id. The authorization server fetches the metadata document, verifies it, and proceeds with the OAuth flow. No per-server registration step is needed.
// Client ID Metadata Document served at the client_id URL
// GET https://my-mcp-client.example.com/.well-known/oauth-client
{
  "client_id": "https://my-mcp-client.example.com/.well-known/oauth-client",
  "client_name": "My MCP Desktop Client",
  "redirect_uris": ["http://127.0.0.1:9876/callback"],
  "grant_types": ["authorization_code"],
  "response_types": ["code"],
  "token_endpoint_auth_method": "none",
  "scope": "mcp:tools mcp:resources"
}
CIMD is the recommended registration mechanism for public clients (desktop apps, CLI tools, browser extensions) that cannot securely store a client secret. For confidential server-to-server clients, traditional DCR or pre-registered credentials remain appropriate.
Incremental Scope Consent
New in 2025-11-25
When a client's current token does not have sufficient scope for a requested operation, the server can signal this via a WWW-Authenticate header with a scope parameter indicating the additional scopes needed. The client can then request the user's consent for just the additional scopes, rather than re-authorizing all scopes from scratch.
// Server responds 403 with WWW-Authenticate indicating needed scope
// HTTP/1.1 403 Forbidden
// WWW-Authenticate: Bearer scope="mcp:admin:delete"

// Client: request incremental consent for the new scope
const additionalScopes = parseWWWAuthenticate(response.headers['www-authenticate']);
const newToken = await requestIncrementalConsent(additionalScopes);
// Retry the request with the upgraded token
This is important for progressive authorization: start a session with minimal scopes (read tools, list resources), then ask for elevated scopes (write, delete, admin) only when the user actually tries to do something that needs them. It reduces the initial consent burden and follows the principle of least privilege.
Common Authentication Failures
- Returning 403 instead of 401: 401 means "not authenticated" (present credentials), 403 means "authenticated but not authorized" (wrong scope). Use the right code or clients will not know to re-authenticate.
- Not validating the audience claim: A token issued for your user service should not work on your MCP server. Always validate
audmatches your server's identifier. - Not handling token expiry during long tool calls: An MCP tool that takes 5 minutes to execute may outlive a short-lived access token. Use the token manager pattern with a generous buffer.
- Logging tokens: Never log full tokens in application logs. Log the token's
sub(subject) andjti(token ID) instead for traceability without exposure.
What to Build Next
- Add Bearer token validation to your existing Streamable HTTP MCP server. Test it with both valid and expired tokens.
- Implement a simple OAuth client using PKCE that stores tokens in a local file and refreshes them automatically.
nJoy 😉