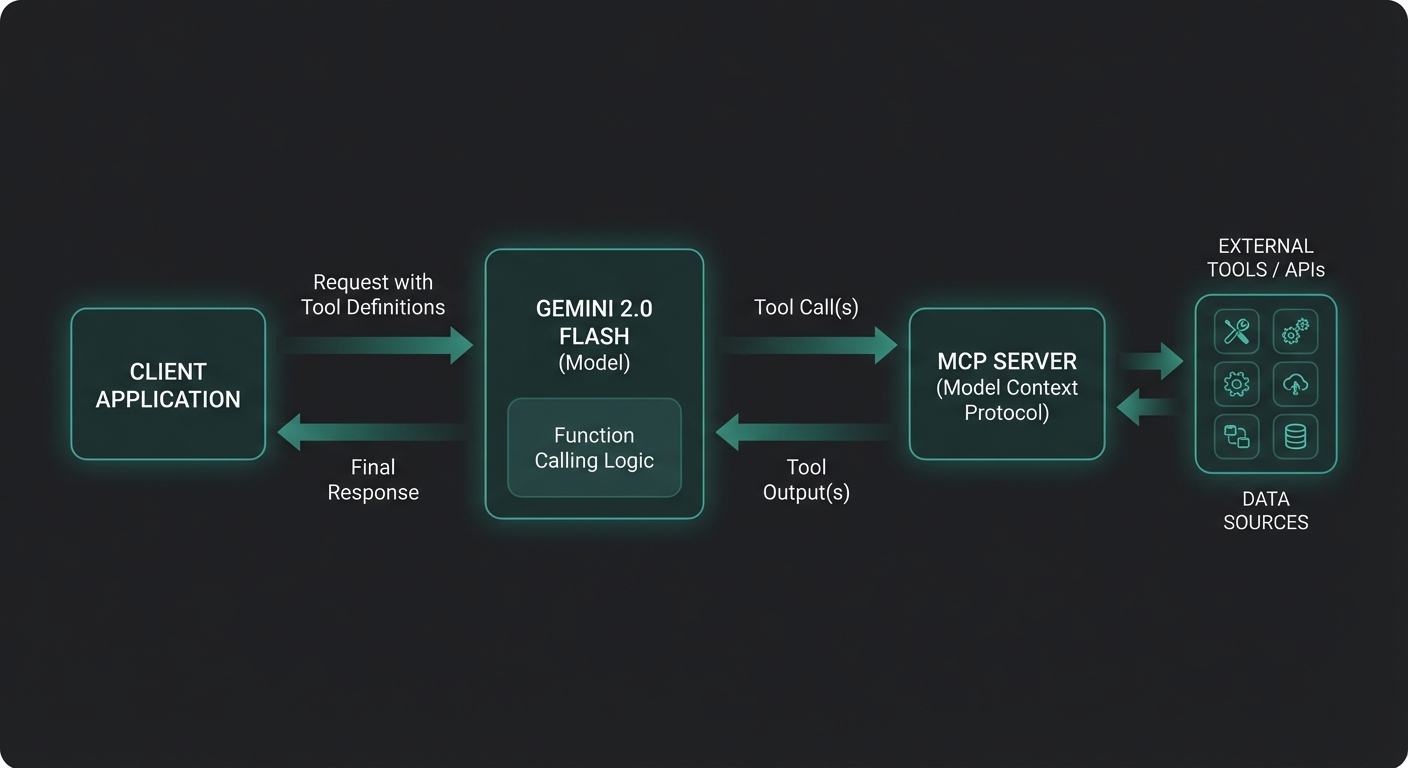
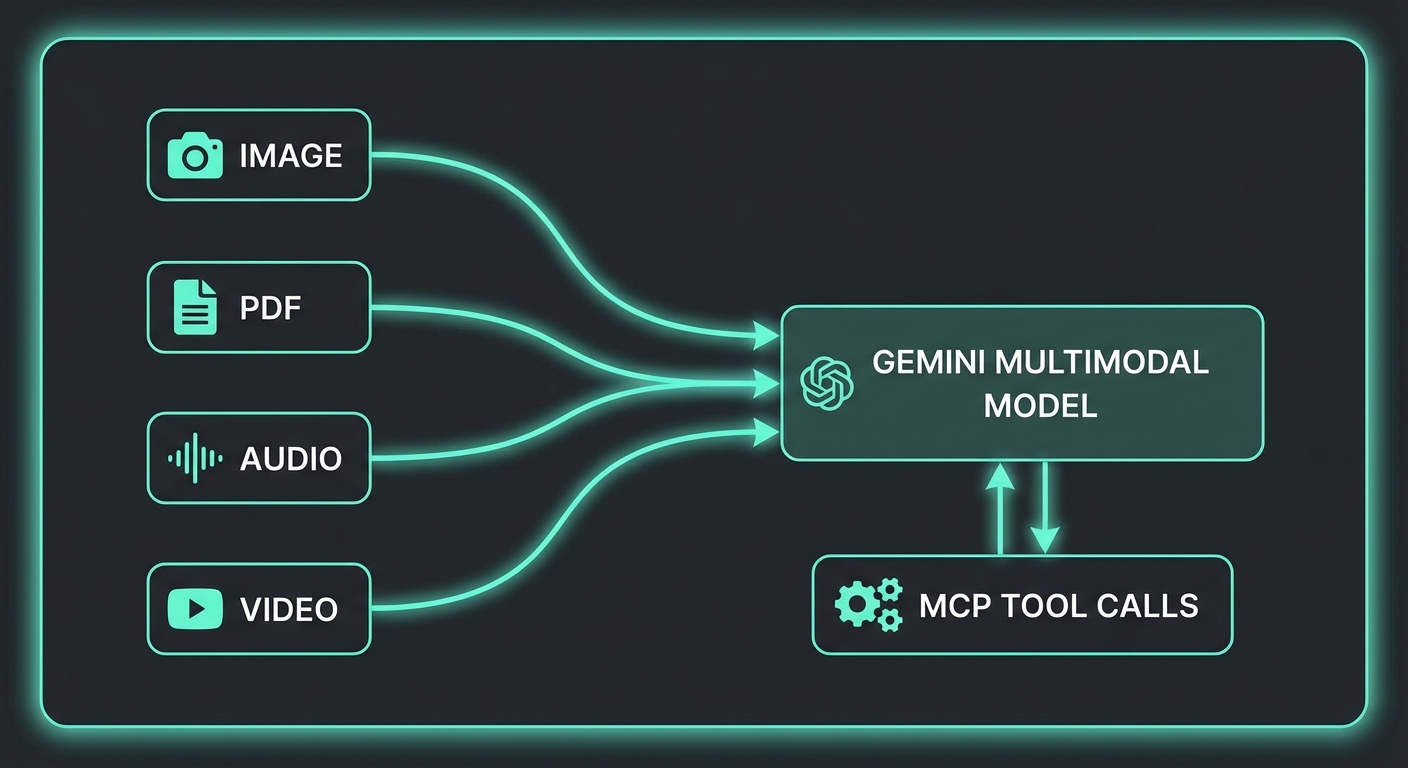
Gemini’s multimodal capabilities are not a bolt-on feature — they are a first-class part of the API. When you combine them with MCP, you unlock tool-calling patterns that no other provider can match today: an agent that reads a PDF invoice and simultaneously queries your accounting database; a vision pipeline that processes uploaded product photos and calls your inventory API; an audio transcription workflow that tags clips with taxonomy from your knowledge base. This lesson covers the full multimodal stack for MCP applications.
The Multimodal Parts System
Every Gemini request is built from an array of parts. A part can be text, inline data (base64), or a file URI from the Files API. This composability is what makes multimodal tool calling clean:
import { GoogleGenerativeAI } from '@google/generative-ai';
import fs from 'node:fs';
import path from 'node:path';

const genai = new GoogleGenerativeAI(process.env.GEMINI_API_KEY);

// Inline image (small files up to ~20MB)
function imageToInlinePart(filePath, mimeType = 'image/jpeg') {
  const data = fs.readFileSync(filePath).toString('base64');
  return { inlineData: { mimeType, data } };
}

// Inline PDF
function pdfToInlinePart(filePath) {
  const data = fs.readFileSync(filePath).toString('base64');
  return { inlineData: { mimeType: 'application/pdf', data } };
}
This parts-based architecture is why Gemini multimodal feels natural to work with. Rather than separate endpoints for vision and text, you compose a single array of parts, mixing modalities freely. When MCP tools are added on top, the model can reason across image content and tool results in the same conversation turn.
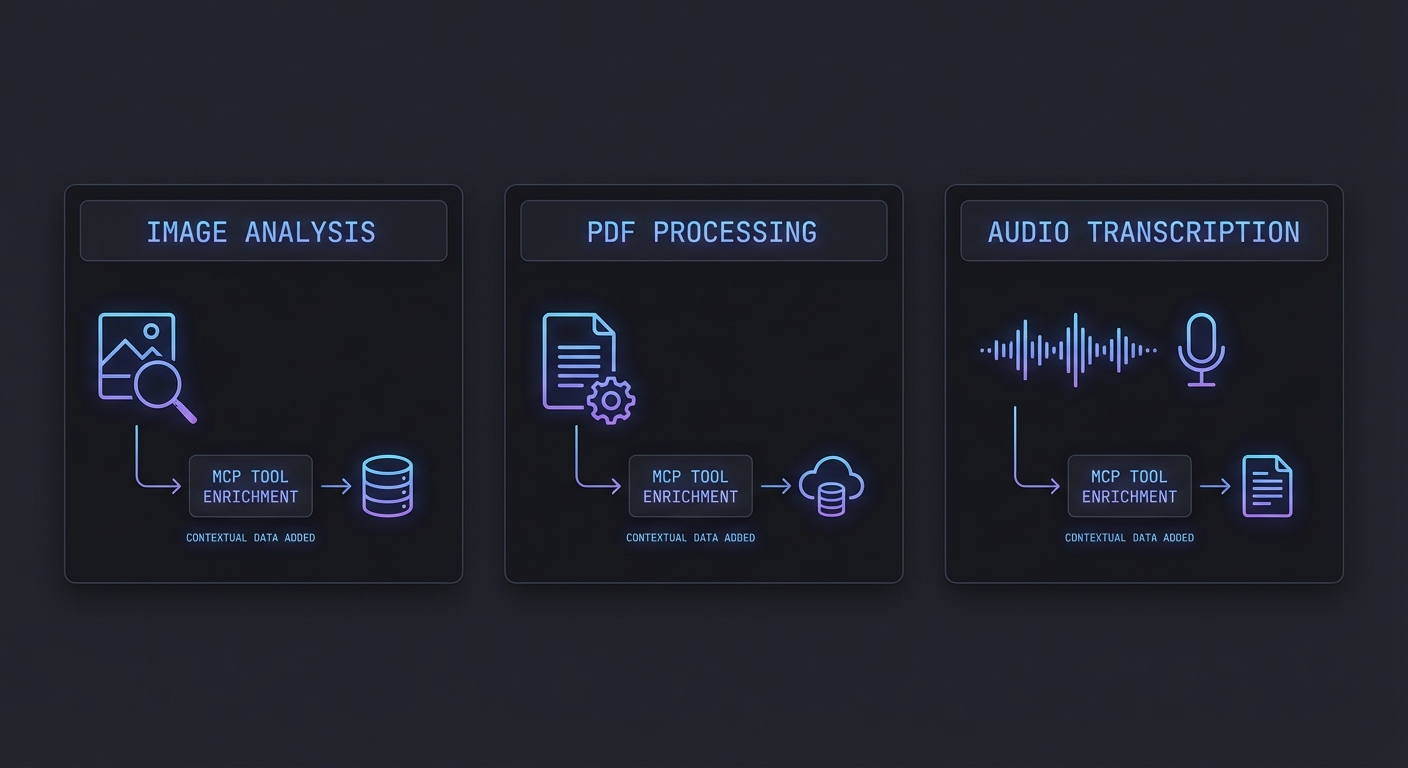
Image Analysis + MCP Tool Calls
A common pattern: the user uploads a product photo, the model identifies it visually, then calls an MCP tool to fetch live inventory and pricing data for that product:
import { Client } from '@modelcontextprotocol/sdk/client/index.js';
import { StdioClientTransport } from '@modelcontextprotocol/sdk/client/stdio.js';
const transport = new StdioClientTransport({
command: 'node',
args: ['./servers/inventory-server.js'],
});
const mcp = new Client({ name: 'vision-agent', version: '1.0.0' });
await mcp.connect(transport);
const { tools: mcpTools } = await mcp.listTools();
const model = genai.getGenerativeModel({
model: 'gemini-2.0-flash',
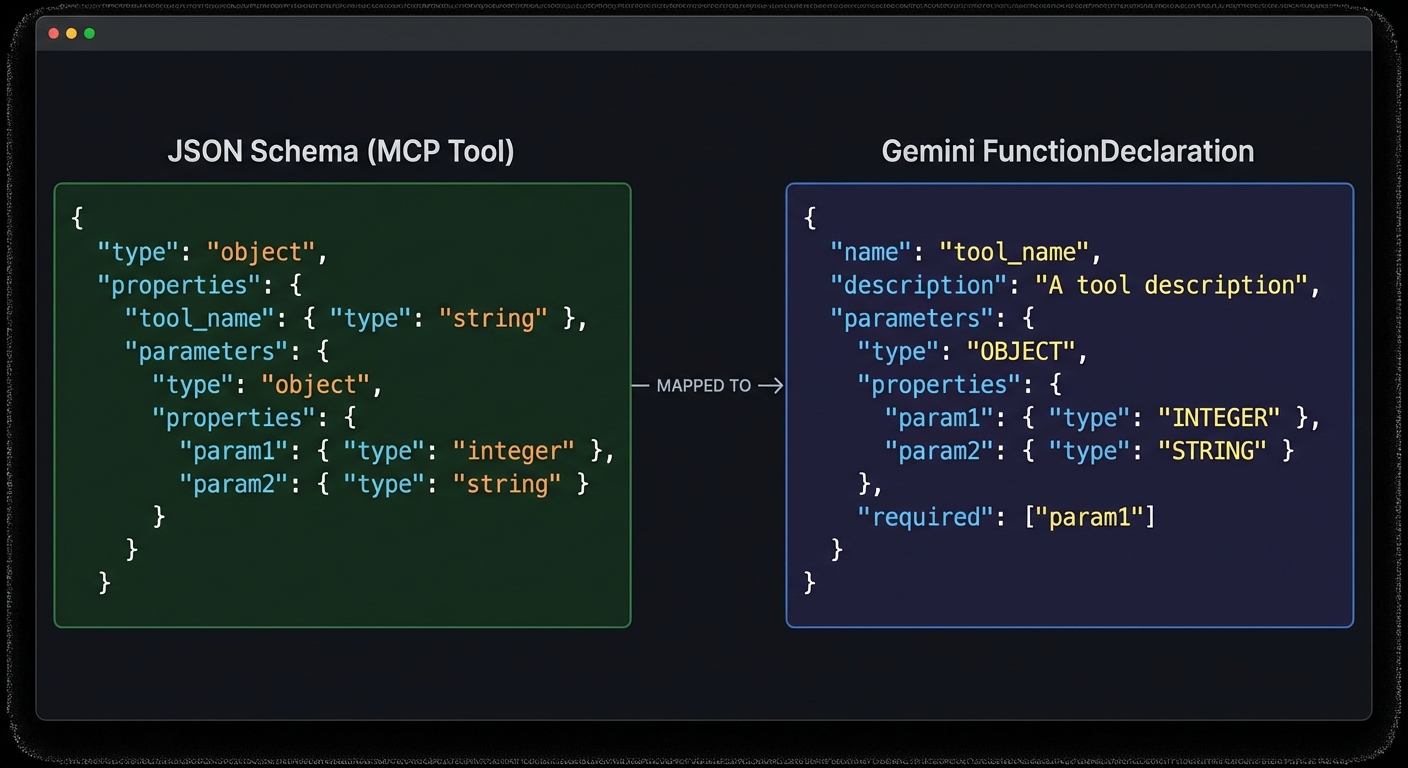
tools: [{ functionDeclarations: mcpTools.map(t => ({ name: t.name, description: t.description, parameters: t.inputSchema })) }],
});
async function analyzeProductImage(imagePath) {
const chat = model.startChat();
const imagePart = imageToInlinePart(imagePath);
let response = await chat.sendMessage([
imagePart,
{ text: 'Identify this product and check its current inventory and pricing using the available tools.' },
]);
let candidate = response.response.candidates[0];
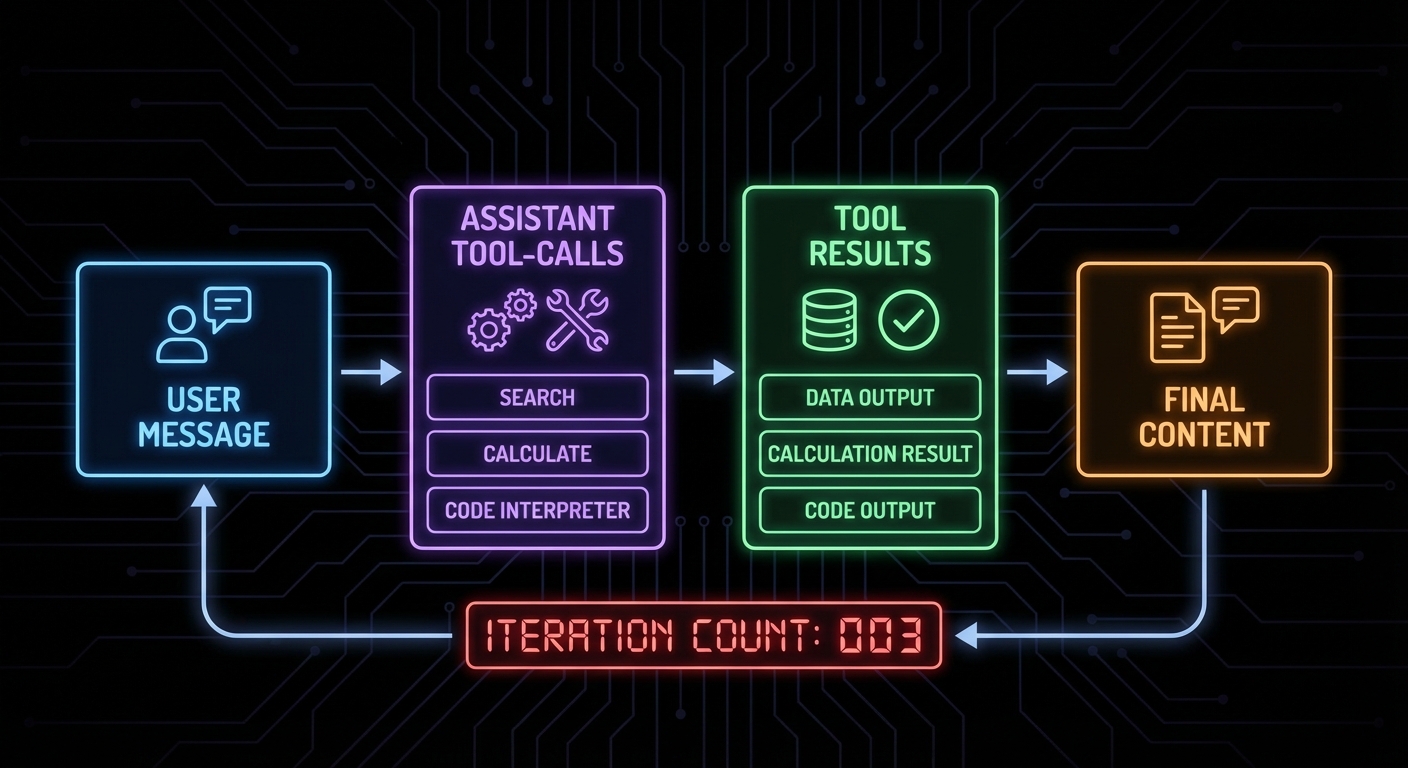
// Tool calling loop (same pattern as lesson 24)
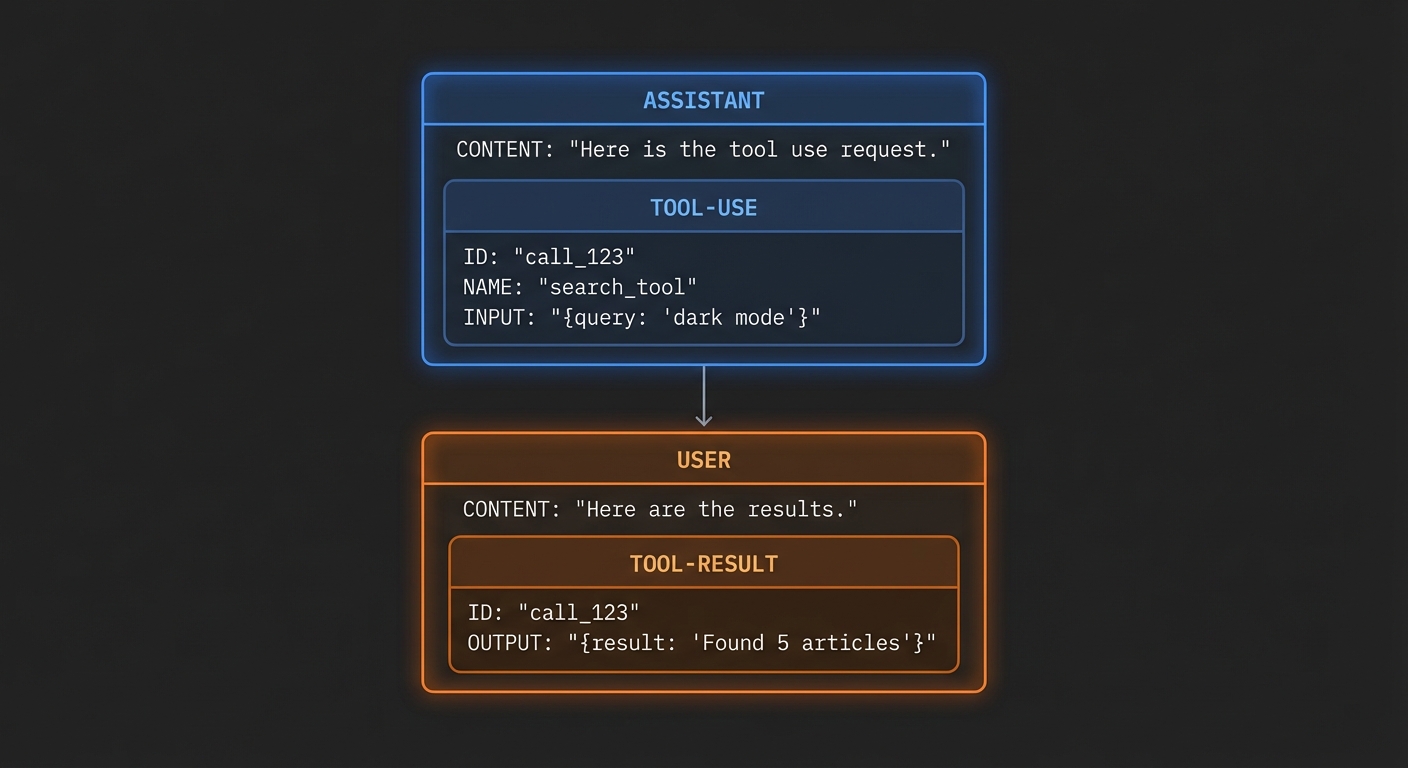
while (candidate.content.parts.some(p => p.functionCall)) {
const calls = candidate.content.parts.filter(p => p.functionCall);
const results = await Promise.all(calls.map(async part => {
const fc = part.functionCall;
const result = await mcp.callTool({ name: fc.name, arguments: fc.args });
const text = result.content.filter(c => c.type === 'text').map(c => c.text).join('\n');
return { functionResponse: { name: fc.name, response: { result: text } } };
}));
response = await chat.sendMessage(results);
candidate = response.response.candidates[0];
}
return candidate.content.parts.filter(p => p.text).map(p => p.text).join('');
}
const analysis = await analyzeProductImage('./uploads/product-photo.jpg');
console.log(analysis);
In practice, this pattern powers use cases like warehouse quality control (photograph a shelf, look up inventory), insurance claims processing (photograph damage, cross-reference policy), and retail product identification. The key insight is that the model handles the visual recognition while MCP tools provide the live data layer.
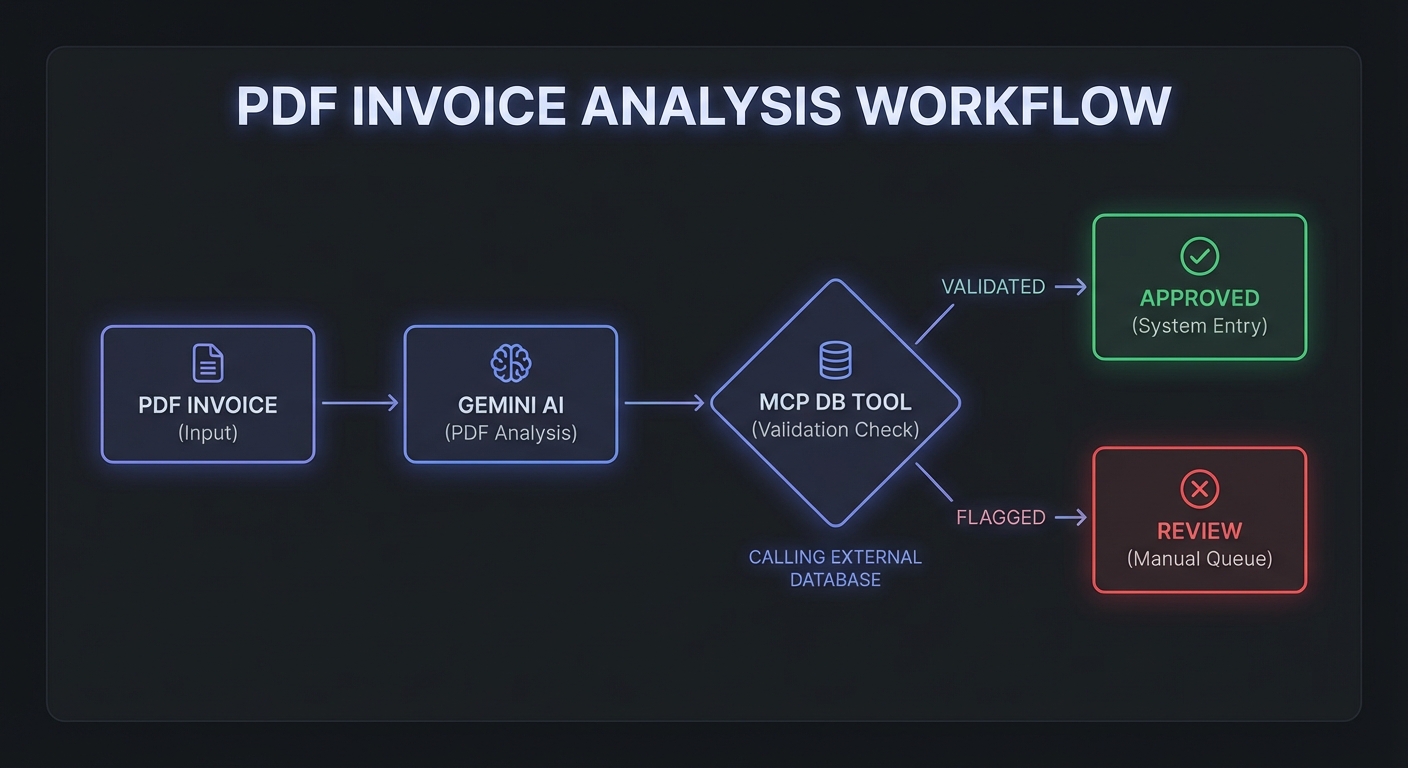
PDF Processing with MCP Enrichment
PDFs are particularly powerful. A 200-page contract, a scanned invoice, or a technical specification can be passed to Gemini as inline data. The model reads the entire document and can simultaneously call MCP tools to enrich or validate the extracted information:
async function processInvoice(pdfPath) {
  const model = genai.getGenerativeModel({
    model: 'gemini-2.5-pro-preview-03-25',  // Pro for complex document understanding
    tools: [{ functionDeclarations: mcpTools.map(t => ({ name: t.name, description: t.description, parameters: t.inputSchema })) }],
  });

  const chat = model.startChat();
  const pdfPart = pdfToInlinePart(pdfPath);

  let response = await chat.sendMessage([
    pdfPart,
    {
      text: `Extract all line items from this invoice (product name, SKU, quantity, unit price, total).
For each line item, use the verify_product tool to check if the SKU exists in our system.
Flag any discrepancies between the invoice price and our current pricing.
Return a structured JSON summary.`,
    },
  ]);

  let candidate = response.response.candidates[0];
  while (candidate.content.parts.some(p => p.functionCall)) {
    const calls = candidate.content.parts.filter(p => p.functionCall);
    const results = await Promise.all(calls.map(async part => {
      const fc = part.functionCall;
      const result = await mcp.callTool({ name: fc.name, arguments: fc.args });
      const text = result.content.filter(c => c.type === 'text').map(c => c.text).join('\n');
      return { functionResponse: { name: fc.name, response: { result: text } } };
    }));
    response = await chat.sendMessage(results);
    candidate = response.response.candidates[0];
  }

  return candidate.content.parts.filter(p => p.text).map(p => p.text).join('');
}
Be careful with PDF size when using inline base64 encoding. A 50-page PDF might be 5-10MB, but base64 inflates that by roughly 33%. If your invoices or contracts regularly exceed 15MB, skip ahead to the Files API section below to avoid hitting request size limits.
The Files API for Large Files
Files over ~20MB (or videos) should use the Files API rather than inline base64. This also supports re-use across multiple requests without re-uploading:
import { GoogleAIFileManager } from '@google/generative-ai/server';

const fileManager = new GoogleAIFileManager(process.env.GEMINI_API_KEY);

// Upload once, use multiple times
const uploadedFile = await fileManager.uploadFile('./large-report.pdf', {
  mimeType: 'application/pdf',
  displayName: 'Q1 2026 Report',
});

console.log(`Uploaded: ${uploadedFile.file.uri}`);

// Wait for processing to complete
let fileState = await fileManager.getFile(uploadedFile.file.name);
while (fileState.state === 'PROCESSING') {
  await new Promise(r => setTimeout(r, 2000));
  fileState = await fileManager.getFile(uploadedFile.file.name);
}

if (fileState.state !== 'ACTIVE') {
  throw new Error(`File processing failed: ${fileState.state}`);
}

// Reference in any model call
const filePart = {
  fileData: {
    mimeType: fileState.mimeType,
    fileUri: fileState.uri,
  },
};

// Now use filePart in chat.sendMessage([filePart, { text: 'Summarize this report...' }])
The Files API also opens up video analysis. You can upload a product demo video, have Gemini analyze visual content frame by frame, and then call MCP tools to log findings or trigger workflows. Audio and video share the same upload-then-reference pattern shown above.
Audio Transcription + Tool Enrichment
async function processAudioWithEnrichment(audioPath) {
  const model = genai.getGenerativeModel({
    model: 'gemini-2.0-flash',
    tools: [{ functionDeclarations: mcpTools.map(t => ({ name: t.name, description: t.description, parameters: t.inputSchema })) }],
  });

  const audioData = fs.readFileSync(audioPath).toString('base64');
  const audioPart = { inlineData: { mimeType: 'audio/mpeg', data: audioData } };

  const chat = model.startChat();
  let response = await chat.sendMessage([
    audioPart,
    { text: 'Transcribe this audio. Then identify any product names or order numbers mentioned and look them up in our system.' },
  ]);

  let candidate = response.response.candidates[0];
  while (candidate.content.parts.some(p => p.functionCall)) {
    const calls = candidate.content.parts.filter(p => p.functionCall);
    const results = await Promise.all(calls.map(async part => {
      const fc = part.functionCall;
      const result = await mcp.callTool({ name: fc.name, arguments: fc.args });
      const text = result.content.filter(c => c.type === 'text').map(c => c.text).join('\n');
      return { functionResponse: { name: fc.name, response: { result: text } } };
    }));
    response = await chat.sendMessage(results);
    candidate = response.response.candidates[0];
  }

  return candidate.content.parts.filter(p => p.text).map(p => p.text).join('');
}
Notice that all three modality examples – image, PDF, and audio – reuse the identical tool-calling loop from the function calling lesson. This is intentional. Multimodal inputs change what the model sees, not how it calls tools. Your MCP server code stays exactly the same regardless of input type.
Multimodal MCP Resources
MCP resources can also return binary content (type 'blob') – useful for image thumbnails, report PDFs, or audio clips. You can fetch these from a resource and pass them directly to Gemini:
// Fetch a binary resource from MCP and pass it to Gemini
const resource = await mcp.readResource({ uri: 'report://monthly/2026-03.pdf' });
const blobContent = resource.contents.find(c => c.mimeType === 'application/pdf');

if (blobContent) {
  const pdfPart = { inlineData: { mimeType: 'application/pdf', data: blobContent.blob } };
  const response = await chat.sendMessage([pdfPart, { text: 'Extract the key metrics from this report.' }]);
}
Audio Content Type in MCP
New in 2025-03-26
MCP added audio as a first-class content type alongside text and image in spec version 2025-03-26. Tool results and resource contents can now include audio blocks with base64-encoded data and a MIME type. This means an MCP server can return audio recordings, synthesised speech, or extracted audio clips directly as tool output – clients that support audio can play or process them without a separate download step.
// MCP tool returning audio content
server.tool('transcribe_meeting', '...', { recording_uri: z.string() }, async ({ recording_uri }) => {
  const audioBuffer = await downloadAudio(recording_uri);
  const transcript = await transcribe(audioBuffer);

  return {
    content: [
      { type: 'text', text: transcript },
      {
        type: 'audio',
        data: audioBuffer.toString('base64'),
        mimeType: 'audio/wav',
      },
    ],
  };
});
For Gemini specifically, you can pass MCP audio content directly into the inlineData format shown in the examples above. The audio type supports WAV, MP3, FLAC, OGG, and other standard MIME types. For files over ~10MB, use the Gemini Files API to upload first, then reference by file URI.
Failure Modes to Watch
- File too large for inline: Base64 encoding a 50MB video inline will hit request size limits. Use the Files API for anything over ~10MB to be safe.
- Unsupported MIME types: Not all MIME types work with all models. Test
image/webpandapplication/x-pdfvariants – stick toimage/jpeg,image/png, andapplication/pdffor broadest support. - Files API cleanup: Uploaded files persist for 48 hours. For GDPR/CCPA compliance, explicitly delete files after processing with
fileManager.deleteFile(name). - Audio length limits: Inline audio has a limit of about 20MB; use the Files API for longer recordings. Processing 1 hour of audio uses roughly 1,750 tokens per minute.
What to Build Next
- Build an invoice processing MCP agent: takes a scanned PDF, extracts line items, calls a
lookup_productMCP tool for each SKU, and outputs a reconciled JSON report. - Add a
get_imageresource to an MCP server that returns product photos as blob content – have Gemini analyze them and then call yourtag_producttool.
nJoy 😉