Redis Databases: The Anti-Pattern That Haunts Production

Redis is one of those tools you adopt on a Monday and depend on completely by Thursday. It’s fast, it’s simple, and its data structures make your brain feel big. But buried inside Redis is a feature that has been silently causing production incidents for years: multiple logical databases within a single instance. You’ve probably used it. You might be using it right now. And there’s a very good chance it’s going to bite you at the worst possible moment.

Dark visualization of Redis databases sharing a single server process with interference between them
Multiple Redis databases: they look separate, but they live in the same house and share everything

What Redis Databases Actually Are

Redis ships with 16 databases numbered 0 through 15. You switch between them using the SELECT command. Each database has its own keyspace, which means keys named user:1 in database 0 are completely separate from user:1 in database 5. On the surface this looks like proper isolation. It is not.

The Redis documentation itself is blunt about this. From the official docs on SELECT:

“Redis databases should not be used as a way to separate different application data. The proper way to do this is to use separate Redis instances.” — Redis documentation, SELECT command

This isn’t buried in a footnote. It’s right there in the command reference. And yet, multiple databases are everywhere in production. Why? Because they’re convenient. Running one Redis process is simpler than running three. And the keyspace separation looks exactly like the isolation you actually need.

# This looks clean and organised
redis-cli SELECT 0   # application sessions
redis-cli SELECT 5   # background pipeline processing
redis-cli SELECT 10  # lightweight caching

# What you think you have: three isolated stores
# What you actually have: three buckets in one leaking tank

The Shared Resource Problem: What Actually Goes Wrong

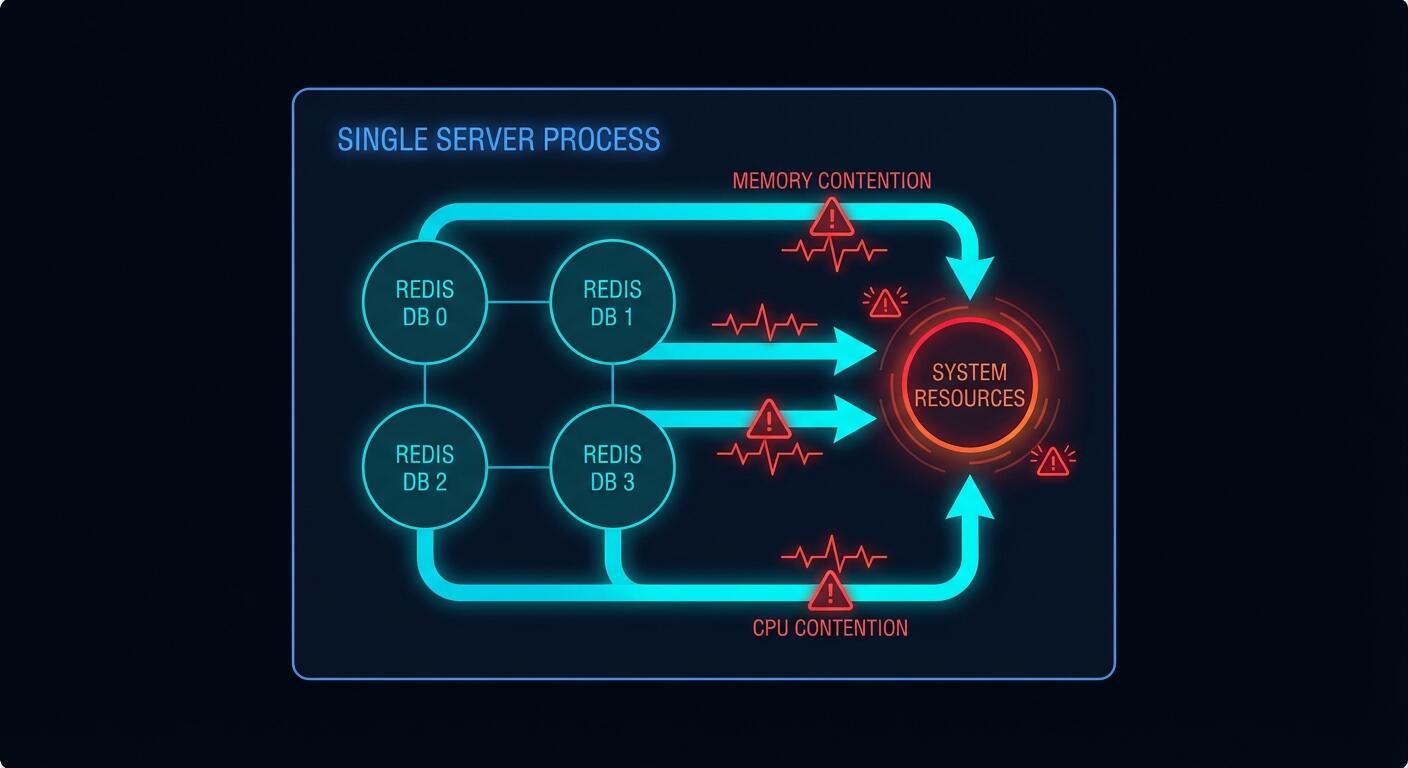
Every Redis database within a single instance shares the same server process. That means one pool of memory, one CPU thread (Redis is single-threaded for commands), one network socket, one set of configuration limits. When you SELECT a different database number, you’re not switching to a different process. You’re just telling Redis to look in a different keyspace. The underlying machinery is identical.

Kleppmann in Designing Data-Intensive Applications explains why this matters at a systems level: shared resources without isolation boundaries mean a fault in one subsystem propagates to all others. He’s talking about distributed systems broadly, but the principle applies here with brutal precision. Your databases are not subsystems. They are namespaces sharing a single subsystem.

Here is what that looks like in practice.

Case 1: Memory Eviction Wipes Your Cache

You configure a single Redis instance with maxmemory 4gb and maxmemory-policy allkeys-lru. You use database 5 for pipeline job queues and database 10 for caching API responses. Your pipeline goes through a burst period and starts writing thousands of large job payloads into database 5.

# redis.conf
maxmemory 4gb
maxmemory-policy allkeys-lru

# Your pipeline flooding database 5
import redis
r = redis.Redis(db=5)
for job in burst_of_10k_jobs:
    r.set(f"job:{job.id}", job.payload, ex=3600)  # big payloads

# Meanwhile in your web app...
cache = redis.Redis(db=10)
result = cache.get("api:products:page:1")  # returns None — evicted
# Cache miss. Your DB gets hammered.

When Redis hits the memory limit it runs LRU eviction across all keys in all databases. It doesn’t know or care that database 10’s cache keys are serving live user traffic. It just evicts whatever is least recently used. Your carefully populated cache gets gutted to make room for the pipeline. Cache hit rate goes from 85% to 12%. Your database gets hammered. Everyone’s pager goes off at 2am.

This is not a hypothetical. It’s a well-documented operational failure mode.

Case 2: FLUSHDB Takes Down More Than You Planned

You’re cleaning up stale test data. You connect to what you think is the test database and run FLUSHDB. Redis flushes database 0. Your sessions are in database 0. Your production users are now all logged out simultaneously.

# Developer runs this thinking they're on the test DB
redis-cli -n 0 FLUSHDB

# But your sessions were also on DB 0
# Every logged-in user just got kicked out
# Support tickets: many

With separate instances, this failure mode is impossible. You’d have to explicitly connect to the production instance and deliberately flush it. The separate instance is an actual boundary. The database number is just a label.

Case 3: FLUSHALL Is Always a Disaster

Someone runs FLUSHALL to clean up a database. FLUSHALL wipes every database in the instance. It doesn’t ask which one. If all your databases are in one Redis instance, this single command takes out everything: your sessions, your pipeline queues, your caches, your temporary data. Everything. Simultaneously.

# Looks like it's cleaning just one thing
redis-cli FLUSHALL  # deletes EVERY database (0 through 15)

# Equivalent damage: one wrong command vaporises
# db 0: sessions     → all users logged out
# db 5: pipeline     → all queued jobs lost
# db 10: cache       → cache cold, DB under full load

Case 4: A Slow Operation Blocks Everything

Redis is single-threaded for command execution. A slow operation in one database blocks commands in all other databases. You’re running a large KEYS * scan in database 5 during maintenance (yes, you know not to do this, but someone does it anyway). It takes 800ms. For 800ms, every GET in database 10 queues up. Your cache layer is unresponsive. Your application timeout counters tick.

# Someone runs this on db 5 "just to debug something"
redis-cli -n 5 KEYS "*pipeline*"
# Returns after 800ms

# During those 800ms, database 10 clients are blocked:
cache.get("user:session:abc123")  # waiting... waiting...
# Your app's 500ms timeout fires
# HTTP 504 responses hit your users

With separate instances, a blocked db 5 instance doesn’t touch db 10’s instance. The processes are independent.

Dark diagram showing how Redis single-threaded commands and shared memory cause cross-database interference
One process, one thread, one memory pool: a bad day in database 5 is a bad day everywhere

The Redis Cluster Problem: A Hard Wall

Here’s a constraint that isn’t optional or configurable. Redis Cluster, which is the standard approach for horizontal scaling and high availability in production, only supports database 0.

“Redis Cluster supports a single database, and the SELECT command is not allowed.” — Redis Cluster specification

If you’ve built your application around multiple database numbers and you later need to scale horizontally with Redis Cluster, you’re stuck. You have to refactor your data access layer, migrate your keys, and retest everything. The cost of the “convenient” multi-database approach arrives as a large refactoring bill exactly when you can least afford it: when your traffic is growing.

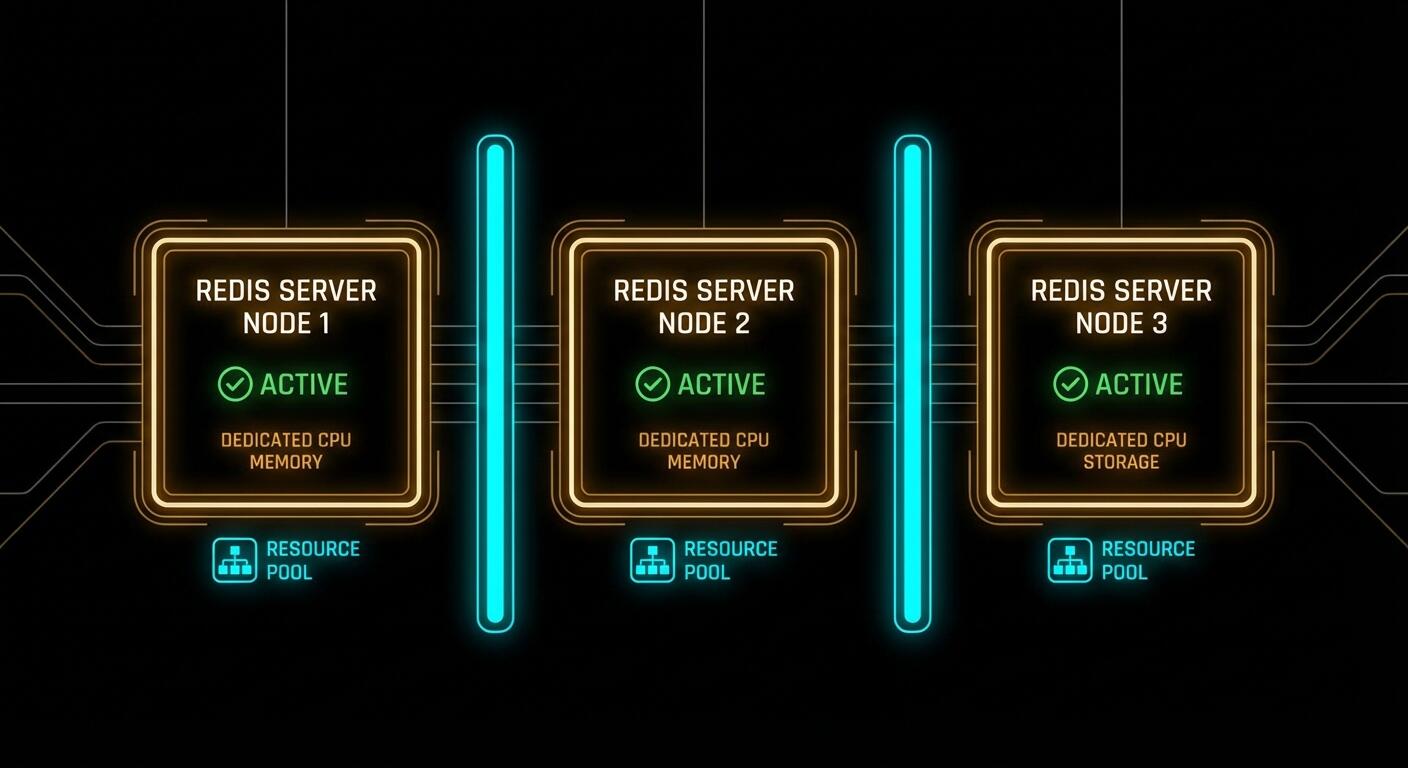
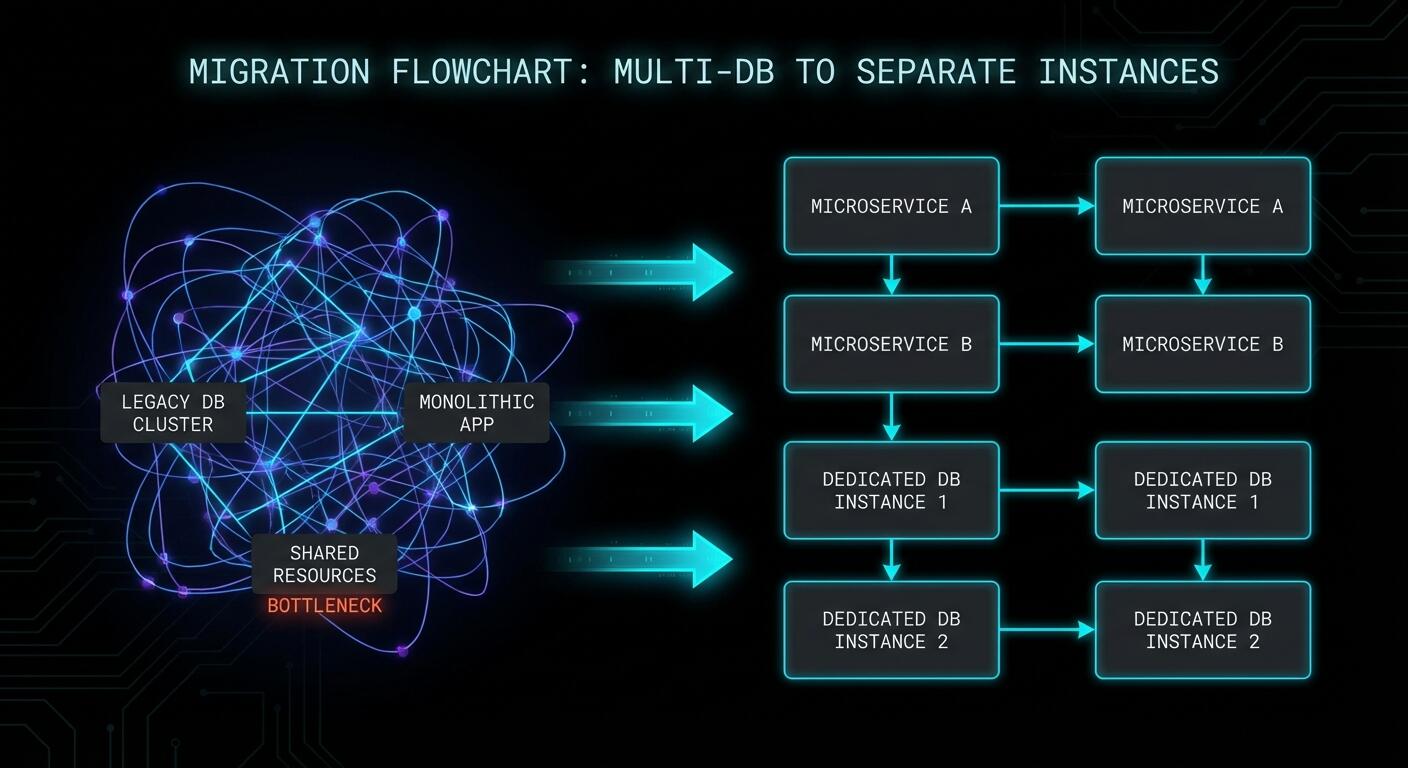
The Proper Pattern: Separate Instances

The correct approach is to run a separate Redis instance for each logical use case. This is not complicated. Redis has a tiny footprint. Running three instances uses almost no additional overhead compared to running one with three databases.

# redis-pipeline.conf
port 6380
maxmemory 1gb
maxmemory-policy noeviction  # pipeline jobs must NOT be evicted
save 900 1                   # persist pipeline jobs to disk

# redis-cache.conf
port 6381
maxmemory 2gb
maxmemory-policy allkeys-lru  # cache should evict LRU freely
save ""                       # no persistence needed for cache

# redis-sessions.conf
port 6382
maxmemory 512mb
maxmemory-policy volatile-lru  # only evict keys with TTL set
save 60 1000                   # persist sessions more aggressively

Notice what this gives you that you absolutely cannot have with multiple databases. Each instance has its own maxmemory and its own maxmemory-policy. Your pipeline instance uses noeviction because job loss is unacceptable. Your cache instance uses allkeys-lru because cache misses are fine. Your session instance uses volatile-lru and persists aggressively. These policies are mutually exclusive requirements. You cannot satisfy them with a single configuration file.

# Application connections — clean and explicit
import redis

pipeline_redis = redis.Redis(host='localhost', port=6380)
cache_redis    = redis.Redis(host='localhost', port=6381)
session_redis  = redis.Redis(host='localhost', port=6382)

# Now a pipeline burst doesn't evict cache entries
# A FLUSHDB on cache doesn't touch sessions
# A slow pipeline scan doesn't block session lookups
# Each can scale, replicate, and fail independently

The Pragmatic Programmer’s core principle of orthogonality applies perfectly here: components that have nothing to do with each other should not share internal state. Your pipeline and your cache are orthogonal concerns. Coupling them through a shared Redis process violates that principle, and you pay for the violation eventually.

Dark architectural diagram showing three independent Redis instances with separate resources, configurations and isolation
Separate instances: different ports, different configs, different memory policies, zero cross-contamination

How to Migrate Away From Multiple Databases

If you’re already using multiple databases in production, the migration is straightforward but requires care. Here’s the logical path.

Step 1: Inventory your databases. Connect to your Redis instance and check what’s actually living in each database.

# Check key counts per database
redis-cli INFO keyspace
# Output shows something like:
# db0:keys=1240,expires=1100,avg_ttl=86300000
# db5:keys=340,expires=340,avg_ttl=3598000
# db10:keys=5820,expires=5820,avg_ttl=299000

Step 2: Start new instances before touching the old one. Spin up your new Redis instances with appropriate configs for each use case. Don’t migrate anything yet.

Step 3: Dual-write during transition. Update your application to write to both the old database number and the new dedicated instance. Reads still come from the old instance. This gives you a warm new instance without a cold-start cache miss storm.

# Transition period: write to both, read from old
def set_cache(key, value, ttl):
    old_redis.select(10)
    old_redis.setex(key, ttl, value)
    new_cache_redis.setex(key, ttl, value)  # warm the new instance

def get_cache(key):
    return old_redis.get(key)  # still reading from old

Step 4: Flip reads, then remove dual-write. Once the new instance has a reasonable warm state, flip reads to the new instance. Monitor cache hit rates. Once stable for a day or two, remove the dual-write to the old database number.

Step 5: Verify and clean up. After all traffic is on dedicated instances, verify the old database numbers are empty and decommission them.

Dark flowchart showing step by step migration from multi-database Redis to separate instances
The migration path: inventory, spin up, dual-write, flip, clean up

When Multiple Databases Are Actually Fine

It would be unfair to say multiple databases are always wrong. There are genuine use cases:

  • Local development and unit tests — when you want to isolate test data from dev data on a single machine without the overhead of multiple processes. Database 0 for your running dev server, database 1 for tests that get flushed between runs.
  • Organisational separation within a single application — separating sessions, cache, and queues within one application that has identical resource requirements and tolerates the same eviction policy. This is the original intended use case.
  • Very small applications with negligible traffic — where the Redis instance is nowhere near its limits and you simply want namespace separation without the operational overhead.

The moment you have meaningfully different workloads, different eviction requirements, or need horizontal scaling, multiple databases stop being an organisational convenience and start being a liability.

What to Check Right Now

  • Run INFO keyspace — if you see more than db0 in production with significant key counts, you have work to do.
  • Check your maxmemory-policy — one policy cannot serve all use cases correctly. If you have both pipeline jobs and cache data, you need different policies.
  • Check for Redis Cluster in your roadmap — if it’s there, multiple databases will block you. Start planning the migration now, before you need to scale.
  • Audit your FLUSHDB and FLUSHALL usage — in scripts, Makefiles, CI pipelines, anywhere. Know exactly what would be affected if one of those runs in the wrong context.
  • Review slow query logs — check if slow commands in one database are causing latency spikes visible in your application metrics at the same timestamps.

Redis is an extraordinary tool. It earns its place in almost every production stack. But its database feature was designed for a simpler era when “run one Redis for everything” was the standard advice. The standard has moved on. Your architecture should too.

nJoy 😉

Your Legacy App Called. It Wants to Live in a Container.

Your monolithic Apache-PHP-MySQL server from 2009 is still alive. It is held together with cron jobs, a hand-edited httpd.conf, and the quiet prayers of a sysadmin who has since left the company. You know exactly who you are. The good news: Docker will not judge you. It will just containerise the whole mess and make it someone else’s problem in a much more structured way.

Containerising legacy applications is one of the most practically impactful things you can do for an ageing system short of a full rewrite. This guide walks you through the entire process: why it matters, the mechanics of Dockerfiles and networking, persistent data, security, and a real end-to-end example lifting a CRM stack off bare metal and into containers. No hand-waving. Let’s get into it.

Legacy application being containerised with Docker
The moment of containerisation: lifting a legacy workload off bare metal and into Docker.

Why Bother? The Case Against “If It Ain’t Broke”

The classic argument for leaving legacy systems alone is that they work. True, but so did physical post. The problem is not what the system does today; it is what happens the next time you need to update a dependency, onboard a new developer, or scale under load. Hunt and Thomas put it well in The Pragmatic Programmer: the entropy that accumulates in software systems compounds over time, and the cost of ignoring it is paid with interest.

Containers solve three compounding problems simultaneously. First, environment uniformity: the application and every one of its dependencies are packaged together, so “it works on my machine” becomes a meaningless sentence. The container you run on your laptop is structurally identical to the one in production. Second, horizontal scalability: containers start in milliseconds, not the several seconds a VM needs. That gap matters enormously when a load spike hits at 2 am. Third, deployment speed and rollback: shipping a new version is swapping an image tag. Rolling back is swapping it back. No more change-freeze weekends.

The shift from physical servers to VMs already multiplied the number of machines we managed. Containers take that abstraction one step further: a container is essentially a well-isolated process sharing the host kernel, with no hypervisor overhead. Docker’s contribution was not inventing that idea; it was making the developer experience smooth enough that everyone actually used it.

The Dockerfile: Your Application’s Constitution

A Dockerfile is a recipe. Each instruction adds a layer to the resulting image; Docker caches those layers, so rebuilds after small changes are fast. Consider a Python Flask application that was previously deployed by SSH-ing into a server and running python app.py inside a screen session (we have all seen this):

# app.py
from flask import Flask
app = Flask(__name__)

@app.route('/')
def hello_world():
    return 'Hello, World!'

if __name__ == '__main__':
    app.run(host='0.0.0.0', port=5000)

The Dockerfile that containerises it:

FROM python:3.11-slim

WORKDIR /app

COPY requirements.txt /app/
RUN pip install --no-cache-dir -r requirements.txt

COPY . /app/

CMD ["python", "app.py"]

Build and run:

docker build -t my-legacy-app .
docker run -p 5000:5000 my-legacy-app

That is it. The application now runs in an isolated environment reproducible on any machine with Docker installed. The FROM python:3.11-slim line pins the runtime; no more implicit dependency on whatever Python version happens to be installed on the server. Knuth would approve of the precision.

Docker container networking diagram with bridge networks
User-defined bridge networks give containers automatic DNS resolution for each other’s names.

Networking: Containers Talking to Containers

Single-container deployments are the easy case. Legacy applications rarely are that simple; they almost always involve a web server, an application layer, and a database. Docker’s networking model needs to be understood before you wire them together.

The most basic scenario is exposing a container port to the host with the -p flag:

docker run -d -p 8080:80 --name web-server nginx

Port 8080 on the host routes into port 80 inside the container. Straightforward. For inter-container communication, the old approach was --link, which is now deprecated. The correct approach is a user-defined bridge network:

docker network create my-network

docker run -d --network=my-network --name my-database mongo
docker run -d --network=my-network my-web-app

Within my-network, containers resolve each other by name. my-web-app can reach the Mongo instance at the hostname my-database. Docker handles the DNS. For anything beyond a pair of containers, Docker Compose is the right tool:

services:
  web:
    image: nginx
    networks:
      - my-network
  database:
    image: mongo
    networks:
      - my-network

networks:
  my-network:
    driver: bridge

One docker compose up and the entire topology comes up, networked and named correctly. One docker compose down and it evaporates cleanly, which is more than you can say for that 2009 server.

Volumes: Because Containers Are Ephemeral and Databases Are Not

A container’s filesystem dies with the container. For stateless web processes, that is fine. For a database, it is a disaster. Volumes are Docker’s answer: they exist independently of any container and survive container restarts and deletions.

Three flavours. Anonymous volumes are created automatically:

docker run -d --name my-mongodb -v /data/db mongo

Named volumes give you control:

docker volume create my-mongo-data
docker run -d --name my-mongodb -v my-mongo-data:/data/db mongo

Host volumes mount a directory from the host machine directly:

docker run -d --name my-mongodb -v /path/on/host:/data/db mongo

Host volumes are useful for development, where you want live code reloading. For production databases, named volumes are the right choice. In Docker Compose, the volume declaration is clean:

services:
  database:
    image: mongo
    volumes:
      - my-mongo-data:/data/db

volumes:
  my-mongo-data:

One practical note on databases: you do not have to containerise them at all. Running a containerised web layer against an AWS RDS instance is a perfectly legitimate architecture. Amazon handles provisioning, replication, and backups; you handle the application. The common pattern is a containerised database in local development (spin up, load test data, tear down without ceremony) and a managed database service in production. Your application connects via the same protocol either way.

Docker volumes providing persistent storage across container restarts
Named volumes outlive any individual container; your database data does not disappear on restart.

Configuration and Environment Variables: Don’t Hard-Code Secrets

Legacy applications often have configuration scattered across a dozen INI files, some environment variables, and several values that someone once hard-coded “just temporarily” in 2014. Docker gives you structured ways to handle all of it.

For immutable build-time config, use ENV in the Dockerfile:

FROM openjdk:11
ENV JAVA_HOME /usr/lib/jvm/java-11-openjdk-amd64

For runtime config that varies per environment, use the -e flag or, better, a .env file:

# .env
DB_HOST=database.local
DB_PORT=3306
docker run --env-file .env my-application

In Docker Compose with variable substitution across environments:

services:
  my-application:
    image: my-application:${TAG:-latest}
    environment:
      DB_HOST: ${DB_HOST}
      DB_PORT: ${DB_PORT}

Never commit .env files containing passwords to a public repository. This is obvious advice that nonetheless appears in breach post-mortems with depressing regularity. Add .env to your .gitignore and use a secrets manager for production credentials.

For configuration files (Apache’s httpd.conf, PHP’s php.ini), mount them as volumes rather than baking them into the image. This keeps the image immutable and the configuration adjustable at runtime:

services:
  web:
    image: my-apache-image
    volumes:
      - ./my-httpd.conf:/usr/local/apache2/conf/httpd.conf

Security: Every Layer Counts

Containerisation improves security through isolation, but it introduces its own attack surface if you are careless. The Docker Unix socket at /var/run/docker.sock is effectively root access to the host; restrict who can reach it. Scan your images for known CVEs before deployment: docker scout cve my-image gives you a breakdown.

Do not run containers as root. Specify a non-root user in your Dockerfile:

FROM ubuntu:latest
RUN useradd -ms /bin/bash myuser
USER myuser

Drop Linux capabilities you do not need and add back only what the container requires:

docker run --cap-drop=all --cap-add=net_bind_service my-application

Mount sensitive data read-only:

docker run -v /my-secure-data:/data:ro my-application

Instrument containers with Prometheus and Grafana or the ELK stack. Unexpected outbound traffic or CPU spikes in a container are worth knowing about in real time, not in the morning post-mortem.

Real-World Example: Dockerising a Legacy CRM

This is where it gets concrete. Suppose you have a CRM system running on a single aging physical server: Apache serves the web layer, PHP handles the application logic, MySQL stores the data. The components are tightly coupled, share the same filesystem, and have never been deployed anywhere else. Every update involves downtime.

The migration follows six steps.

Step 1: Isolate components. Decouple Apache first by introducing NGINX as a reverse proxy routing to a separate Apache process. Move the MySQL database to a separate instance. Identify shared libraries or PHP extensions that need to be present in the isolated environments. Use mysqldump to migrate data consistently:

mysqldump -u username -p database_name > data-dump.sql
mysql -u username -p new_database_name < data-dump.sql

If sessions were stored locally on the filesystem, migrate them to a distributed store like Redis at this stage.

Step 2: Write Dockerfiles. One per component:

# Apache
FROM httpd:2.4
COPY ./my-httpd.conf /usr/local/apache2/conf/httpd.conf
COPY ./html/ /usr/local/apache2/htdocs/
# PHP-FPM
FROM php:8.2-fpm
RUN docker-php-ext-install pdo pdo_mysql
COPY ./php/ /var/www/html/
# MySQL
FROM mysql:8.0
COPY ./sql-scripts/ /docker-entrypoint-initdb.d/

Step 3: Network and volumes. Create a user-defined bridge network and attach all containers to it. Bind a named volume to the MySQL container for data persistence:

docker network create crm-network
docker volume create mysql-data

docker run --network crm-network --name my-apache-container -d my-apache-image
docker run --network crm-network --name my-php-container -d my-php-image
docker run --network crm-network --name my-mysql-container \
  -e MYSQL_ROOT_PASSWORD=my-secret \
  -v mysql-data:/var/lib/mysql \
  -d my-mysql-image

Or, the cleaner Compose version:

services:
  web:
    image: my-apache-image
    networks:
      - crm-network
  php:
    image: my-php-image
    networks:
      - crm-network
  db:
    image: my-mysql-image
    environment:
      MYSQL_ROOT_PASSWORD: my-secret
    volumes:
      - mysql-data:/var/lib/mysql
    networks:
      - crm-network

networks:
  crm-network:
    driver: bridge

volumes:
  mysql-data:

Step 4: Configuration management. Move all credentials and environment-specific values into a .env file. Mount Apache and PHP configuration files as volumes so they can be adjusted without rebuilding images. Use envsubst to populate configuration templates at container startup rather than hard-coding values.

Step 5: Testing. Run functional parity tests against both the legacy and dockerised environments in parallel using Selenium for the web UI and Postman for any API surfaces. Load test with Apache JMeter or Gatling. Run OWASP ZAP for dynamic security scanning; it dockerises cleanly and can be dropped into a CI pipeline. Have a rollback plan before you touch production.

Step 6: Deploy. Push images to Docker Hub or a private registry. In production, a container orchestration layer like Kubernetes takes over from Docker Compose, but the images are identical. The operational model becomes declarative: you describe the desired state, and the orchestrator keeps reality matching the declaration. Kleppmann's treatment of distributed systems consensus in Designing Data-Intensive Applications is useful background if you are stepping into Kubernetes territory.

Docker Compose wiring Apache, PHP-FPM, and MySQL containers together
A single docker-compose.yml describes the entire legacy CRM stack: web, PHP, and database, all networked and persistent.

What to Watch Out For

  • Image bloat — start from -slim or -alpine base images. A 1.2 GB image that could be 120 MB is a pull-time tax on every deployment.
  • Secrets in layers — every RUN instruction creates a layer. If you COPY a file with credentials and then RUN rm it, the credentials are still in the layer history. Use multi-stage builds or external secret injection.
  • Running as root — the default. Don't. Add a non-root user in the Dockerfile and switch to it before CMD.
  • Ignoring the .dockerignore file — equivalent to .gitignore for build contexts. Without it, you send your entire project directory (including node_modules, .git, and that test database dump) to the Docker daemon on every build.
  • Ephemeral config confusion — containers are immutable; config should not live inside them. If you are docker exec-ing into containers to tweak config files, you are doing it wrong and the next restart will undo everything.
  • Skipping health checks — add a HEALTHCHECK instruction so orchestrators know when a container is actually ready, not just started.

nJoy 😉